Where to Place Highlighter Tiles: Dado Line, Feature Wall, and Floor Border Placement Guide
Learn the ideal placement for highlighter tiles using dado lines, feature walls, vertical accents, and floor borders. Follow practical planning tips to create balanced, elegant interiors in Indian homes.
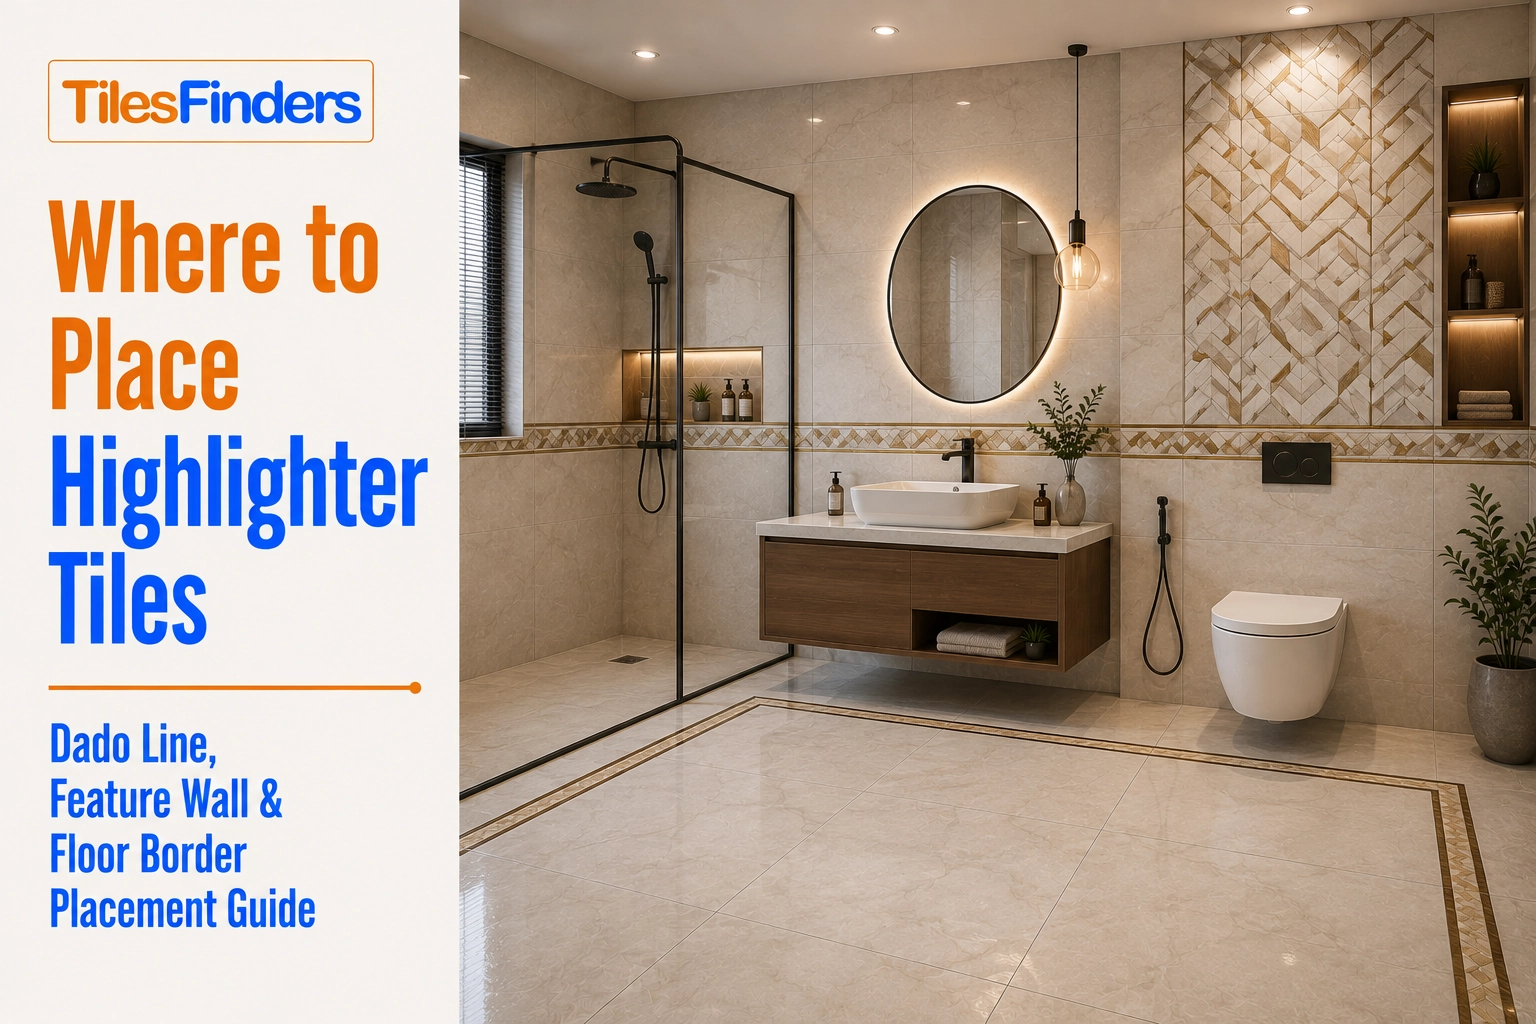
Highlighter tile placement is as important as the design itself. Use proper dado heights, feature wall positioning, and planned floor borders to create balanced, architectural interiors with clean, professional-looking results.
The single biggest factor separating a highlighter accent that looks deliberate from one that looks accidental is not the tile design; it is the placement height and positioning logic behind it. This guide covers the specific placement mechanics, dado line height, feature wall positioning, and floor border logic that Indian designers use to make a highlighter band read as architecture rather than decoration.
What a Dado Line Is and Why It Matters
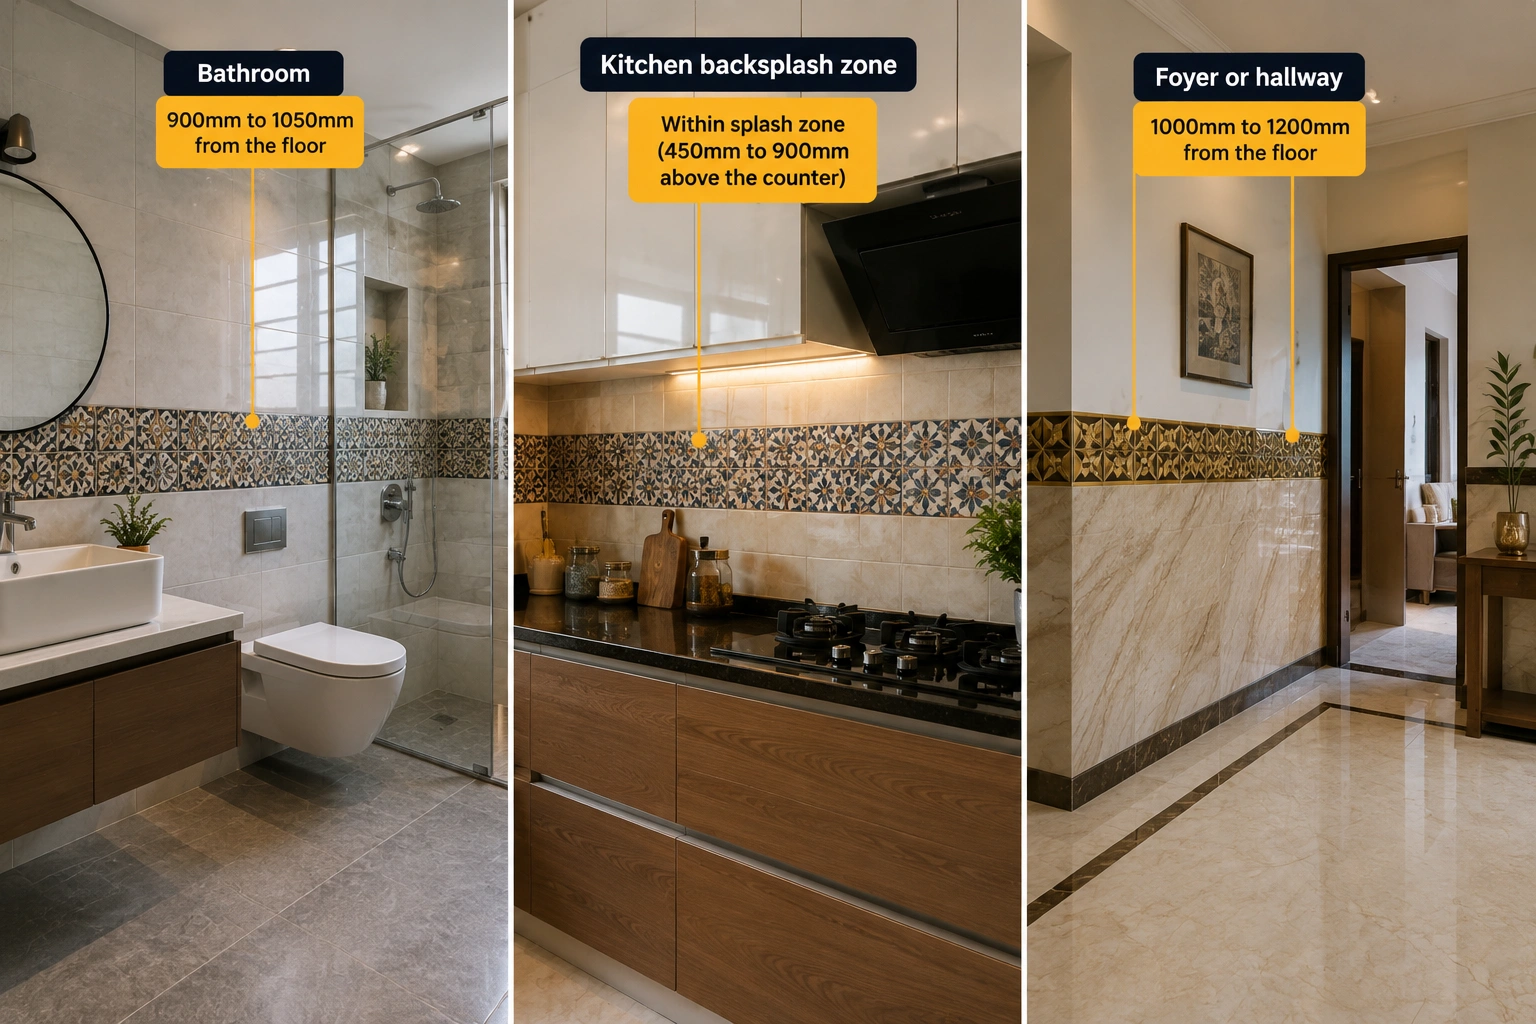
A dado line is a horizontal division on a wall, traditionally marking the boundary between a lower, more robust wall treatment and an upper, more decorative one, a concept borrowed from classical architecture and widely used in Indian bathroom and kitchen wall tiles. A highlighter band placed at dado height does double duty: it references this architectural tradition and gives the eye a clear horizontal anchor partway up the wall.
| Room Type | Typical Dado Height | Reasoning |
| Bathroom | 900mm to 1050mm from the floor | Roughly counter or waist height, below which walls see the most splash and contact exposure |
| Kitchen backsplash zone | Not a true dado application; highlighter typically sits within the splash zone itself | The backsplash's own height range, 450mm to 900mm above the counter, functions differently from a full-room dado |
| Foyer or hallway | 1000mm to 1200mm from the floor | Slightly higher than a bathroom dado, closer to a traditional decorative dado rail height in classical interior design |
Pro tip: Measure your specific wall height before finalising dado placement rather than using a fixed number, and aim to position the highlighter band so the wall above and below it are not dramatically unequal in proportion. A highlighter placed too close to the floor or too close to the ceiling reads as miscalculated rather than intentional.
From The Marketplace
Popular tiles right now







Feature Wall Placement Logic
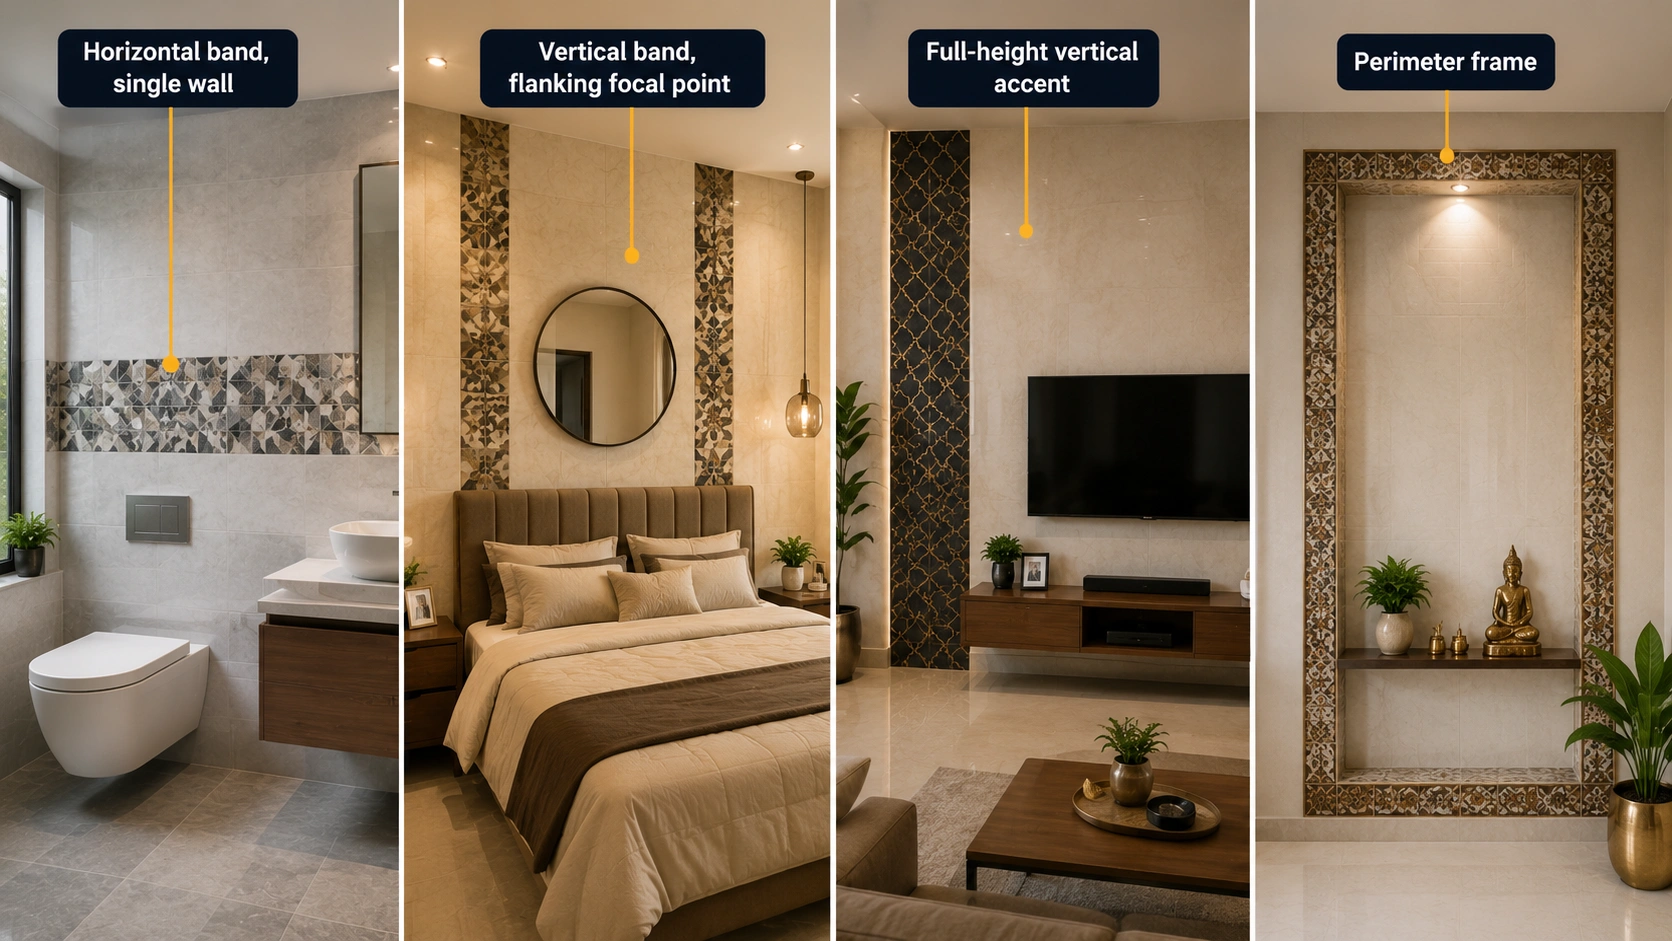
- Horizontal band, single wall. The most common feature wall highlighter placement is a single horizontal row at or near dado height, running the full width of the wall.
- Vertical band, flanking a focal point. A vertical highlighter strip on either side of a mirror, headboard, or TV can frame the focal element, a less common but effective alternative to a horizontal band.
- Full-height vertical accent. A single vertical highlighter strip running floor to ceiling works as a narrow feature moment, distinct from a horizontal band and suited to a wall with strong height to showcase.
- Perimeter frame. A highlighter run around all four edges of a defined wall panel or niche creates a picture-frame effect, best reserved for a smaller, contained wall zone rather than a full room wall.
Looking for inspiration before deciding between a horizontal band, vertical accent, or framed niche? Explore our Highlighter Tile Design Ideas guide to discover 20+ creative accent strip layouts used in Indian bathrooms, living rooms, TV units, and feature walls. It helps you visualise which placement style complements your room proportions and décor before installation.
Floor Border Placement Logic
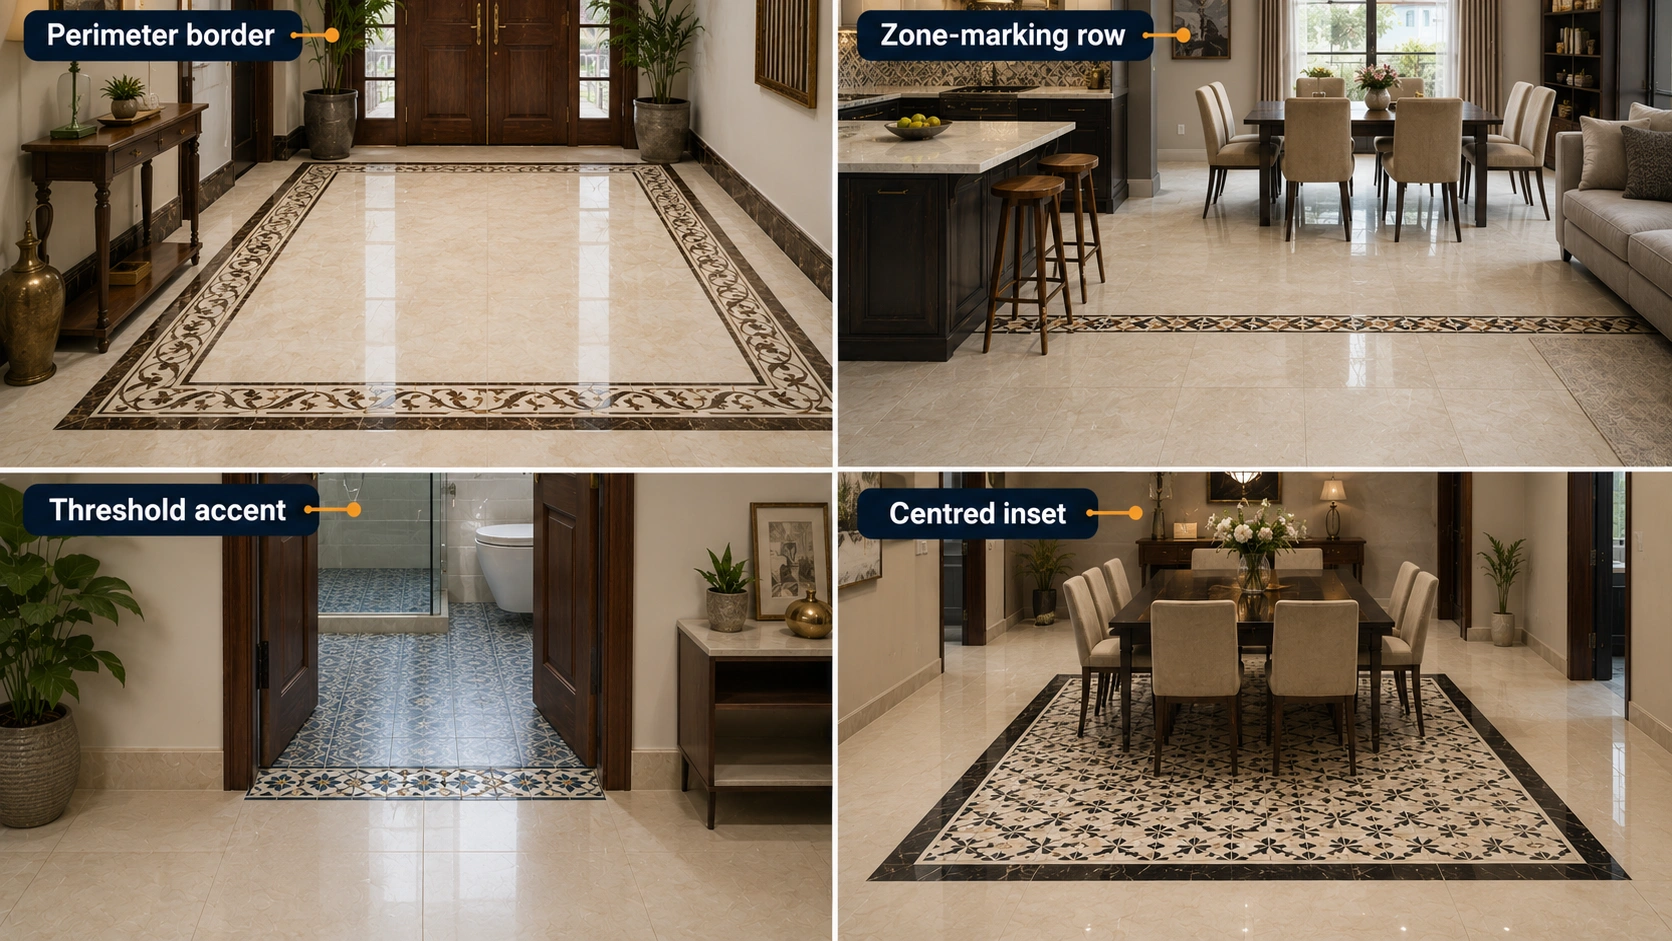
| Placement Type | What It Does | Best Application |
| Perimeter border | Runs the full edge of a room, framing the field from the wall inward | Formal foyers, dining rooms, any room wanting a classical framed floor read |
| Zone-marking row | A single accent row marking a functional boundary within an open-plan space | Open-plan kitchen to dining transition, living room seating zone boundary |
| Threshold accent | A short accent run at a doorway or room transition, not extending across the full floor | Entrance thresholds, bathroom doorways, and any point transitioning between two rooms |
| Centred inset | A highlighter run positioned as a band through the middle of a room rather than at its edge | A less common, more graphic statement suited to a room with a clear central axis, such as a formal dining room |
Measurement and Planning Mechanics
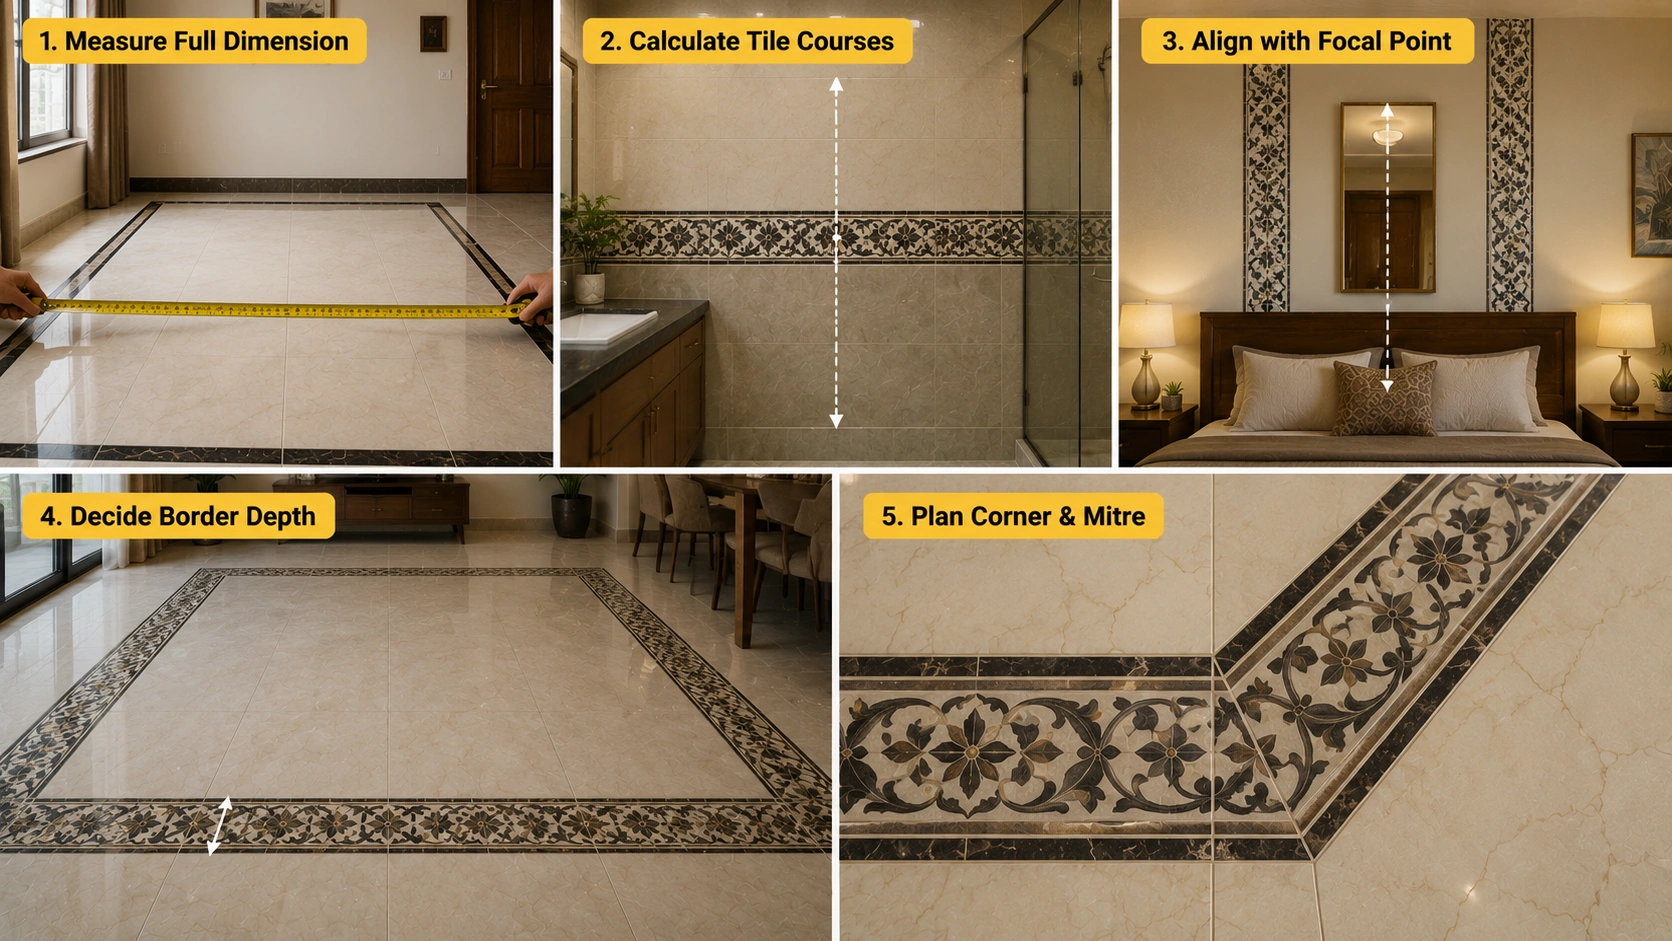
- Measure the full wall or floor dimension before deciding a highlighter's exact position, since the band should generally run the complete width or length of the surface rather than stopping short.
- Calculate the tile courses above and below a dado line before finalising its height, adjusting slightly if needed so neither the upper nor lower field requires an awkward partial tile row at the ceiling or floor.
- For a vertical accent, confirm its position relative to the room's actual focal point, such as a mirror or headboard, measuring from that element rather than the wall's edge.
- For a floor border, decide the border's depth, typically one or two tiles, before ordering, since this affects how the corners are mitred or joined at each turn.
- Plan corner and mitre details for any perimeter border or picture-frame wall accent, confirming with the installer how the highlighter will turn each corner cleanly.
Once you've finalised the layout, understanding the right strip width, tile combinations, and suitable applications is equally important. Our Highlighter Tiles Guide explains where accent strips work best, how to match them with wall and floor tiles, and practical design tips for Indian homes.
Common Placement Mistakes
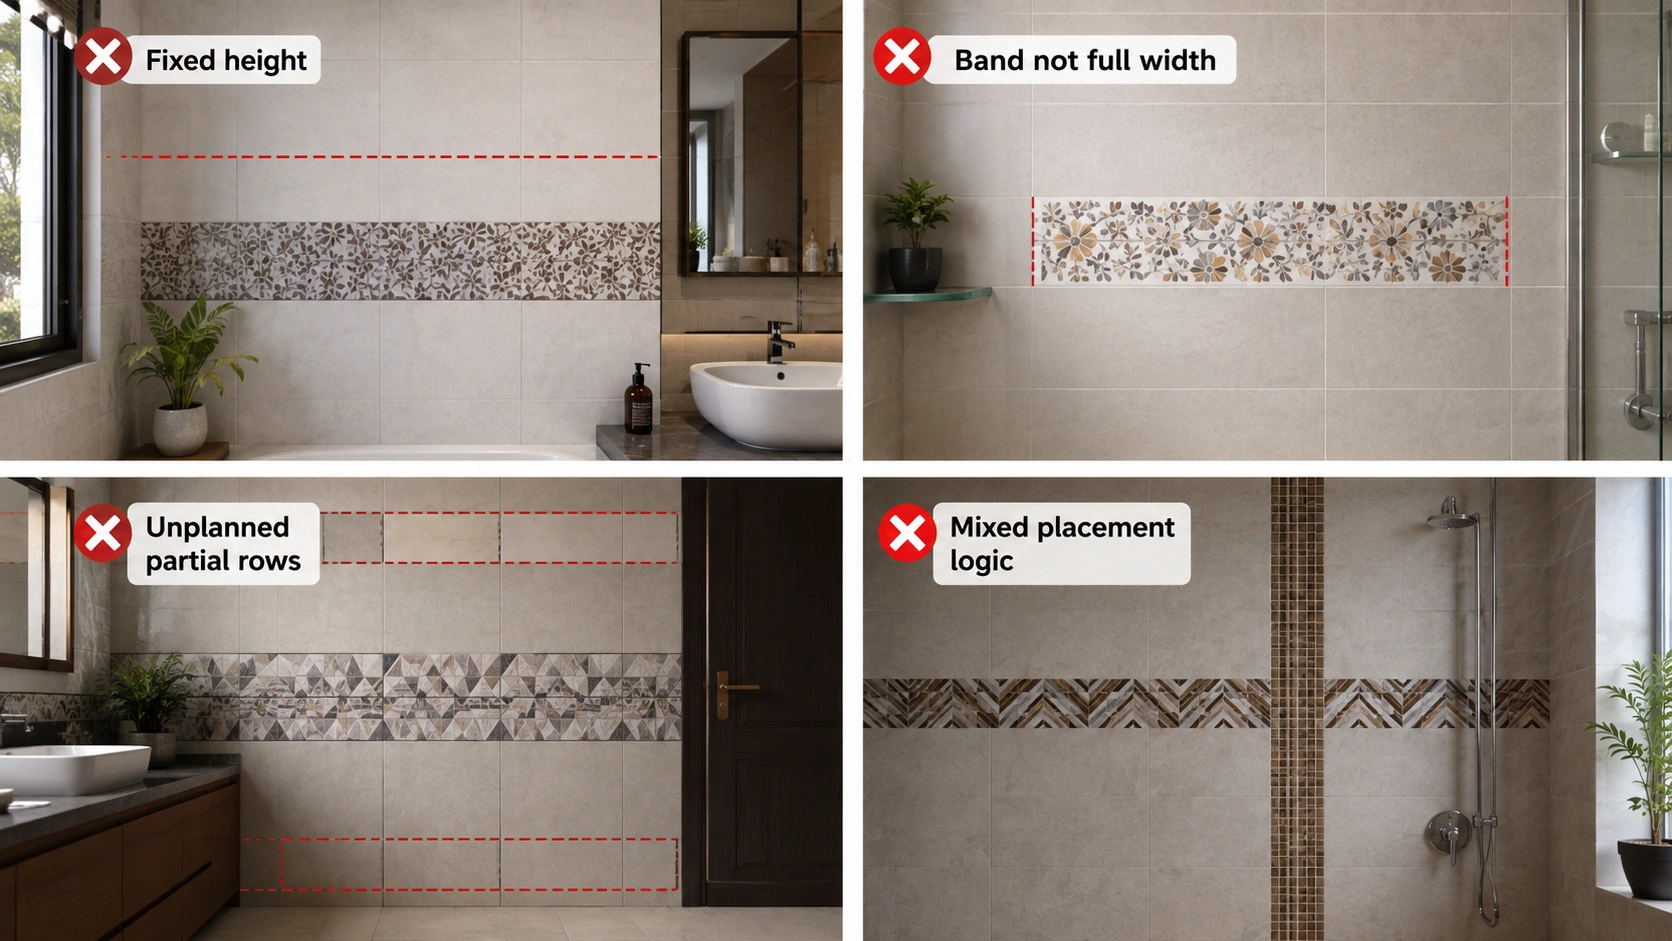
- Placing a dado band at a fixed height without checking the specific wall's proportions. A generic 1000mm placement can look miscalculated on an unusually tall or short wall; always verify against the actual room.
- Stopping a horizontal band short of the wall's full width. A highlighter that does not run edge-to-edge reads as an interrupted pattern rather than a deliberate architectural line.
- Ignoring the tile course planning above and below the dado line. Failing to plan for full tile courses on either side of the band often forces an awkward, unplanned partial row at the ceiling or floor.
- Mixing placement logic types on the same wall. Combining a horizontal dado band with a vertical accent strip on the same surface without a clear hierarchy tends to look uncoordinated rather than layered.
Room-by-Room Placement Summary
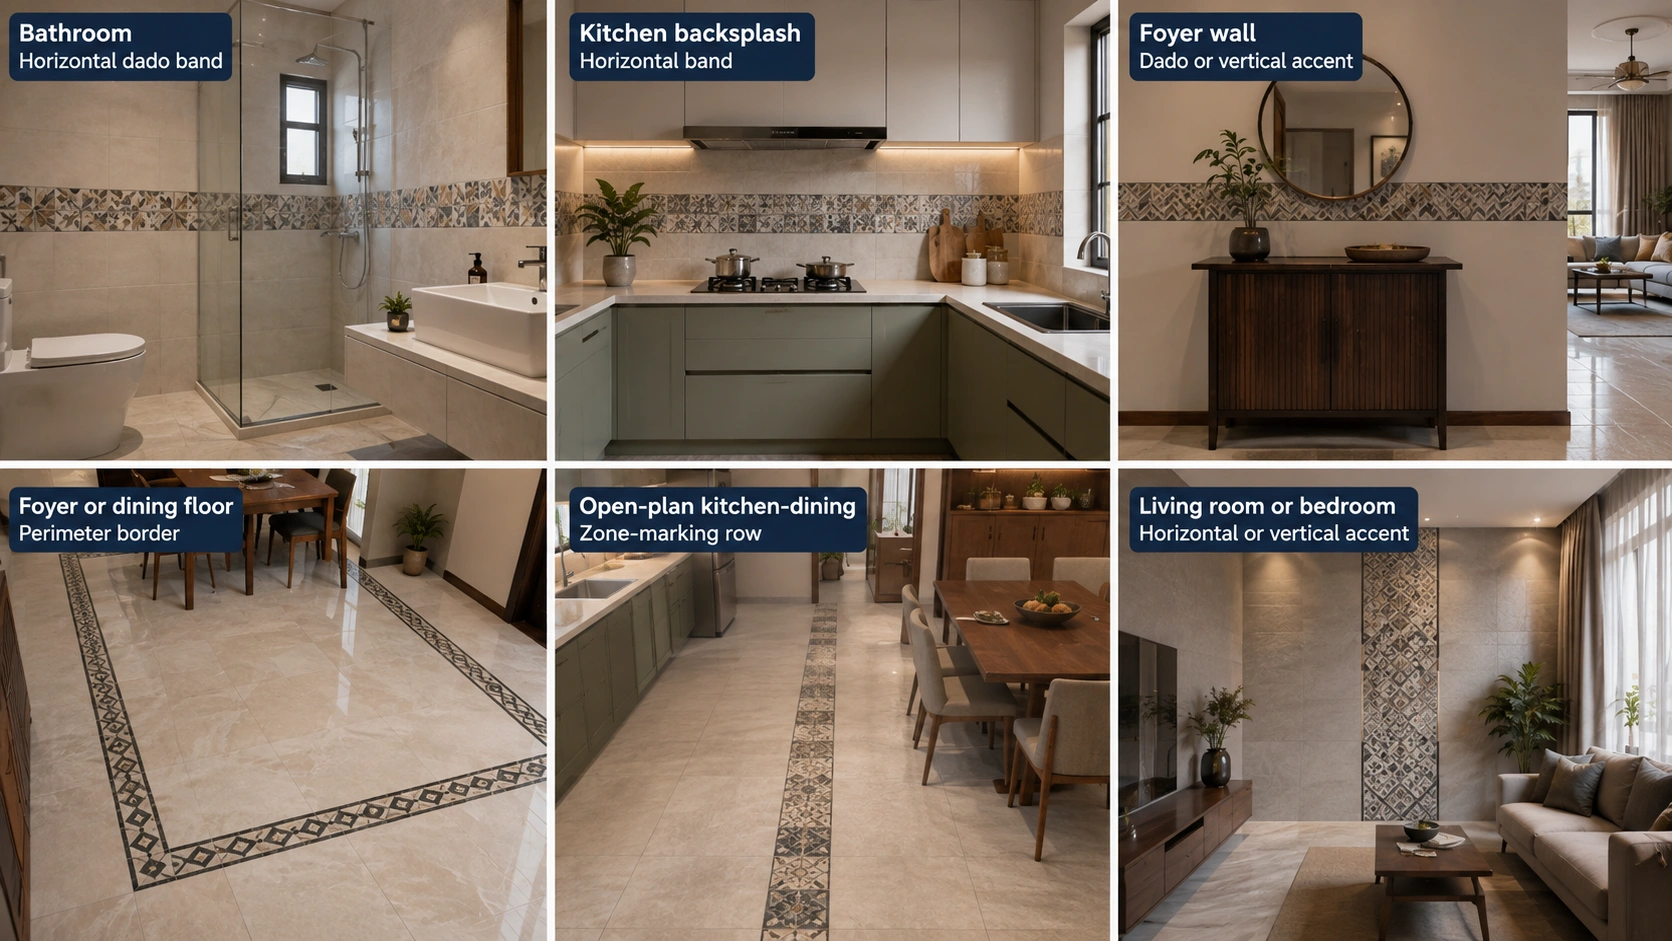
| Room | Recommended Placement | Typical Height or Position |
| Bathroom | Horizontal dado band | 900mm to 1050mm from the floor |
| Kitchen backsplash | Horizontal band within the splash zone | Centred within the 450mm to 900mm backsplash height range |
| Foyer wall | Horizontal dado band or vertical flanking accent | 1000mm to 1200mm from the floor, or either side of a console mirror |
| Foyer or dining floor | Perimeter border | Full room edge, one to two tiles deep |
| Open-plan kitchen-dining floor | Zone-marking row | At the functional boundary between zones |
| Living room or bedroom feature wall | Horizontal band or full-height vertical accent | Dado height for horizontal, floor to ceiling for vertical |
Highlighter Placement Planning in India: 2026 Context
Indian tile installers and interior designers increasingly plan highlighter placement at the same stage as the overall tile layout, rather than as an afterthought once the field tile is already ordered, given how directly placement height affects the final tile course count and cut planning above and below a dado line. Confirming exact wall and floor dimensions with your installer before finalising a highlighter order remains the single most effective way to avoid the awkward partial-row problem that comes from planning placement in isolation.
Plan Your Highlighter Placement on TilesFinders
Highlighter strips and matched field tiles for dado bands, feature walls, and floor borders can be selected together on TilesFinders, with course-planning guidance available so your placement lands cleanly against your room's actual dimensions.

FAQs
A dado line is a horizontal division on a wall marking the boundary between a lower and upper wall treatment, a concept borrowed from classical architecture. A highlighter band placed at dado height, typically 900mm to 1050mm in a bathroom, gives the wall a clear architectural anchor.
900mm to 1050mm from the floor is the typical dado height for a bathroom, roughly counter or waist height, though the exact position should be verified against the specific wall's proportions rather than applied as a fixed number.
Yes, generally. A horizontal band that stops short of the wall's full width reads as an interrupted pattern rather than a deliberate architectural line, undermining the intentional quality a highlighter is meant to create.
Typically, one to two tiles deep, decisions are made before ordering, since this affects how the corners are mitred or joined at each turn of the room's perimeter.
Yes, either as a full-height vertical accent strip or as a pair of vertical strips flanking a focal point like a mirror or headboard, both are effective alternatives to the more common horizontal dado band.
A zone-marking row sits at a functional boundary within a continuous open-plan floor, such as between a kitchen and dining area, while a threshold accent is a shorter run specifically at a doorway or room transition point, not extending across the full floor.
Calculate the tile courses above and below the proposed dado height before finalising its exact position, adjusting slightly if needed so neither the upper nor lower field requires an unplanned partial row at the ceiling or floor.
Generally not recommended without a clear design hierarchy, since combining both placement types on the same surface without one clearly leading tends to look uncoordinated rather than deliberately layered.


Tiles Worth Exploring
See our tile guides first
Set TilesFinders as a preferred source and our buying guides surface ahead of the rest for you.
Add as preferred sourceTakes one tap. Nothing to install.
What Readers Say
I was about to redo my parking area with the wrong tile size until I read this. The layout comparisons saved me from a costly mistake.
We reference TilesFinders guides while briefing clients on material selection. The size and pattern breakdowns are accurate and easy to explain visually.
On site, I get asked about grout spacing all the time. This article gave me a solid reference I now share with my team before every job.
Finally a guide that doesn't just push generic advice. The oil stain removal steps actually worked on our clubhouse driveway tiles.
I run a small construction firm and now send this link to clients directly when they ask about entrance tile sizing. Saves me an hour of explaining.
Good practical detail, though I wish there were more examples for compact apartment entrances specifically, not just villas.
My mother-in-law wanted marble, I wanted vitrified. This blog gave us the neutral comparison we needed to actually decide together.
Detailed without being overwhelming. I appreciated that it covered both cost and maintenance, not just the aesthetics.
Used the algae and hard water removal tips on our terrace tiles after the monsoon. Worked better than what our regular cleaner was doing.
As someone who sources tiles for multiple builder projects, I find these comparisons genuinely useful for vendor conversations, not just consumer content.
Recommended this to a client who kept second-guessing the entrance design. The small vs large layout section settled the debate instantly.
Straightforward and honest, no unnecessary jargon. Would like to see a similar breakdown for outdoor pool-deck tiles next.
We've bookmarked several TilesFinders guides for our design handbook. Reliable source when clients want data, not just opinions.
Two paths, one marketplace.
Get free quotes from verified suppliers.
Share your room, budget, and style. Suppliers in Morbi respond within hours.
Get Free QuotesList your business, reach real buyers.
Put your showroom in front of homeowners searching for tiles right now.
List Your BusinessMore Blogs
See all
Highlighter Tiles in India: Accent Strip Design Guide for Walls and Floors
Learn how to use highlighter tiles for walls and floors with correct sizing, placement, design id...
Read More
Highlighter Tile Design Ideas: 20+ Bold Accent Strip Looks for Indian Bathrooms and Living Rooms
Explore 20+ highlighter tile design ideas for Indian bathrooms and living rooms, featuring metall...
Read More
Best Highlighter and Border Tiles India 2027: GVT Accent Strip Picks by Room
Discover the best highlighter and border tiles for Indian homes in 2027. Compare entry, mid, and ...
Read More