Parking Tile Installation Guide: Base, Slope and Drainage for Indian Driveways
Learn how to install parking tiles correctly for Indian driveways. Covers base preparation, slope, drainage, expansion joints, curing, and common installation mistakes.
-1e76854d-c5b0-4e73-bdde-a2d6ee6086c3.webp)
- Why Parking Tile Installations Fail in Indian Driveways
- Step 1: Choosing the Right Parking Tile for Indian Driveways
- Step 2: Base Preparation for Parking Tiles in Indian Conditions
- Step 3: Correct Slope for Indian Driveway Tiles
- Step 4: Drainage Planning for Indian Parking Areas
- Step 5: Tile Laying Method for Parking Areas
- Step 6: Expansion Joints for Outdoor Parking Tiles in India
- Step 7: Grouting and Curing Outdoor Parking Tiles
- Common Mistakes That Cause Parking Tiles to Crack or Lift
- Installing Once, Correctly
A successful parking tile installation depends more on the foundation than the tile itself. Use a properly compacted sub-base, adequate PCC thickness, semi-dry mortar bedding, correct drainage slope (1:50 to 1:80), expansion joints, and proper curing. Choose only parking-rated GVT, full-body vitrified, or porcelain tiles with anti-skid finishes, and avoid ceramic, PGVT, and glossy tiles. Following the correct installation sequence helps prevent cracking, waterlogging, tile lifting, and premature failure in Indian weather conditions.
Parking tiles in Indian homes fail for one of three reasons. The base was not prepared correctly. The slope was laid flat. Or no one planned the drainage before the first tile went down.
The tiles themselves rarely cause the problem. A well-made GVT or full-body tile can carry a loaded SUV, handle Rajasthan summers and Mumbai monsoons, and last fifteen to twenty years without a single crack. What breaks parking tiles is what happens underneath them and around them during installation.
This guide covers every step of parking tile installation from soil preparation to grouting, with the specific numbers, ratios, and Indian site conditions that civil contractors and homeowners skip because no one tells them clearly.
If you are tiling a home driveway, a housing society compound, a standalone bungalow parking area, or a commercial parking zone, the sequence here applies. The numbers change slightly by load type, and those differences are called out at each step.
Why Parking Tile Installations Fail in Indian Driveways
Most parking tile failures in India share the same root causes. Understanding them before picking up a trowel is the most important part of this guide.
| Failure Mode | What It Looks Like | Root Cause |
|---|---|---|
| Tile cracking | Random cracks within 6 to 12 months | Inadequate PCC base, no expansion joints |
| Tile lifting | Hollow sound, tiles pop up at edges | Weak mortar bond, no slope, so water sits under tiles |
| Grout disintegration | Grout washes out, wide joints after the monsoon | Wrong grout type, no curing, water pooling in joints |
| Edge tile failure | First and last row break first | No edge restraint, no expansion joint at the boundary |
| Waterlogging | Water sits on the surface after rain, and seeps under | Zero or wrong slope direction, blocked drain |
| Hollow patches under tiles | The section feels soft underfoot, and the vehicle load cracks the area | Uneven mortar bed, voids in bedding layer |
| Surface spalling | Tile surface chips or flakes | Wrong tile type used (ceramic or PGVT), no load rating check |
Important: Parking tile installation is classified as a structural outdoor application. Skipping any of the steps in this guide - especially base preparation, slope, and expansion joints - will lead to tile failure regardless of how good the tile itself is.
Step 1: Choosing the Right Parking Tile for Indian Driveways
The tile must be selected before the base is designed because the tile's thickness and load rating directly determine the bedding depth and PCC strength needed below it. Most installers skip this logic and work backwards, which is where problems start.
Tile Categories That Work for Parking
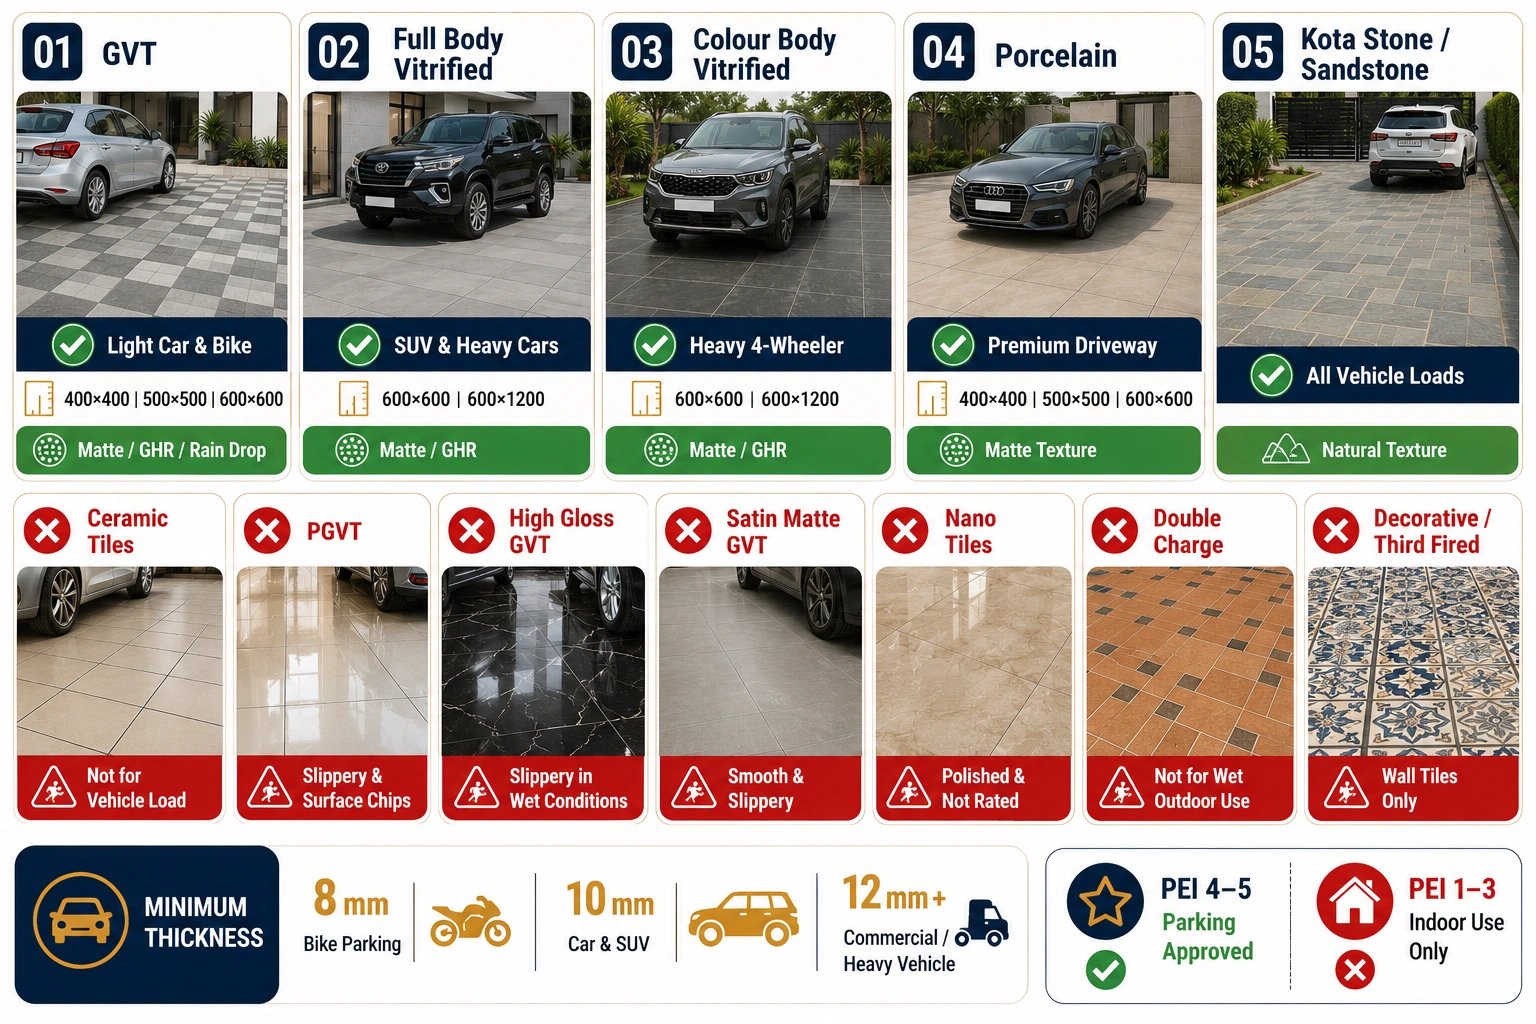
Only specific tile categories and finish types are suitable for parking. The table below lists what works, at what load level, and why.
| Tile Category | Sizes That Work | Load Suitability | Finish to Use | Notes |
|---|---|---|---|---|
| GVT (Glazed Vitrified) | 400x400, 500x500, 600x600 mm | Two-wheeler to light 4-wheeler | Matte, GHR, Rain Drop only | Most common parking tile in India; good load capacity in 8 to 10 mm thickness |
| Full Body Vitrified | 600x600, 600x1200 mm | Heavy 4-wheeler, SUV, Innova | Matte, GHR | Colour runs through full thickness; chips at edges stay the same colour; preferred for heavy load |
| Colour Body Vitrified | 600x600, 600x1200 mm | Heavy 4-wheeler | Matte, GHR | Similar to full body, edge chip stays the same colour as the surface |
| Porcelain | 400x400, 500x500, 600x600 mm | Two-wheeler to light 4-wheeler | Matte, natural texture | Good for premium driveways; confirm 9 mm+ thickness for 4-wheeler use |
| Kota Stone / Sandstone | Custom sizes | All loads | Natural textured surface | Rajasthan natural stone; excellent load capacity; needs sealing for stain resistance |
Tile Categories That Must Not Be Used for Parking
Important: The following tile types are technically unsuitable for parking applications. Using them will cause surface failure, cracking, or dangerous slipping.
| Category / Finish | Why It Fails for Parking |
|---|---|
| Ceramic tiles (any size) | Water absorption of 3 to 16% causes freeze-thaw damage; not rated for vehicle load |
| PGVT (Polished Glazed Vitrified) | Polished surface is dangerously slippery when wet; polished glaze chips under vehicle tyre pressure |
| High Gloss / Semi High Gloss GVT | Same slipping risk as PGVT; surface not rated for outdoor wet vehicle traffic |
| Satin Matte finish GVT | Appears matte, but the surface is smooth and slippery under a wet vehicle tyre load |
| Nano (Soluble Salt) tiles | Only available in 600x600 polished glossy; slippery and not rated for vehicle load |
| Double Charge vitrified | Good scratch resistance, but not made for wet outdoor zones; no anti-skid rating for parking |
| Third Fired / Decorative tiles | Decorative wall tiles only; zero load rating |
| Any tile under 8 mm in thickness | Insufficient thickness for vehicle load; will crack under tyre pressure points |
Minimum tile thickness for parking: 8 mm for two-wheeler parking and light pedestrian areas. 10 mm for private car and SUV driveways. 12 mm or higher for heavy vehicles, trucks, or commercial parking lots.
Pro Tip: Always check the tile's PEI (Porcelain Enamel Institute) wear rating. For parking and outdoor heavy-traffic use, a PEI rating of 4 or 5 is required. Tiles with PEI 1 to 3 are rated for light indoor use only.
Step 2: Base Preparation for Parking Tiles in Indian Conditions
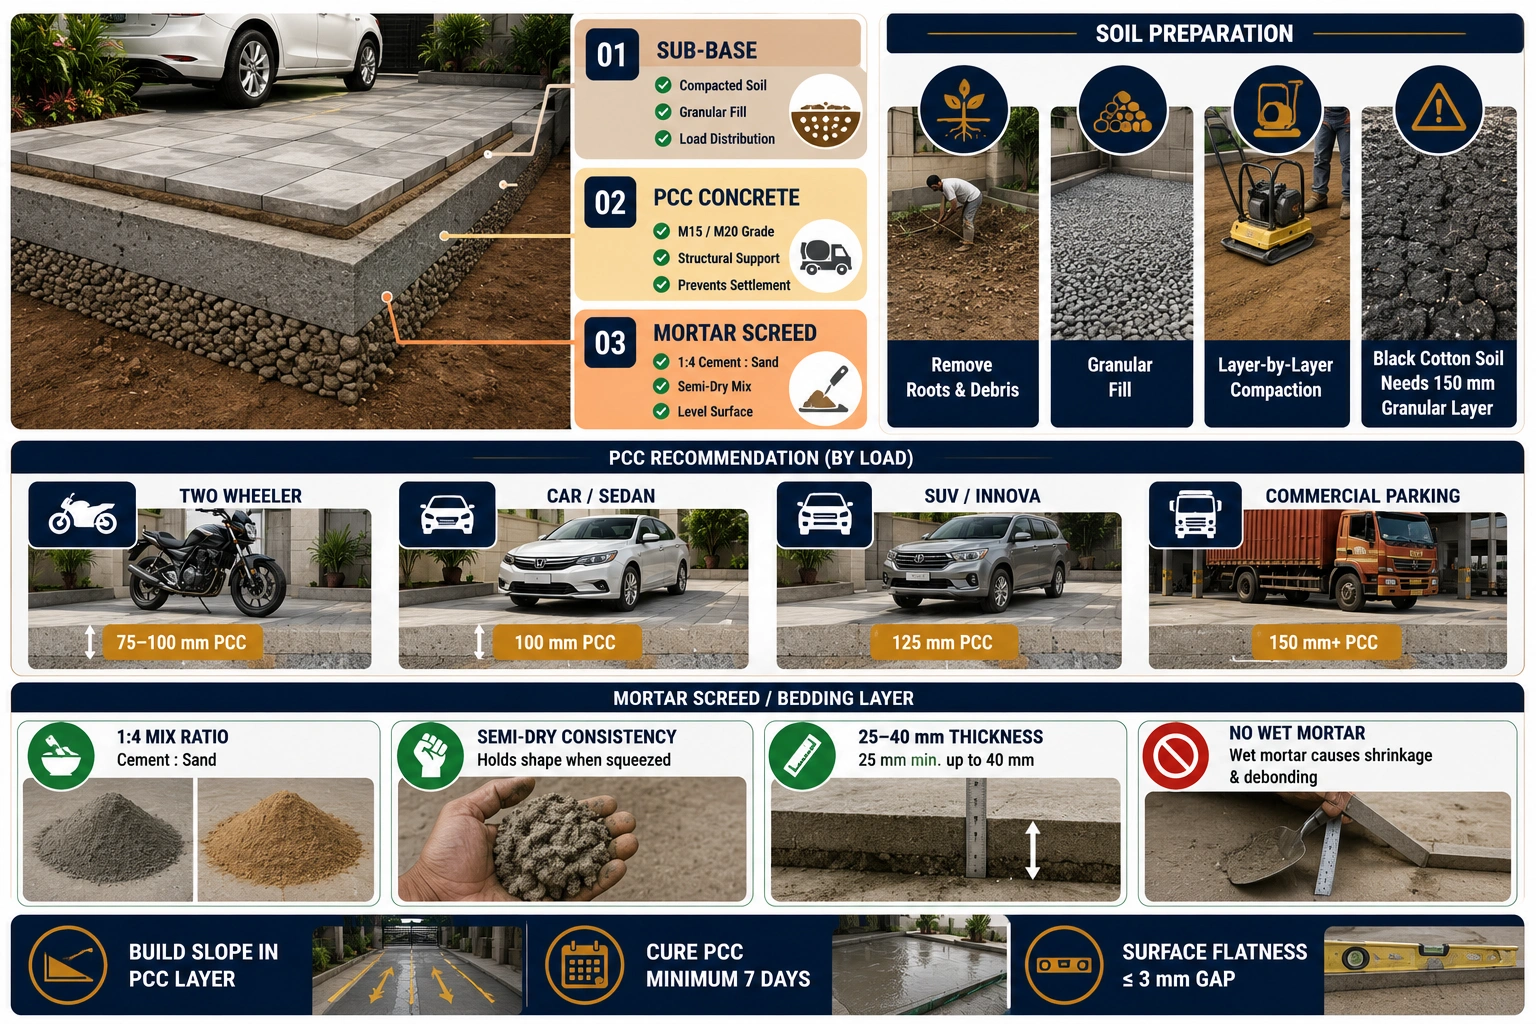
The base below the parking tiles is a three-layer system. Each layer has a specific job. Skipping or under-specifying any one layer transfers the structural load directly onto the tile and the grout joints, which is where cracks begin.
| Layer | Material | Thickness | Purpose |
|---|---|---|---|
| Layer 1: Sub-base | Compacted native soil or granular fill | As required by the site depth | Stable platform; load distribution into the ground |
| Layer 2: PCC (Plain Cement Concrete) | M15 or M20 grade concrete (1:2:4 or 1:1.5:3 mix) | 100 mm minimum; 125 to 150 mm for heavy vehicles | Structural load-bearing layer; prevents settlement |
| Layer 3: Mortar Screed / Bedding | Dry mortar mix (cement: sand 1:4) | 25 to 40 mm | Levels the PCC surface; allows slope adjustment; bonding layer for tile |
Sub-base: Soil Preparation and Compaction
The quality of the soil below everything else determines how much the base will settle over time. In Indian conditions, soil types vary significantly. Black cotton soil (found across Maharashtra, Madhya Pradesh, and parts of Gujarat) is expansive and shrinks and swells with moisture. Sandy soil in coastal areas compacts poorly. Red laterite soil in South India is generally more stable.
For all soil types, the sub-base must be:
- Cleared of all organic matter, roots, and debris to a minimum depth of 150 mm below finished tile level
- Compacted in layers of 100 mm using a plate compactor or hand rammer
- Filled with granular material (coarse sand, crushed gravel, or moorum) where the natural soil is soft or expansive
- Tested for bearing capacity before PCC is poured. Soft or spongy areas must be excavated and refilled with compacted granular material.
Important: Black cotton soil expands up to 40% when wet and shrinks in summer. Parking tiles laid directly over black cotton soil without adequate granular fill will crack every monsoon. Minimum 150 mm of granular replacement layer is required over black cotton soil before PCC.
PCC Layer: The Load-Bearing Concrete Base
PCC (Plain Cement Concrete) is the structural backbone of any outdoor tile installation. This is not an optional layer. Parking tiles laid over compacted earth or sand alone will fail under vehicle load within one to two monsoon cycles.
| Application | Recommended PCC Grade | Minimum PCC Thickness | Reinforcement |
|---|---|---|---|
| Two-wheeler/pedestrian only | M15 (1:2:4 mix) | 75 to 100 mm | Not required |
| Private car, hatchback, sedan | M15 (1:2:4 mix) | 100 mm | Optional |
| SUV, Innova, heavy 4-wheeler | M20 (1:1.5:3 mix) | 125 mm | 8 mm rebar mesh recommended |
| Commercial parking, trucks | M20 or higher | 150 mm minimum | Rebar mesh required |
| Society compound (multiple vehicles) | M20 (1:1.5:3 mix) | 125 to 150 mm | 8 mm rebar mesh recommended |
The PCC must be cured for a minimum of 7 days after pouring before any mortar screed or tiling work begins. Premature loading of fresh concrete causes internal micro-cracks that propagate upward through the tile layer later.
Pro Tip: Pour PCC with the drainage slope already built in. Correcting the slope in the mortar screed layer is possible, but it adds material and cost. It is easier and more accurate to set the slope at the PCC level using slope guides or a spirit level with a calculated fall.
Mortar Screed / Bedding Layer
The mortar screed sits between the PCC and the tile. Its job is to provide a flat, level surface for tile laying, accommodate slope adjustments, and create a mechanical bond with the tile above.
Use a dry mortar mix of cement and coarse sand in a 1:4 ratio. The mix should be damp but not wet. When squeezed in a fist, it should hold shape without releasing water. This is called the 'semi-dry' or 'damp mix' method and is standard for outdoor parking tile installation in India.
| Specification | Requirement |
|---|---|
| Mix ratio | 1 part cement to 4 parts coarse sand (1:4) |
| Consistency | Semi-dry (damp, not wet); holds shape when squeezed |
| Thickness | 25 mm minimum; up to 40 mm where slope correction is needed |
| Compaction | Must be tamped down firmly before the tile is laid |
| Curing before tiling | Allow 24 hours after screed is laid before tiling begins in summer; 48 hours in monsoon or humid conditions |
| Surface flatness | Check with a 2-metre straightedge; no gap greater than 3 mm under the straightedge |
Important: Never use a wet mortar slurry as the bedding layer for parking tiles. Wet mortar shrinks as it dries and pulls the tile with it, causing hollow spots and eventual debonding. The semi-dry method is non-negotiable for outdoor heavy-load applications.
Step 3: Correct Slope for Indian Driveway Tiles
Slope is what makes the difference between a driveway that drains cleanly after every rain and one that collects water, grows algae, and stains within two seasons. In India, where monsoon rainfall intensity can reach 100 mm per hour in cities like Mumbai and Cherrapunji, slope is a structural requirement, not a finishing detail.
The Correct Slope Ratio for Outdoor Parking Tiles
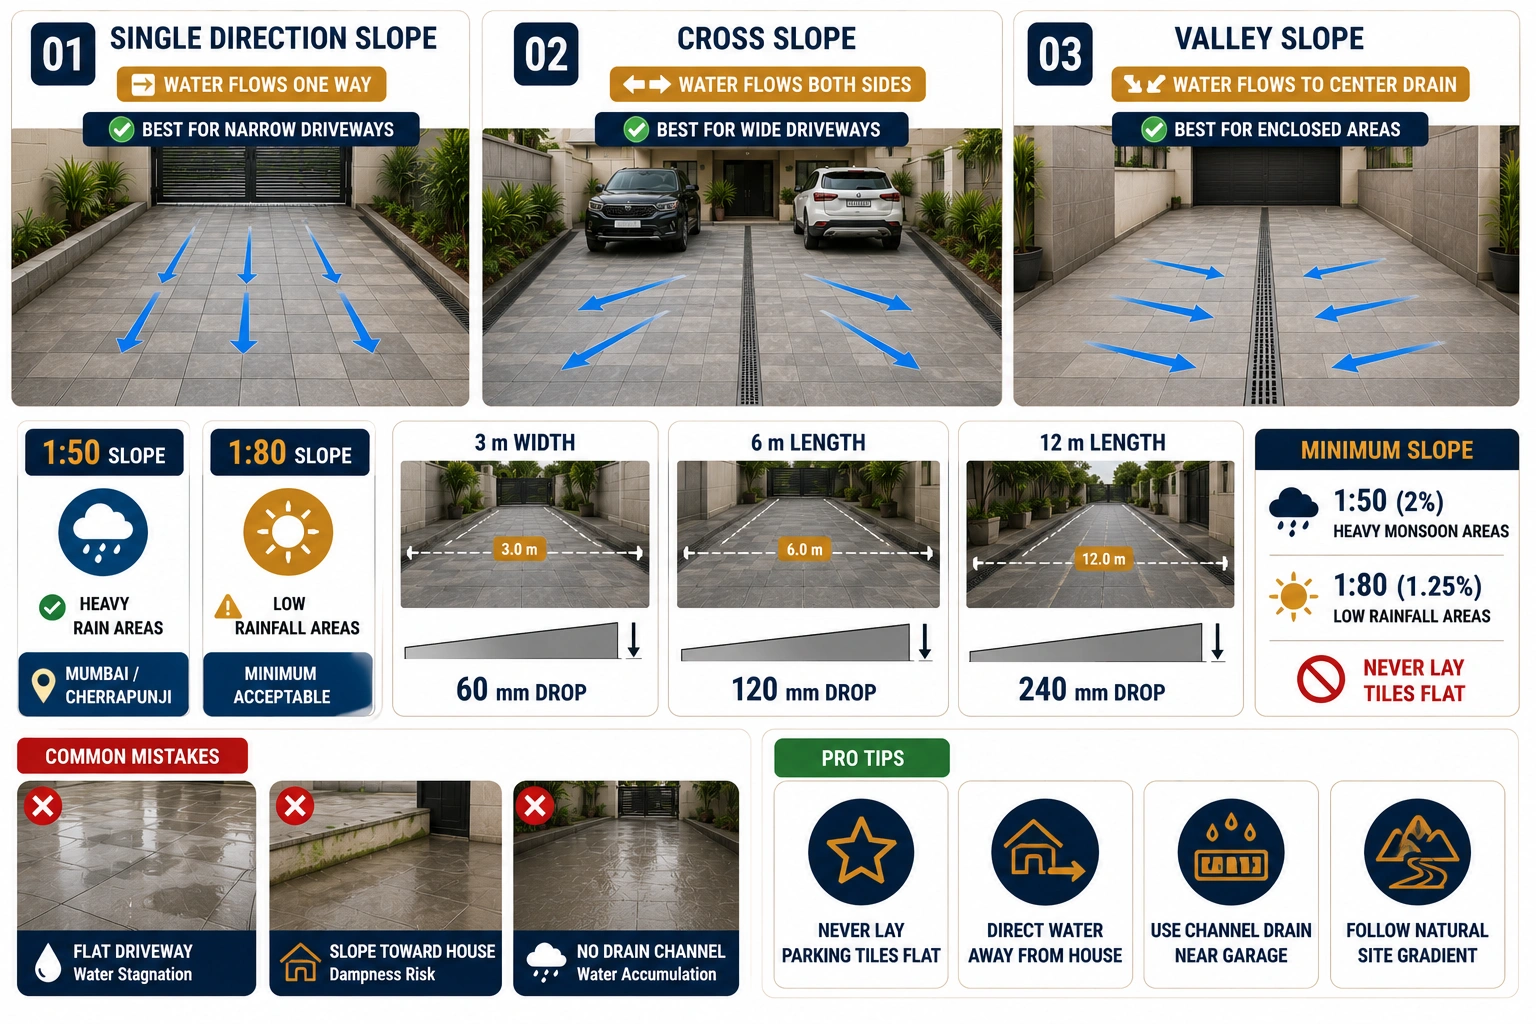
The standard slope for outdoor tiles in India is 1:50 to 1:80. This means for every 50 to 80 mm of horizontal run, the surface drops by 1 mm. In practical terms, for Indian driveways:
| Driveway Width / Length | Slope Ratio | Total Drop Required | Practical Check |
|---|---|---|---|
| 3 metres wide | 1:50 | 60 mm drop across the width | Place a 3 m straightedge; one end should be 60 mm lower |
| 3 metres wide | 1:80 | 37 mm drop across width | Minimum acceptable; use 1:50 in high-rainfall zones |
| 6 metres long | 1:50 | 120 mm drop along the length | Use a laser level or slope gauge for accuracy |
| 6 metres long | 1:80 | 75 mm drop along the length | Check with a spirit level at every 600 mm interval |
| 12 metres long | 1:50 | 240 mm drop along length | For long driveways, a cross-slope (shed to both sides) is recommended |
Minimum slope for Indian conditions: 1:50 (2%) for cities with heavy monsoon. 1:80 (1.25%) is the absolute minimum for low-rainfall zones. Never lay parking tiles completely flat.
Direction of Slope in Indian Driveway Layouts
Slope direction must lead water away from the structure (house wall, boundary wall, or garage door) and toward an open drain or channel. Three slope configurations are common in Indian driveways.
| Slope Configuration | How It Works | Best For |
|---|---|---|
| Single-direction slope | The entire surface slopes in one direction toward the drain at the low end | Narrow driveways under 3 metres wide; simple rectangular shapes |
| Cross-slope (shed to both sides) | Surface is highest at the centre spine; water sheds left and right to channel drains on both edges | Wide driveways above 4 metres; society compounds; long driveways |
| Valley slope (invert slope) | Surface slopes from both sides toward a central channel drain | Driveways with walls on both sides; enclosed garage areas |
Important: Never slope a driveway toward the house wall or garage door. Water at the base of walls causes dampness, plaster damage, and long-term structural issues. If the site gradient forces the slope toward the building, a channel drain must be installed between the tiled surface and the wall before tiling begins.
Pro Tip: In hilly or sloped sites (common in Pune, Shimla, Shillong, and other terrain cities), the natural slope of the land may be steeper than 1:50. Do not fight the natural slope. Install tile with the natural gradient, but add cross-falls where needed to direct water away from the structure and toward drains.
Step 4: Drainage Planning for Indian Parking Areas

Drainage must be planned before the first tile is laid, not after. The position of every drain, channel, and outlet determines the slope direction of every tile row. Changing the drainage layout after tiling starts means removing and relaying tiles.
Channel Drains vs Point Drains
| Drain Type | How It Works | Best Use Case | Indian Market Notes |
|---|---|---|---|
| Channel drain (linear drain) | Long slot drain set into the tile surface; captures water along its length | Driveway edges, entry points, and wide compounds | Available in stainless steel and PVC; stainless steel recommended for vehicle load zones |
| Point drain (floor trap) | Single circular or square drain at the low point | Small parking areas, narrow driveways with a single slope | Standard in Indian construction; ensure minimum 100 mm dia. for parking zones |
| Kerb and channel | Raised kerb at driveway edge directs water into gutter or channel at road level. | Driveways that connect directly to street level | Common in bungalow driveways; needs coordination with the municipal drain level |
| Slot drain at entry/exit | A channel drain is placed at the gate line before the car enters the tiled surface | Prevents road water from entering the driveway; society compounds | Critical for compounds that face a busy road during the monsoon |
Indian Monsoon Drainage Reality
Indian monsoon brings sustained high-intensity rainfall, not the drizzle that European drainage standards are designed for. Cities like Mumbai receive 600 mm of rainfall in a single week during June. Chennai driveways face both the southwest and northeast monsoon cycles. Bengaluru's drainage needs are compounded by rapid urban runoff from paved surroundings.
Standard drain sizing used in normal construction is often inadequate for monsoon-intensity events. For parking tile drainage in Indian conditions, use these design principles.
- Drain capacity should be sized for at least 50 mm of rainfall per hour. In Mumbai, Mangalore, and Kerala, the size is 100 mm per hour.
- Keep drain outlet pipes at a minimum 100 mm internal diameter for parking zones. 75 mm drain pipes clog quickly with sand and debris.
- Clean drain traps and channel inserts before every monsoon season. Blocked drains turn a well-designed driveway into a flood zone.
- Provide a minimum of 300 mm clearance between the bottom of the PCC layer and the soffit of any underground drain pipe to prevent PCC cracking from pipe movement.
- In low-lying areas or sites with a high water table (common in coastal cities and river-adjacent plots), consult a civil engineer for a waterproofing membrane under PCC before tiling.
Important: In housing societies, the driveway drainage must connect to the society's underground storm drain network, not to the sewage line. Connecting surface runoff to a sewage line violates RERA and municipal norms and causes overflow during the monsoon. Confirm drain connection points with the society engineer before starting installation.
Step 5: Tile Laying Method for Parking Areas
Once the PCC is cured and the mortar screed is ready, tile laying can begin. Parking tile installation uses a different method from indoor floor tiling because the loads, movement, and moisture exposure are significantly higher.
The Mortar Bedding Method (Standard for Indian Parking)
The mortar bedding method is the correct approach for all outdoor parking tile installations in India. Thin-set adhesive alone is not sufficient for outdoor heavy-load applications.
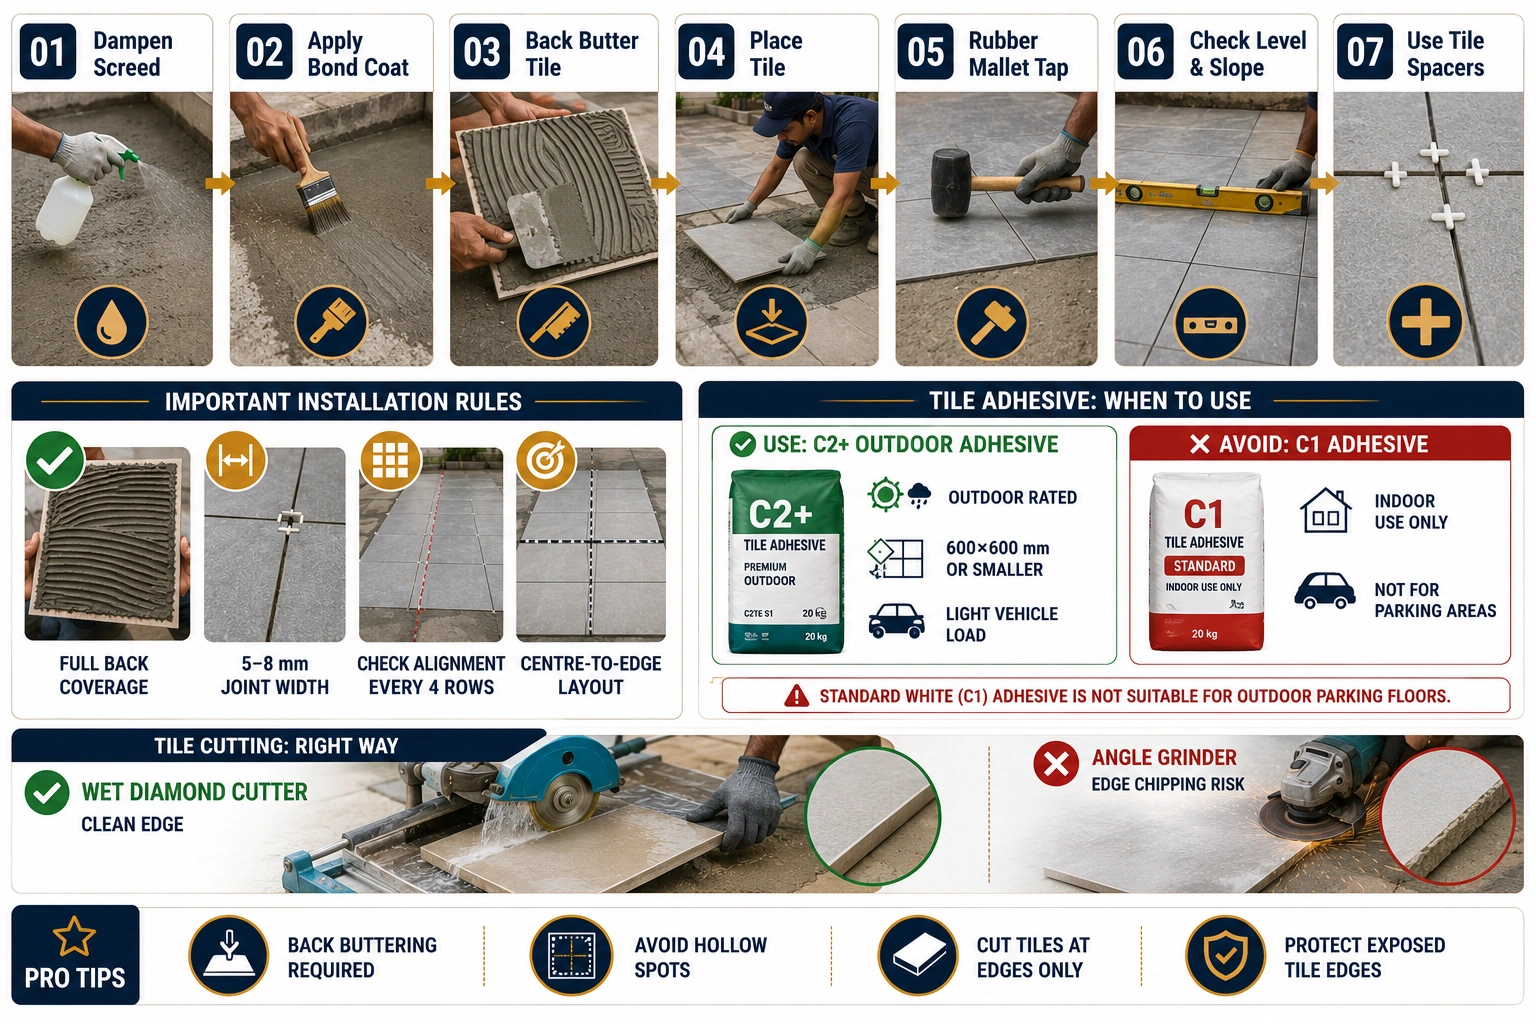
- Dampen the mortar screed surface lightly with water. Do not wet it to saturation; a light mist is enough to prevent the screed from pulling water out of the tile bond coat.
- Apply a thin slurry bond coat of neat cement paste directly onto the mortar screed surface. Use a brush or trowel. This coat is the adhesion layer between the screed and the tile.
- Back-butter each tile with a thin layer of neat cement paste immediately before laying. Apply with a notched trowel (6 mm V-notch) across the entire back of the tile. No dry spots on the back face.
- Place the tile firmly onto the screed with a twisting motion, pressing down to eliminate air pockets. Tap with a rubber mallet across the full tile surface to ensure full contact and the correct level.
- Check the level and slope with a spirit level after each tile is laid. Adjust by tapping or lifting and adding mortar as needed before the bond coat begins to set.
- Maintain consistent joint width (5 to 8 mm for parking tiles) using plastic tile spacers. Joints must be uniform because they carry expansion and contraction loads from Indian temperature cycles.
- Check alignment with a string line after every four rows. Creeping misalignment is much harder to correct after more tiles are laid.
Pro Tip: Back-buttering is not optional for parking tiles. Tiles with hollow spots under them will crack under the point load of a tyre stopping on that area. Full back coverage is required. Check this by lifting a trial tile 20 minutes after laying; 100% of the back face should show mortar contact.
When Tile Adhesive Can Be Used
Polymer-modified tile adhesive (C2 grade or higher, rated for outdoor use) can be used for parking tiles only when all of the following conditions are met.
- The PCC base is fully cured (minimum 28 days) and flat to within 3 mm under a 2 m straightedge.
- The tile size is 600x600 mm or smaller
- The vehicle load is a light 4-wheeler or less
- The adhesive is rated for outdoor and wet zone use (check manufacturer specification for outdoor heavy traffic)
- Expansion joints are still provided at all boundaries and at 3-metre intervals in both directions.
Important: Standard white tile adhesive (C1 grade) sold commonly in Indian hardware shops is rated for indoor wall use. It is not suitable for outdoor parking floors. Always confirm the adhesive grade and outdoor load rating before purchase.
Tile Alignment and Cutting
Set out the tile layout with a chalk snap line before laying begins. Start from the centre of the driveway and work outward so that cut tiles occur at the edges, not in the middle of a visible field.
For cutting parking tiles, use a wet diamond blade tile cutter. Angle grinders cause edge chipping on thick outdoor tiles. All cut edges at boundaries must be protected by edge trim or border tiles, not left exposed to tyre impact.
Avoid cuts smaller than half a tile width in high-traffic zones. Small cut tiles at entry and exit points are vulnerable to edge breakage under tyre load.
Step 6: Expansion Joints for Outdoor Parking Tiles in India
Expansion joints are the most consistently skipped step in Indian parking tile projects. Most installers avoid them because they are slightly more work, and some clients object to the visible lines. The result is cracked tiles every time.
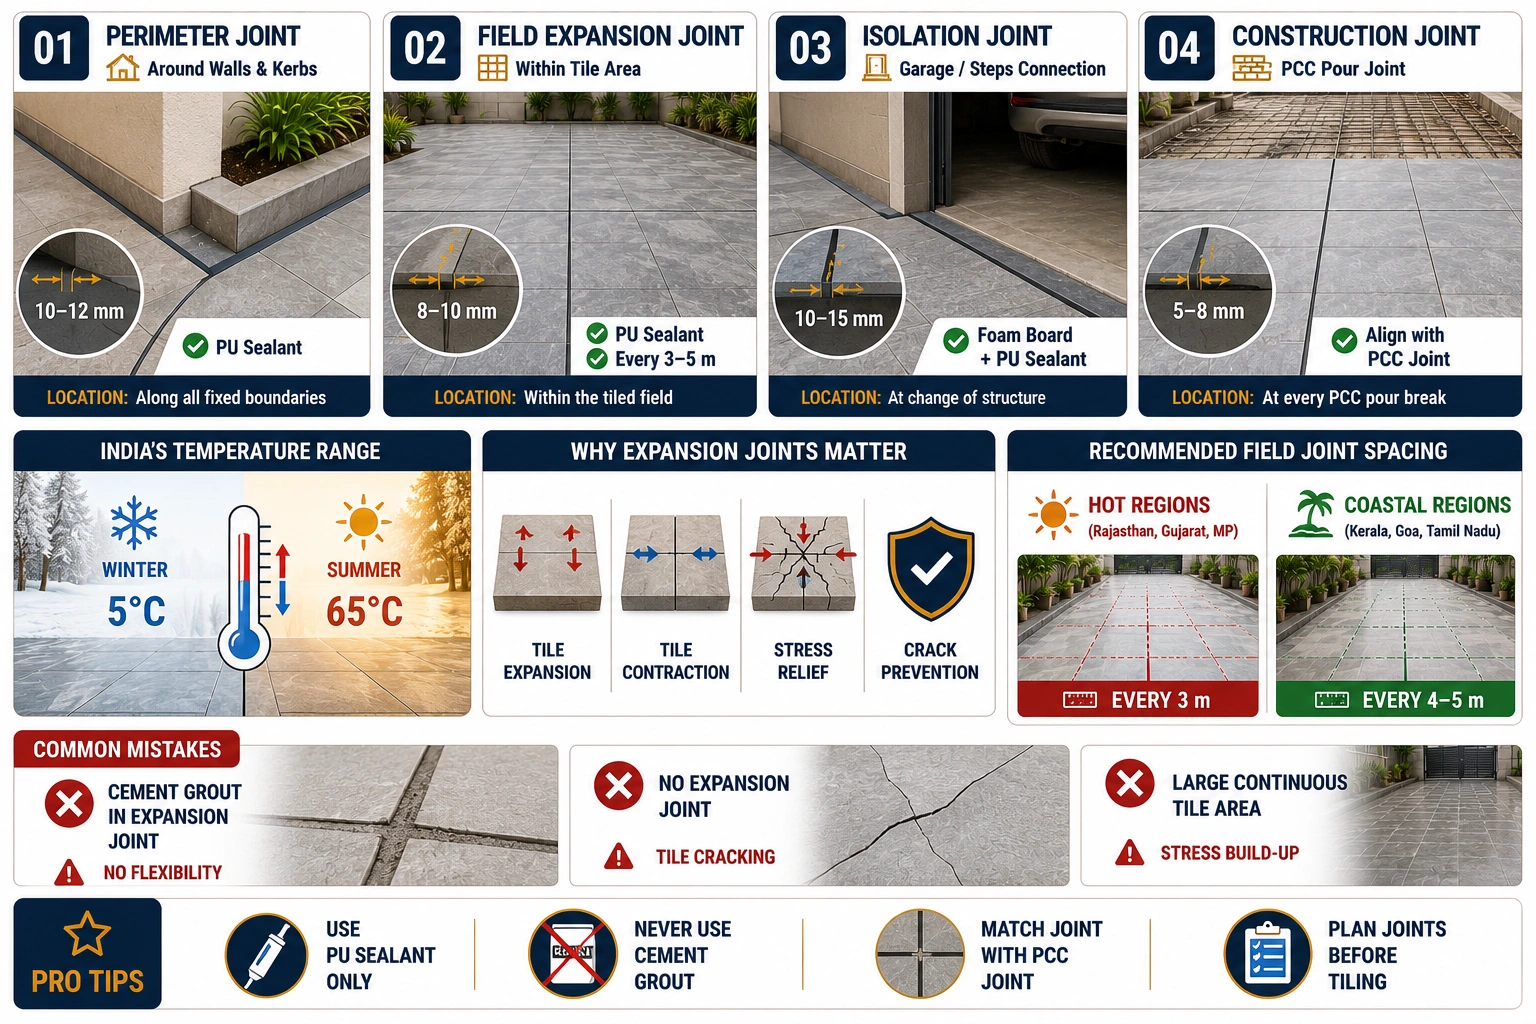
India's climate is the reason expansion joints are non-negotiable here. In North India, ground surface temperature swings from 5 degrees Celsius in winter nights to 65 degrees Celsius on a summer afternoon in Rajasthan. Tiles expand and contract with this range. Without room to move, the stress concentrates at the weakest point, which is always a tile corner or a grout joint.
Expansion Joint Specifications for Indian Parking Tiles
| Joint Type | Location | Width | Spacing | Filler Material |
|---|---|---|---|---|
| Perimeter joint | All boundary walls, columns, kerbs, and drain edges | 10 to 12 mm | Along all fixed boundaries | Polyurethane (PU) sealant or closed-cell foam backer rod plus PU sealant |
| Field expansion joint | Within the tiled field in both directions | 8 to 10 mm | Every 3 metres in high-temp zones (Rajasthan, Gujarat, MP); every 4 to 5 metres in moderate zones | PU sealant over backer rod; colour-matched to grout where aesthetics matter |
| Isolation joint | Where the driveway meets the garage floor, steps, or a different structural slab | 10 to 15 mm | At every change of structure | Compressible foam board plus PU sealant on top |
| Construction joint | Where two separate PCC pours meet | 5 to 8 mm | At every PCC pour break | Cut tile joint to align with PCC joint; fill with PU sealant |
Important: Never fill expansion joints with cement grout. Cement grout is rigid and does not compress. Filling an expansion joint with grout eliminates the joint's function and creates a stress concentration point. Use polyurethane sealant, which remains flexible through temperature cycles.
Pro Tip: In Indian climate zones above 35 degrees average summer temperature (which covers most of North India, Rajasthan, Gujarat, and the Deccan plateau), space field expansion joints at 3 metres maximum. In coastal zones with moderate temperature variation (Kerala, Goa, South Tamil Nadu), 4 to 5 metres is acceptable.
Step 7: Grouting and Curing Outdoor Parking Tiles
Grouting is not just filling gaps. For parking tiles, the grout joint is a structural element that transfers shear load between tiles and protects the bedding layer from water infiltration. Grout selection and application directly affect how long the installation lasts.
Grout Selection for Parking Tiles in India
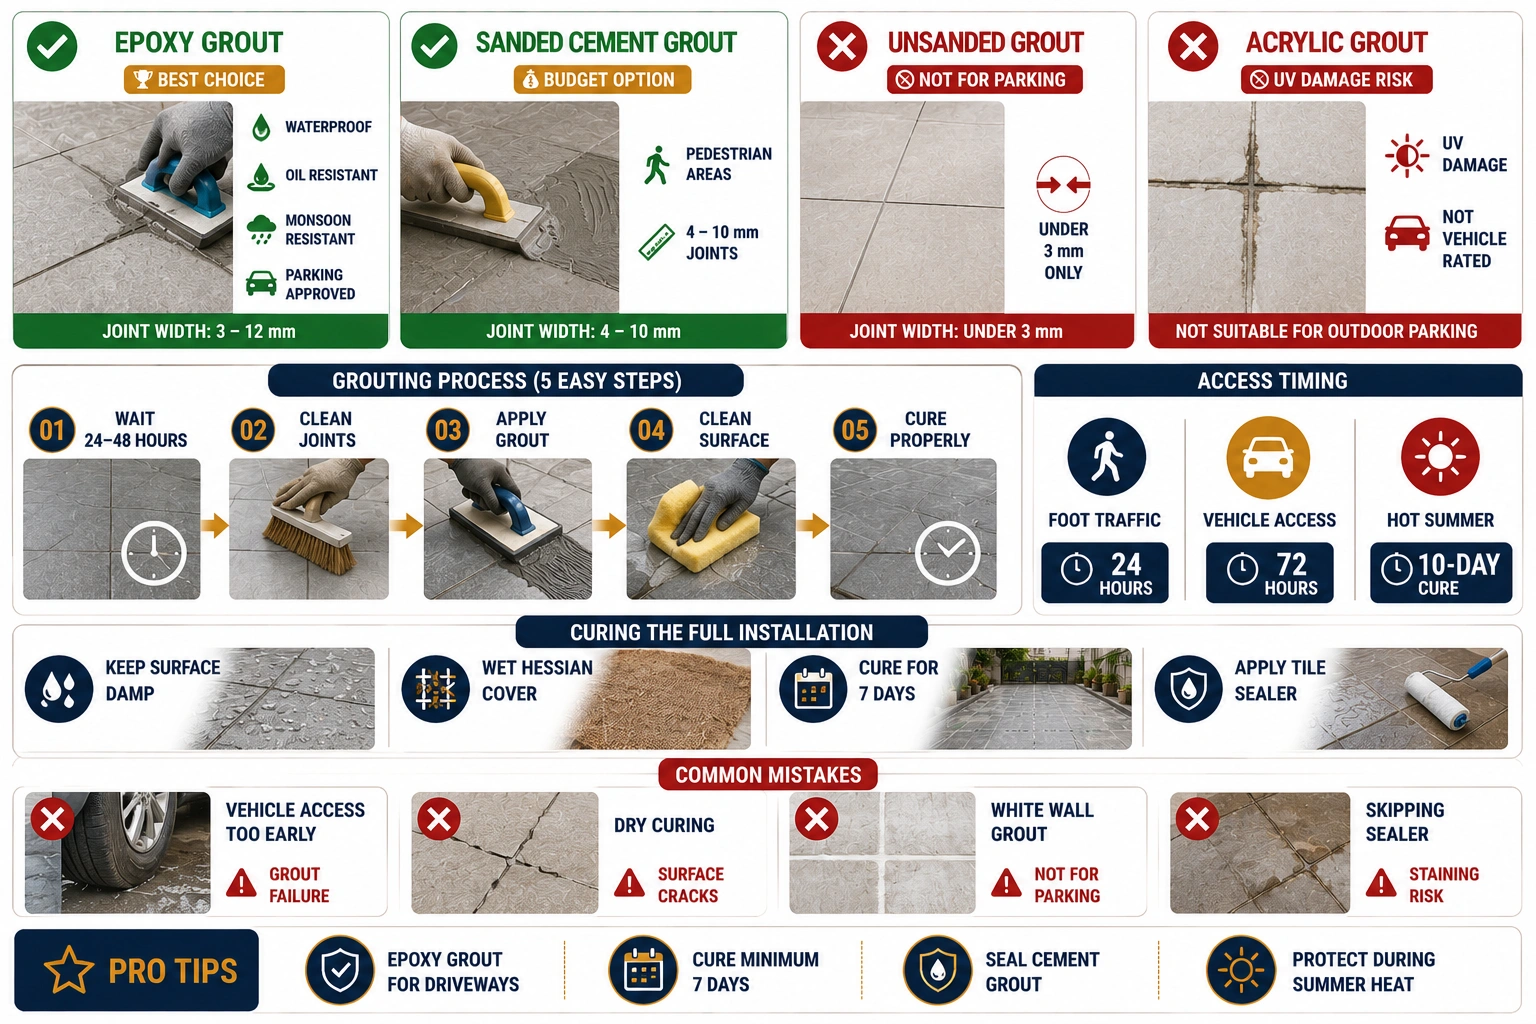
| Grout Type | Suitable for Parking | Joint Width | Notes for Indian Conditions |
|---|---|---|---|
| Cement-based sanded grout | Yes (standard option) | 4 to 10 mm | Adequate for covered or semi-covered parking; stains with oil and hard water over time |
| Epoxy grout | Yes (best option) | 3 to 12 mm | Waterproof, stain-resistant, oil-resistant; handles hard water and monsoon without darkening; higher cost but best long-term performance |
| Unsanded cement grout | No | Under 3 mm | Not strong enough for outdoor parking joint widths |
| Acrylic grout | No | Any | Not rated for outdoor heavy traffic and vehicle load; degrades in UV and heat |
Recommendation: Use epoxy grout for all vehicle-traffic areas and entry/exit points. Use sanded cement grout for pedestrian-only zones if the budget is a constraint. Never use standard white wall grout for any part of a parking tile installation.
Grouting Process
- Allow tile bedding to cure for a minimum of 24 hours before grouting. In monsoon or humid conditions, wait 48 hours. Premature grouting traps moisture under the tiles.
- Clean all tile spacers and loose debris from joints before grouting. Any material left in the joint creates a weak point.
- Dampen joints lightly with water before applying cement-based grout. Do not wet the tiles themselves.
- Force grout into joints at a 45-degree angle with a grout float. Fill each joint with no voids or hollow sections.
- Clean excess grout from the tile surface within 15 to 20 minutes of application using a damp sponge. Do not let grout harden on the tile surface; it bonds to the glaze and is very difficult to remove.
- Allow grout to cure for 24 hours before foot traffic. Allow 72 hours before vehicle access. In summer heat above 35 degrees Celsius, cover grouted areas with wet hessian cloth to slow curing and prevent shrinkage cracks.
Curing the Full Installation
After grouting is complete, the entire installation must be cured. This is the step that locks in the strength of all layers below.
- Keep the tiled surface damp for 7 days by covering with wet hessian sacks or by flooding with a thin water film twice daily.
- Do not allow vehicle access for a minimum of 7 days after grouting is complete.e
- In hot summer conditions, cure for 10 days. Rapid drying in 40 to 4 degrees Celsius heat can cause surface cracking in grout and mortar, even after tiles are sealed.t
- Apply a penetrating tile sealer on the grouted surface after the 7-day cure period for cement-based grout. Sealer reduces oil staining and protects grout from monsoon water infiltration.
Common Mistakes That Cause Parking Tiles to Crack or Lift
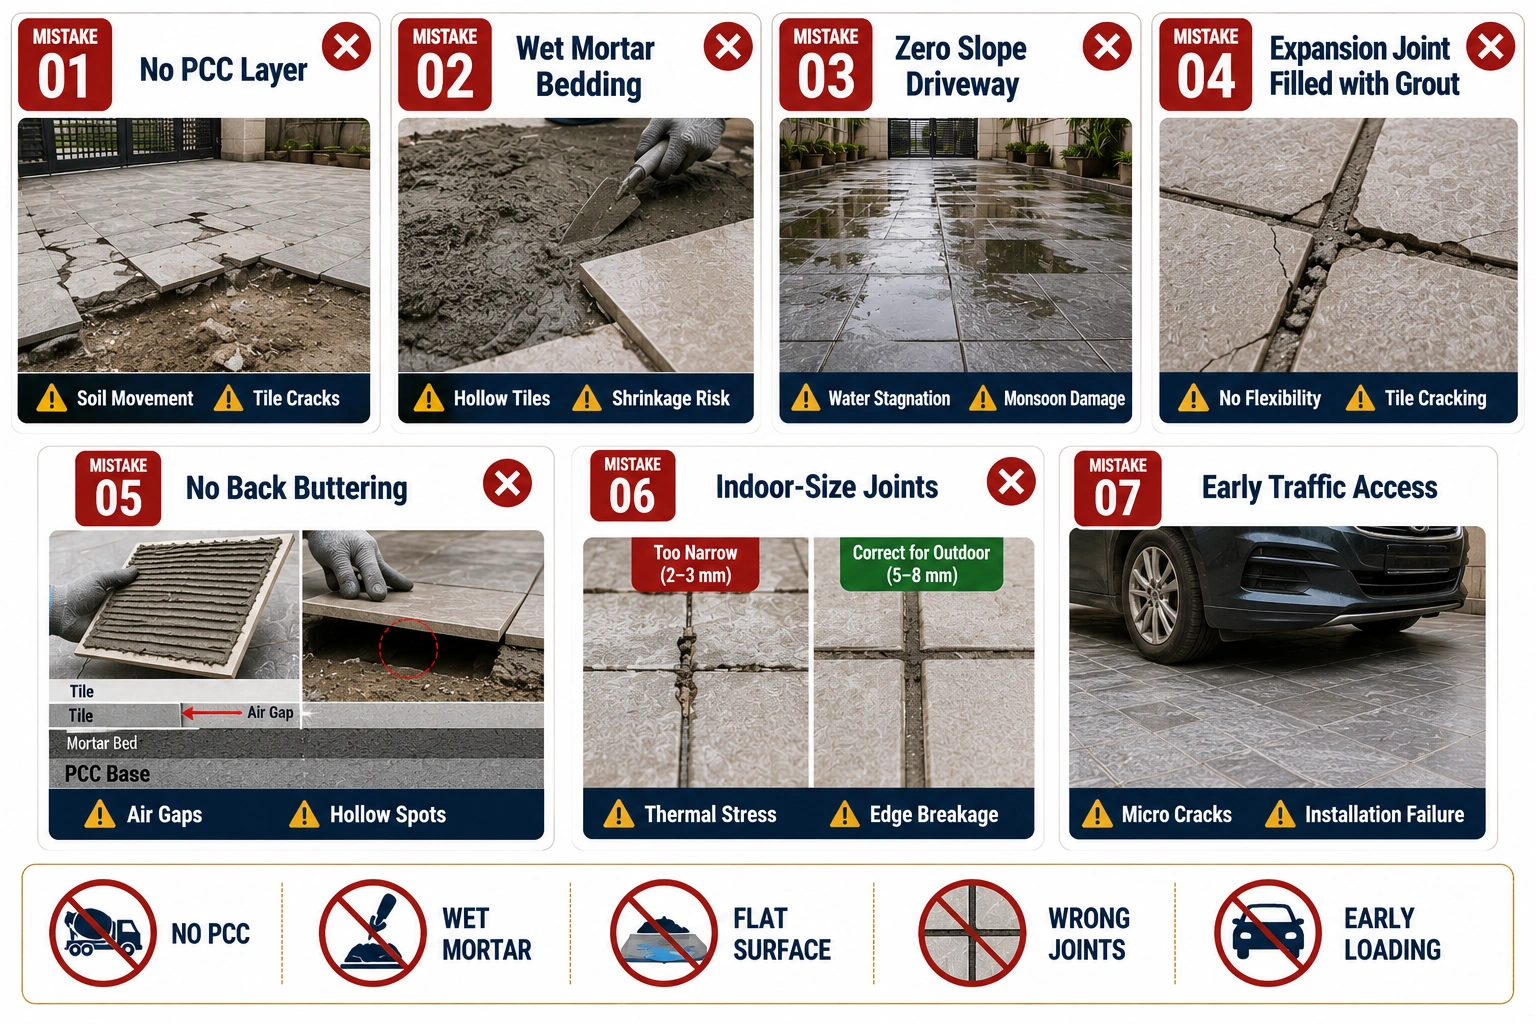
Skipping the PCC layer and tiling directly on compacted soil. Compacted soil shifts with rain, dry spells, and vehicle loads. Without a rigid PCC base, the mortar screed moves and the tiles crack. This shortcut adds two to three weeks to the failure timeline, not decades.
Using wet mortar instead of semi-dry mix for the bedding layer. Wet mortar shrinks as it dries. On a large outdoor surface, this shrinkage creates hollow spots under tiles that fail under tyre point loads. The semi-dry bedding method is the only correct approach for outdoor parking.
Laying tiles flat with zero slope. A flat driveway looks clean during installation,n but collects water at every low point after the first rain. Standing water seeps through grout joints and begins breaking down the bedding layer within one monsoon season. Always build slope in at the PCC stage.
Filling expansion joints with cement grout. This turns what should be a moving joint into a rigid crack waiting to happen. The first significant temperature cycle or vehicle load breaks the groove, but the crack spreads to the tile corners. Use PU sealant in all expansion joints without exception.
Not back-buttering tiles before laying. Placing tiles on a screed surface without a bond coat on the tile back leaves air gaps. Air gaps become hollow tiles. Hollow tiles crack under concentrated vehicle wheel load. Every tile must be back-buttered before it goes down.
Using the same small joint width as indoor tiles. Indoor tiles often use 2 to 3 mm joints. Outdoor parking tiles need 5 to 8 mm joints to accommodate thermal movement. Narrow joints in outdoor applications fill with debris and split the tile edges during expansion.
Allowing foot or vehicle traffic before full curing. The PCC needs 7 days, the mortar screed needs 24 to 48 hours, and the grouted installation needs 7 days. Each layer's strength builds over time. Loading before cure causes micro-cracks that become visible fractures within months.
Installing Once, Correctly
A parking tile installation done correctly lasts fifteen to twenty years with no more maintenance than periodic drain cleaning and an occasional grout re-seal. An installation done incorrectly starts showing problems in the first monsoon and needs partial or complete removal within three to five years.
The steps in this guide are not shortcuts or premium upgrades. They are the minimum correct standard for any outdoor parking tile project in Indian conditions. The PCC base, the slope, the drainage, the expansion joints, and the curing period each have a specific engineering reason behind them.
Before starting any installation, confirm your tile selection against the load requirements of your specific driveway. Check the tile thickness, the PEI rating, and the finish type. Then follow the sequence in this guide from base to grout.
If you are still shortlisting parking tiles for your project, TilesFinders lists verified GVT, full-body, and porcelain outdoor tiles with load ratings, finish specifications, and anti-skid ratings across Indian dealers. You can compare products by size, finish, and price range before your showroom visit, which saves significant time and avoids being sold the wrong tile for your application.

FAQs
Parking tiles require a three-layer base system. First, a compacted sub-base of granular fill or native soil. Second, a PCC (Plain Cement Concrete) layer of a minimum of 100 mm for light vehicles (M15 grade) or 125 to 150 mm for heavy vehicles (M20 grade). Third, a 25 to 40 mm semi-dry mortar screed as the bedding and levelling layer. Skipping the PCC layer is the most common cause of parking tile failure in Indian driveways.
The standard slope for outdoor parking tiles in India is 1:50 (a 20 mm drop per metre of run) for high-rainfall zones and a minimum of 1:80 (12.5 mm drop per metre) for low-rainfall areas. For a 3-metre-wide driveway, this means a total fall of 37 to 60 mm across the width. Slope must always direct water away from the building structure and toward a drain or channel.
GVT (Glazed Vitrified Tile) and Full Body Vitrified tiles can be used for parking when the finish is matte, GHR (Glaze High Resistance), or rain-drop. These finishes provide the anti-skid rating needed for wet vehicle traffic. PGVT (Polished Glazed Vitrified), high-gloss GVT, and satin matte GVT must never be used on parking floors. The polished surface is dangerously slippery under wet tyre load.
Parking tile cracking is prevented by four things done correctly: a solid PCC base of adequate thickness for the vehicle load; a semi-dry mortar bedding that ensures full contact under the tile; properly sized expansion joints (8 to 12 mm) at all boundaries and every 3 to 5 metres in the field, filled with PU sealant; and complete curing of the full installation for 7 days before vehicle access. Each of these steps matters; none can be skipped.
The mortar screed (bedding layer) for parking tiles should be 25 mm minimum and up to 40 mm where slope correction is required. The mix ratio is 1 part cement to 4 parts coarse sand, applied semi-dry (damp but not wet). Tiles should not be laid on the same day the screed is laid; allow 24 hours in summer and 48 hours in humid or monsoon conditions before tiling begins.
Parking tiles require joints of 5 to 8 mm width, wider than indoor tile joints. Wider joints are needed because outdoor tiles expand and contract significantly with Indian temperature swings. Joint width below 4 mm in outdoor parking zones causes tile edge cracking as tiles push against each other during summer heat. All joints should be filled with sanded epoxy or cement grout. Expansion joints at boundaries and field intervals must be filled with PU sealant, not grout.
For an independent bungalow driveway, the drainage outlet can connect to the road drain or an internal soak pit, and the slope direction is simpler to plan. For a housing society compound, drainage must connect to the society's underground storm drain network (not the sewage line), slope must account for multiple vehicle lanes and pedestrian paths, and the PCC base needs to carry heavier combined vehicle loads. Society compound installations should always involve a civil engineer for drainage design and PCC specification.
See our tile guides first
Set TilesFinders as a preferred source and our buying guides surface ahead of the rest for you.
Add as preferred sourceTakes one tap. Nothing to install.
What Readers Say
I was about to redo my parking area with the wrong tile size until I read this. The layout comparisons saved me from a costly mistake.
We reference TilesFinders guides while briefing clients on material selection. The size and pattern breakdowns are accurate and easy to explain visually.
On site, I get asked about grout spacing all the time. This article gave me a solid reference I now share with my team before every job.
Finally a guide that doesn't just push generic advice. The oil stain removal steps actually worked on our clubhouse driveway tiles.
I run a small construction firm and now send this link to clients directly when they ask about entrance tile sizing. Saves me an hour of explaining.
Good practical detail, though I wish there were more examples for compact apartment entrances specifically, not just villas.
My mother-in-law wanted marble, I wanted vitrified. This blog gave us the neutral comparison we needed to actually decide together.
Detailed without being overwhelming. I appreciated that it covered both cost and maintenance, not just the aesthetics.
Used the algae and hard water removal tips on our terrace tiles after the monsoon. Worked better than what our regular cleaner was doing.
As someone who sources tiles for multiple builder projects, I find these comparisons genuinely useful for vendor conversations, not just consumer content.
Recommended this to a client who kept second-guessing the entrance design. The small vs large layout section settled the debate instantly.
Straightforward and honest, no unnecessary jargon. Would like to see a similar breakdown for outdoor pool-deck tiles next.
We've bookmarked several TilesFinders guides for our design handbook. Reliable source when clients want data, not just opinions.
Two paths, one marketplace.
Get free quotes from verified suppliers.
Share your room, budget, and style. Suppliers in Morbi respond within hours.
Get Free QuotesList your business, reach real buyers.
Put your showroom in front of homeowners searching for tiles right now.
List Your Business