Bathroom Tile Layout Patterns: Brick, Herringbone, Stack, and Vertical
Discover how brick bond, herringbone, stack, and vertical tile layouts affect bathroom style, room size perception, wastage, labour costs, and overall renovation budgets in Indian homes.

- Why the Layout Pattern Matters as Much as the Tile
- Brick Bond Pattern: The Reliable Workhorse
- Herringbone Pattern: Character With a Cost
- Stack Bond Pattern: Clean, Fast and Modern
- Vertical Stack Layout: The Space Stretcher
- Diagonal Layout: Honourable Mention for Floors
- Pattern Comparison: Wastage, Labour and Difficulty
- Which Pattern Works Best for Indian Bathroom Sizes
- Grout Colour and Joint Width by Pattern
- Tile Sizes That Work for Each Pattern
- Expert Tips Before Choosing a Pattern
- Common Mistakes When Choosing a Tile Layout Pattern
- Bathroom Tile Pattern Planning Tips Before Finalising the Design
Brick bond, stack bond, vertical stack, and herringbone layouts can dramatically change how a bathroom looks and feels, even when using the same tile. Choose patterns based on room size, budget, wastage, labour cost, and the visual effect you want to achieve.
Two bathrooms can use the same tile, the same colour, the same finish, and still look completely different from each other.
The layout pattern is usually the reason. How a tile is laid decides whether a wall feels tall or squat, whether a small bathroom feels tight or open, and whether the finished room looks considered or just functional.
Most Indian homeowners pick their tile first and ask the contractor to figure out the pattern. That order often goes wrong because the pattern choice also affects how many tiles you need, how long the laying takes, and what the total labour bill looks like.
This guide covers the four main bathroom tile layout patterns named in this blog's title, plus a quick look at diagonal. Each section explains how the pattern works, what it does to the room, which tile sizes suit it, and what it costs extra compared to a plain, straight layout.
Why the Layout Pattern Matters as Much as the Tile
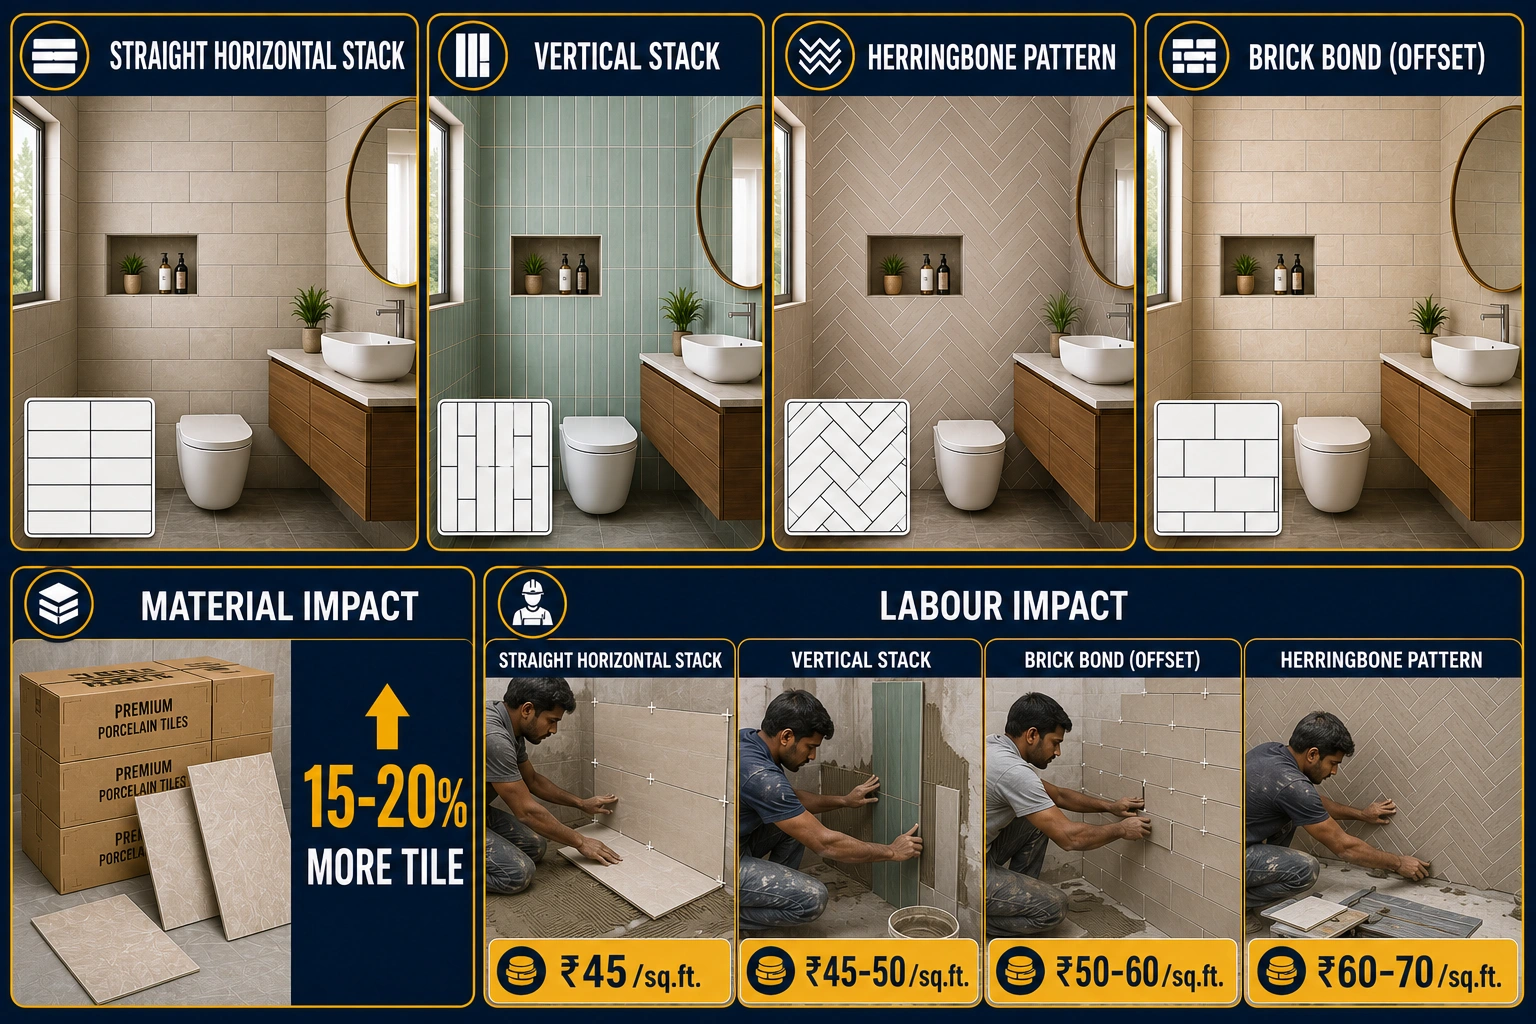
A tile laid in a straight horizontal stack looks calm and wide. The same tile turned vertical pulls the eye upward. Laid in herringbone, it adds movement. Offset by half its length, it becomes a brick bond. The tile itself has not changed. Only its orientation and offset have.
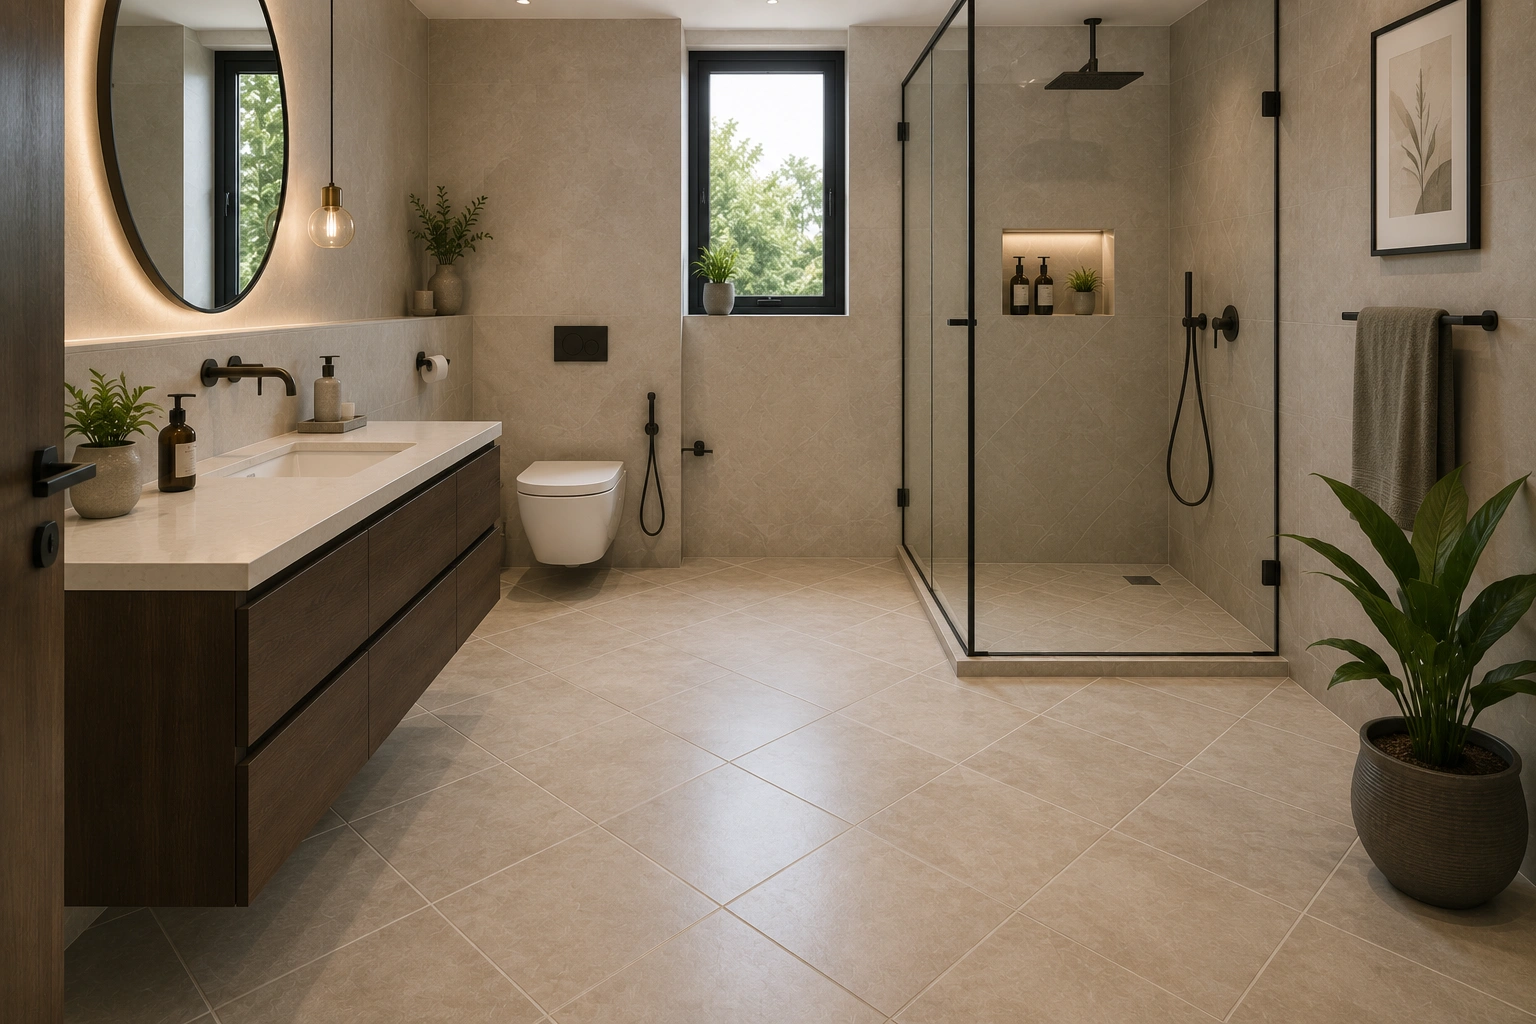
In a compact Indian bathroom, that visual difference is significant. Many Small Bathroom Tile Design Ideas focus on vertical layouts and light colours because they help a 5 x 7 ft. bathroom feel more open and less cramped. The same space with vertical tiles and a light grout line can feel noticeably taller.
The pattern also has a real cost impact that most homeowners discover after placing the tile order. Herringbone and diagonal patterns require 15 to 20 per cent more tile than a straight lay because the angled cuts at the perimeter produce offcuts that cannot be reused. That extra material cost is rarely mentioned in showroom discussions.
Labour rates also rise with pattern complexity. A contractor who quotes ₹45 per sq. ft. for a straight brick bond will often charge ₹60 to ₹70 per sq. ft. for herringbone on the same wall, because the angled cuts take roughly twice as long per piece.
Brick Bond Pattern: The Reliable Workhorse
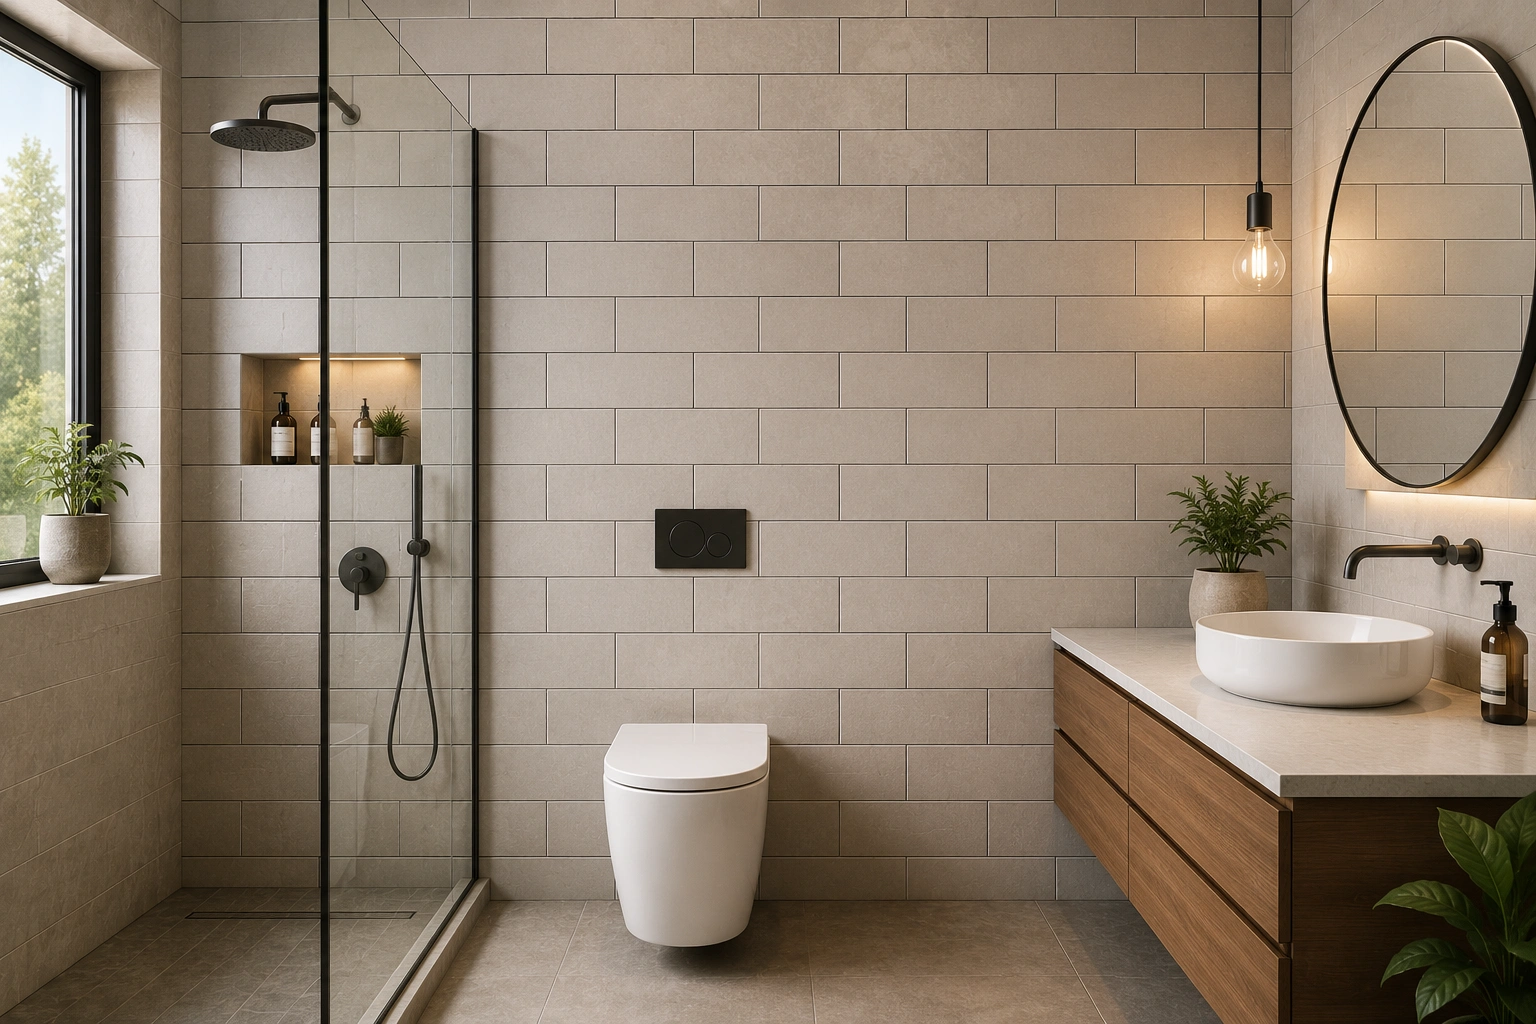
The brick bond, also called a running bond or offset pattern, is the most commonly used tile laying pattern in Indian bathrooms. Each row offsets the next by half the tile length, giving the same staggered look as a brick wall.
It works well because it breaks the rigid grid of a straight stack without adding the difficulty of an angled layout. The eye reads movement without the room feeling busy. On a plain white or beige wall, brick bond gives the tile a sense of structure that a straight grid sometimes lacks.
Brick bond suits rectangular tiles naturally. A 12x24 wall tile laid in horizontal brick bond is the default look for most mid-range bathroom renovations in cities like Pune, Jaipur, and Hyderabad. The offset is typically one-third or one-half the tile length. A one-third offset (called a running bond) is slightly more formal, while a half offset is closer to the classic brick look.
Wastage is around 10 per cent above the measured area. Labour runs at the standard rate for wall tiling because no angled cuts are needed in the field, only at edges.
Herringbone Pattern: Character With a Cost

Herringbone is the layout that gets the most Instagram attention in bathroom renovation posts. It takes rectangular tiles and arranges them in a V-shaped zigzag, with each tile placed at 90 degrees to the next. The result is a pattern with visible movement and depth, which is why it stands out on a plain wall or floor.
The pattern works best as a feature wall rather than across all four bathroom walls. One herringbone wall behind the basin or shower gives the room a focal point. If all four walls carry the pattern, the effect becomes visually heavy in a compact bathroom.
Herringbone is often confused with chevron. They look similar at a glance, but they are different patterns. In a herringbone layout, standard rectangular tiles meet end-to-side at 90 degrees, producing the zigzag from straight pieces. In a chevron layout, each tile is cut at a 45-degree angle so the ends meet in a clear,n continuous V-shape. Chevron needs tiles cut to a specific angle or purpose-made tiles, which raises the cost further. Most Indian contractors offer herringbone; true chevron is less common.
The real catch with herringbone is wastage and labour. Every tile at the pattern edge needs an angled cut. In a typical bathroom, that can mean 30 to 50 per cent of the tiles require cutting, compared to 10 to 15 per cent for a brick bond. Budget 15 to 20 per cent extra tiles above your measured area. Labour often costs 20 to 30 per cent more per sq. ft. than a standard horizontal laying rate.
In Indian market terms, if your standard wall-tiling labour runs ₹45 per sq. ft., expect to pay ₹55 to ₹65 per sq. ft. for herringbone on the same wall. For a 150 sq. ft. feature wall, that difference is roughly ₹1,500 to ₹3,000 in labour alone.
Stack Bond Pattern: Clean, Fast and Modern
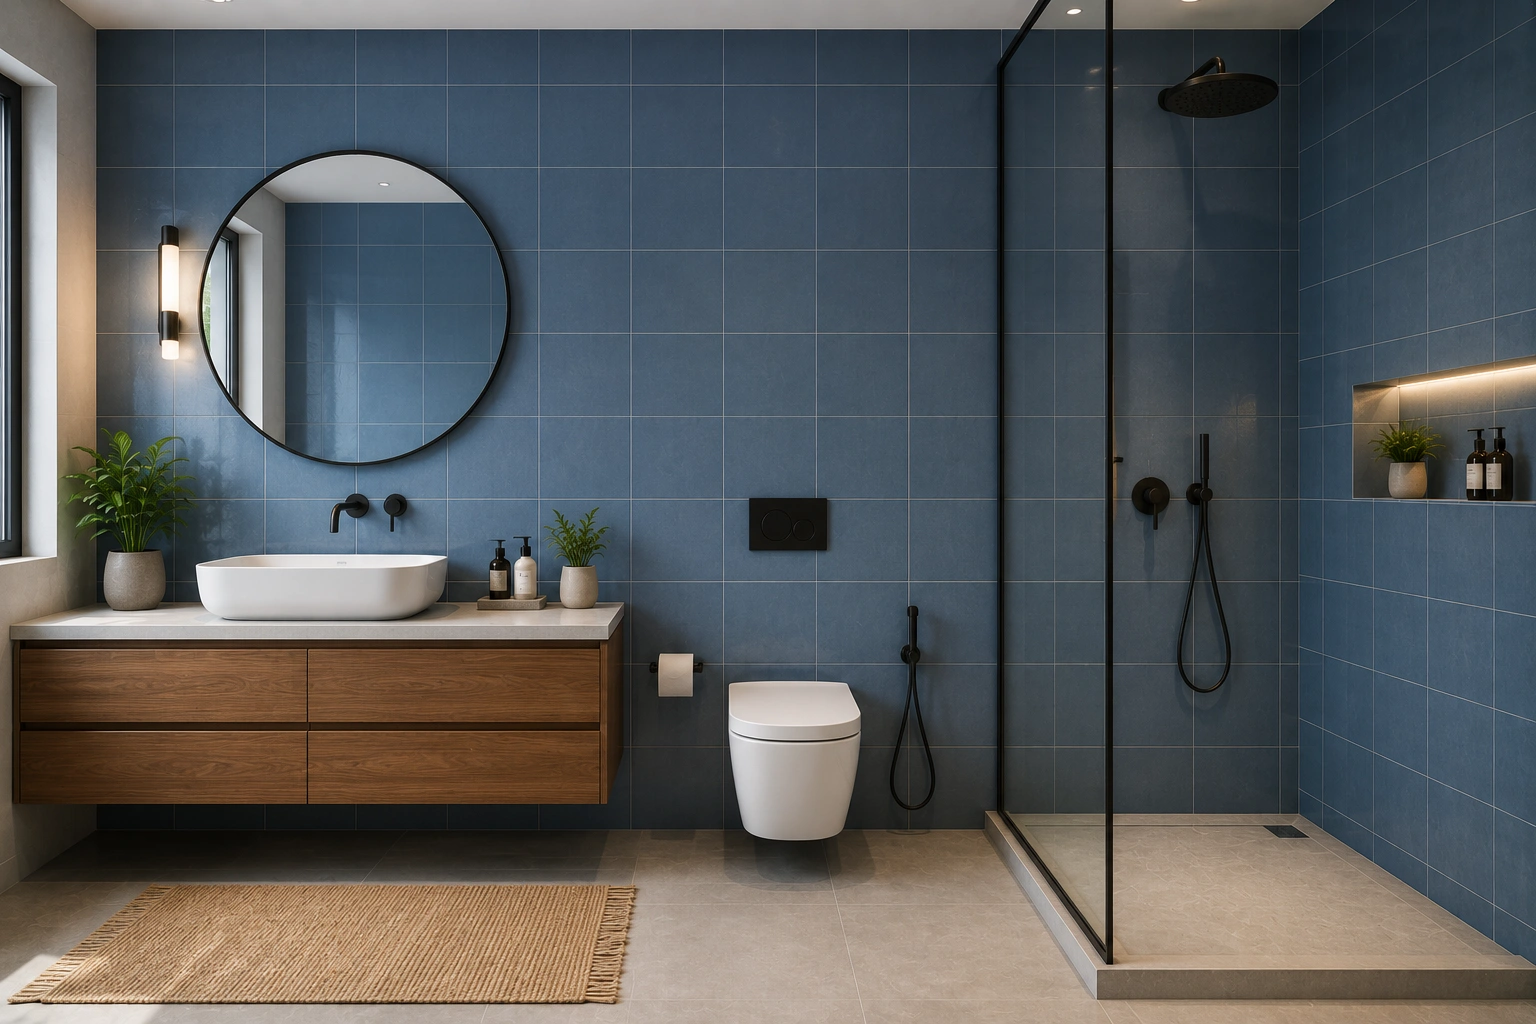
The stack bond, or straight stack, lines every tile up in a precise vertical and horizontal grid. Each tile sits directly above and beside its neighbour, with no offset. The result is a clean, disciplined look that suits large-format tiles and minimal bathrooms.
Stack bond is the fastest pattern to lay and produces the least wastage, usually around 5 to 7 per cent above the measured area. This makes it the lowest-cost layout option in terms of labour and material. Contractors also prefer it for large-format tiles like 2x4 GVT, because keeping big tiles aligned in a grid is simpler than managing offsets with heavy pieces.
The one risk with stack bond is the grout line. All vertical and horizontal joints run in perfect, continuous lines across the wall. If the tiles are even slightly out of square, those continuous lines expose the error. A skilled contractor can handle this, but it requires careful laser-level alignment from the first row.
Stack bond suits the clean look that many younger urban homeowners in Mumbai and Bangalore are choosing for master bathrooms in 2026: large tile, minimal grout, monochrome palette. The look is spare and intentional.
Vertical Stack Layout: The Space Stretcher
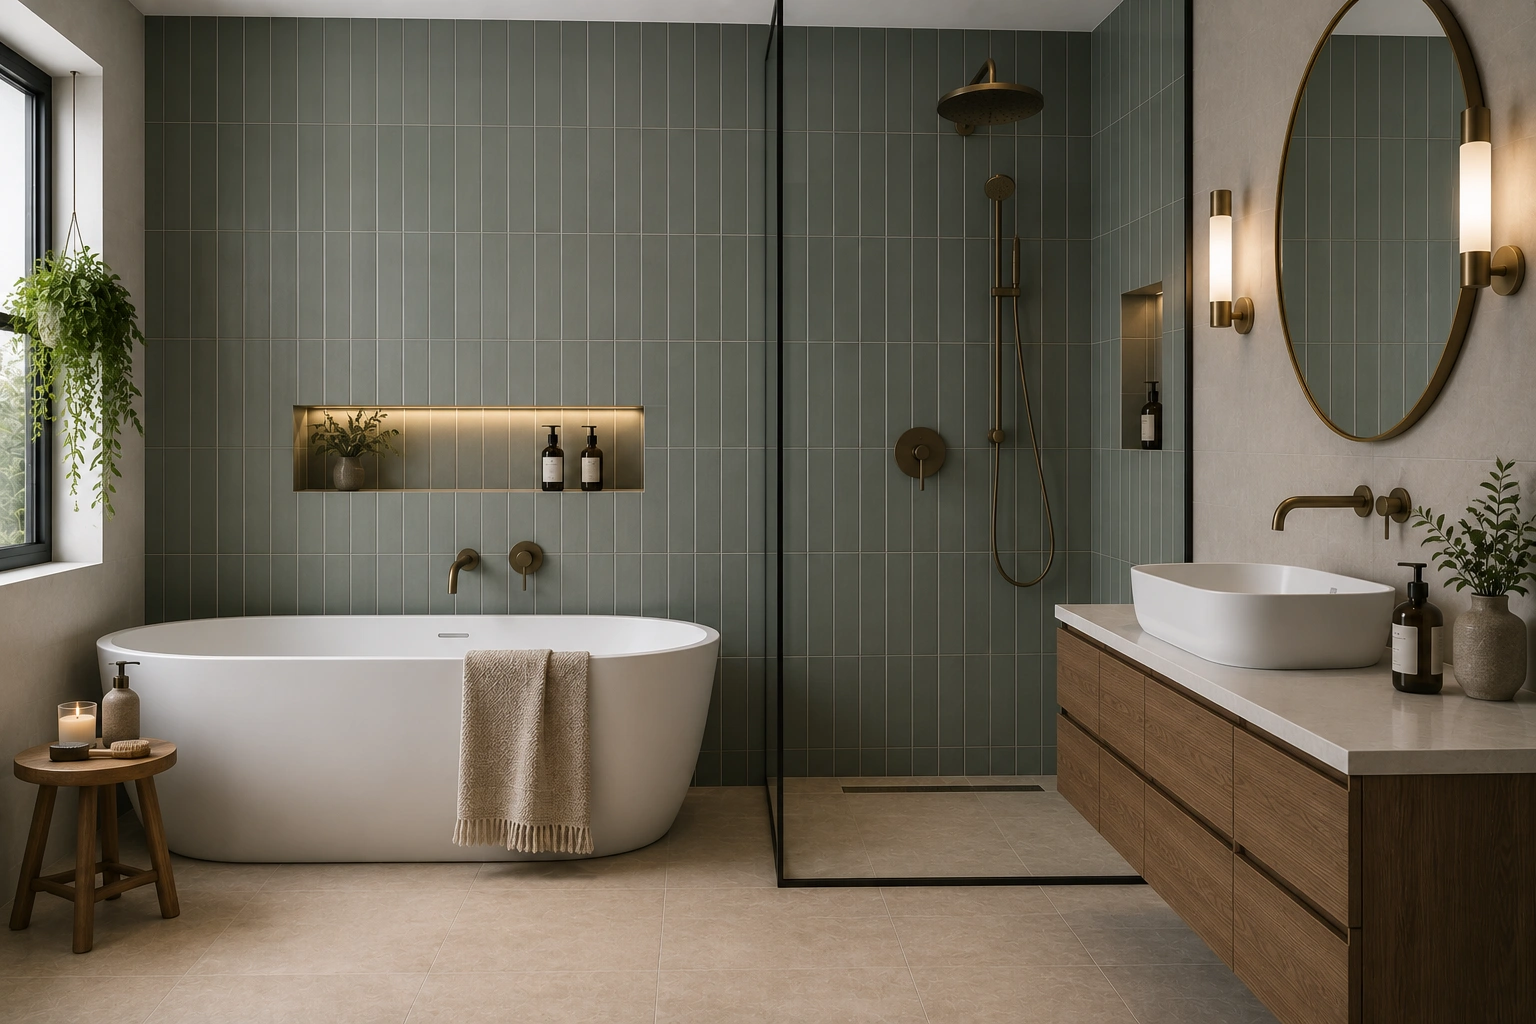
A vertical stack is the same as a stack bond, but with the tile turned 90 degrees. The long axis of the tile now runs top-to-bottom rather than left-to-right. The visual effect is immediate: the eye follows the vertical lines upward, and the ceiling appears higher.
This is the single most effective low-cost trick for compact Indian bathrooms with low or standard 9 ft. ceilings. A 12x24 ceramic wall tile laid horizontally in a brick bond reads as wide and stable. The same tile, standing vertically in a stack layout, reads as tall and open.
Vertical stack works especially well in 1BHK bathrooms where the ceiling height is limited, and the floor plan is tight. The upward movement the pattern creates makes the room feel less compressed without spending more on tile or finishing.
Wastage and labour rates are the same as a horizontal stack bond, around 5 to 7 per cent material buffer and standard laying charges. The only added requirement is that the first tile must be set perfectly plumb from the bottom, because any lean in the starting row becomes visible across the whole wall.
Diagonal Layout: Honourable Mention for Floors
The diagonal layout rotates square tiles 45 degrees so each tile sits as a diamond on the floor. It visually widens narrow bathrooms because the eye follows the diagonal line across the widest part of the room rather than the shorter wall-to-wall distance.
The cost is high. Diagonal laying produces large triangular offcuts at every wall edge, and virtually every perimeter tile needs a 45-degree cut. Wastage runs 15 to 20 per cent above the area, matching herringbone. Labour also rises by a similar amount. For this reason, diagonal is more popular in drawing rooms and large bathrooms than in compact 1BHK spaces, where the cost-to-effect ratio is less favourable.
Diagonal suits square tiles rather than rectangular ones. A 2x2 tile in a light beige on a diagonal floor with a slightly darker grout creates a classic look that has stayed popular in Indian homes for decades.
Pattern Comparison: Wastage, Labour and Difficulty
These figures are approximate and based on 2026 Indian market rates for a standard 150 sq. ft. bathroom wall. Actual rates vary by city, contractor, and tile size.
| Layout Pattern | Extra Tile Needed | Labour vs. Straight Lay | Difficulty for Installer | Best Room Type |
| Stack Bond (horizontal) | 5 to 7 per cent | Base rate (e. Rs. 45 per sq. ft.) | Low | Large bathroom, modern look |
| Vertical Stack | 5 to 7 per cent | Base rate | Low to medium | Small bathroom, low ceiling |
| Brick Bond (running bond) | 8 to 10 per cent | Same or up to 10 per cent more | Low to medium | All bathroom types, most versatile |
| Herringbone | 15 to 20 per cent | 20 to 30per centt more | High | Feature wall, medium to large bathroom |
| Diagonal (floor) | 15 to 2 per cent | 20 to 25 per cent more | High | Drawing room floors, large bathrooms |
For a 150 sq. ft. bathroom wall at a tile rate of ₹80 per sq. ft., the material cost difference between a stack bond (5% buffer) and herringbone (18% buffer) is roughly ₹1,560 in tiles alone. Add the labour premium, and the same wall costs approximately ₹3,500 to ₹5,000 more in herringbone than in a straight stack.
Homeowners comparing different layouts should also review a Bathroom Renovation Cost Guide to understand how tile selection, labour charges, grout choices, and wastage percentages affect the overall project budget.
Which Pattern Works Best for Indian Bathroom Sizes
Indian flats vary enough that one pattern rarely wins across all situations. The size and shape of the bathroom, and whether it is a combined wet room or has a dry zone, both influence which layout makes the most sense.
| Bathroom Type | Recommended Pattern | Why It Works |
| Compact 1BHK (below 40 sq. ft.) | Vertical stack on walls | Draws the eye up, makes the room feel taller |
| Standard 2BHK common bathroom | Horizontal brick bond | Reliable, budget-friendly, suits any tile |
| 2BHK master bathroom with dry zone | Stack bond on walls, brick bond on floor | Clean, fast, low wastage across a larger area |
| Feature wall behind basin or shower | Herringbone | Adds depth and visual interest to one focused surface |
| Large bathroom in 3BHK or 4BHK | Herringbone or diagonal floor | Scale of the room supports the busier pattern |
A common approach in 2BHK master bathrooms is to use a simple vertical or horizontal stack on three plain walls, and then introduce a herringbone layout only on the fourth wall behind the fittings. The contrast between the plain walls and the patterned feature wall reads well without adding herringbone wastage across the full area.
Grout Colour and Joint Width by Pattern
The grout is as much a part of the pattern as the tile itself. In a herringbone layout, the grout lines are a key part of what makes the V-shape visible. A grout colour that matches the tile almost exactly makes the pattern subtle. A contrasting grout makes it bold and graphic.
For stack bond layouts where all joints run in continuous straight lines, a matching grout is usually the better choice. It reduces the visual impact of any minor alignment variation and keeps the surface looking calm.
Joint width also matters by pattern. Herringbone typically uses a narrower joint of 2 to 3 mm to keep the zigzag crisp. Brick bond tolerates a 3 to 5 mm joint. For large-format tiles in a stack bond, a 2 mm joint gives the slab-like appearance that is popular in modern bathrooms.
| Pattern | Recommended Grout Joint | Grout Colour Tip |
| Stack bond (large tile) | 2 mm | Match tile closely for a slab-like look |
| Vertical stack | 2 to 3 mm | Match tile to keep the upward lines clean |
| Brick bond | 3 to 5 mm | Slightly darker than tile works well on floors |
| Herringbone | 2 to 3 mm | Match for subtle effect, contrast for graphic impact |
On bathroom floors, a mid-tone grout is worth the extra thought. Bright white grout on a light floor looks fresh for the first few weeks and then greys quickly in hard-water cities like Chennai and Delhi. A grout one shade darker than the tile hides the daily mineral deposit and stays presentable far longer.
Tile Sizes That Work for Each Pattern
Not every tile size suits every pattern. The right pairing makes the pattern read clearly. The wrong one blurs it or wastes more material than necessary.
| Pattern | Recommended Tile Sizes | Notes |
| Brick bond (wall) | 12x24, 12x18 (wall only) | Rectangular tiles read the offset clearly |
| Herringbone (wall) | 12x24, 12x18 (wall only) | A longer tile makes the V-shape more visible |
| Stack bond (wall) | 2x4, 2x2, 12x24 (wall only) | Large-format tiles suit this layout best |
| Vertical stack (wall) | 12x24, 12x18 (wall only) | The long tile must run vertically, not horizontally |
| Herringbone (floor) | 1x1, 2x2 GVT | Smaller tiles create a finer, more detailed herringbone |
| Diagonal (floor) | 2x2, 20x20 GVT | Square tiles tile naturally into a diamond pattern |
A note on the 12x18 and 12x24 sizes: both are wall-only tiles and should not be used on bathroom floors, regardless of the pattern. For herringbone on a bathroom floor, use a floor-rated tile such as a 1x1 or 2x2 GVT with a matte or anti-skid finish.
Expert Tips Before Choosing a Pattern
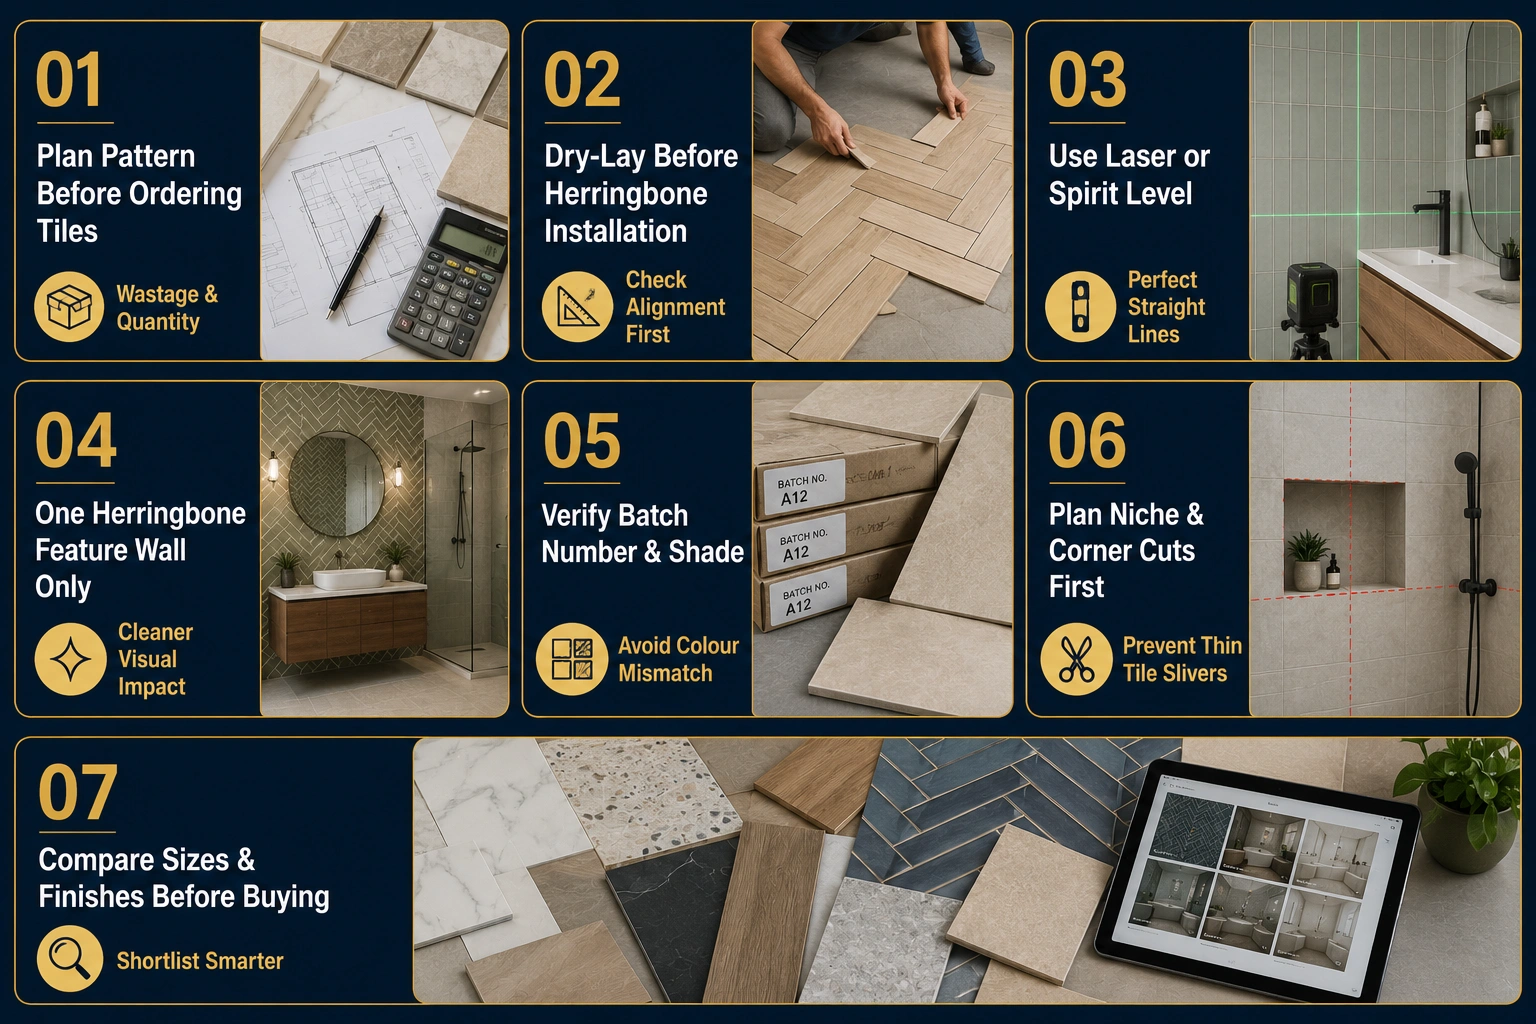
1. Decide the pattern before the tile order, not after. The pattern decides the wastage buffer, which changes how many boxes you need.
2. Ask your contractor to show you a dry-lay of the first few rows before committing to herringbone. A misaligned starting row in herringbone is hard to correct once the adhesive sets.
3. Use a spirit level or laser level from the first tile. Small drifts in a stack bond or vertical layout become clearly visible across a long wall.
4. Keep herringbone to one feature wall in a compact bathroom. The pattern costs more and looks best when it has space to read clearly against plain surrounding walls.
5. Always check the tile batch number and shade variation across boxes before laying starts. Pattern repetition in a herringbone layout makes any shade mismatch more obvious than it would be in a straight stack.
6. If your bathroom has awkward corners, alcoves, or a shower niche, get the contractor to plan the cuts on paper before starting. Pattern cuts around a niche can produce many short slivers unless the layout is planned from the centre outward.
7. Compare tile options and pattern inspirations across Indian suppliers on TilesFinders before visiting a single showroom. Knowing which sizes are available in your preferred finish narrows the pattern shortlist before the first tile is touched.
Common Mistakes When Choosing a Tile Layout Pattern
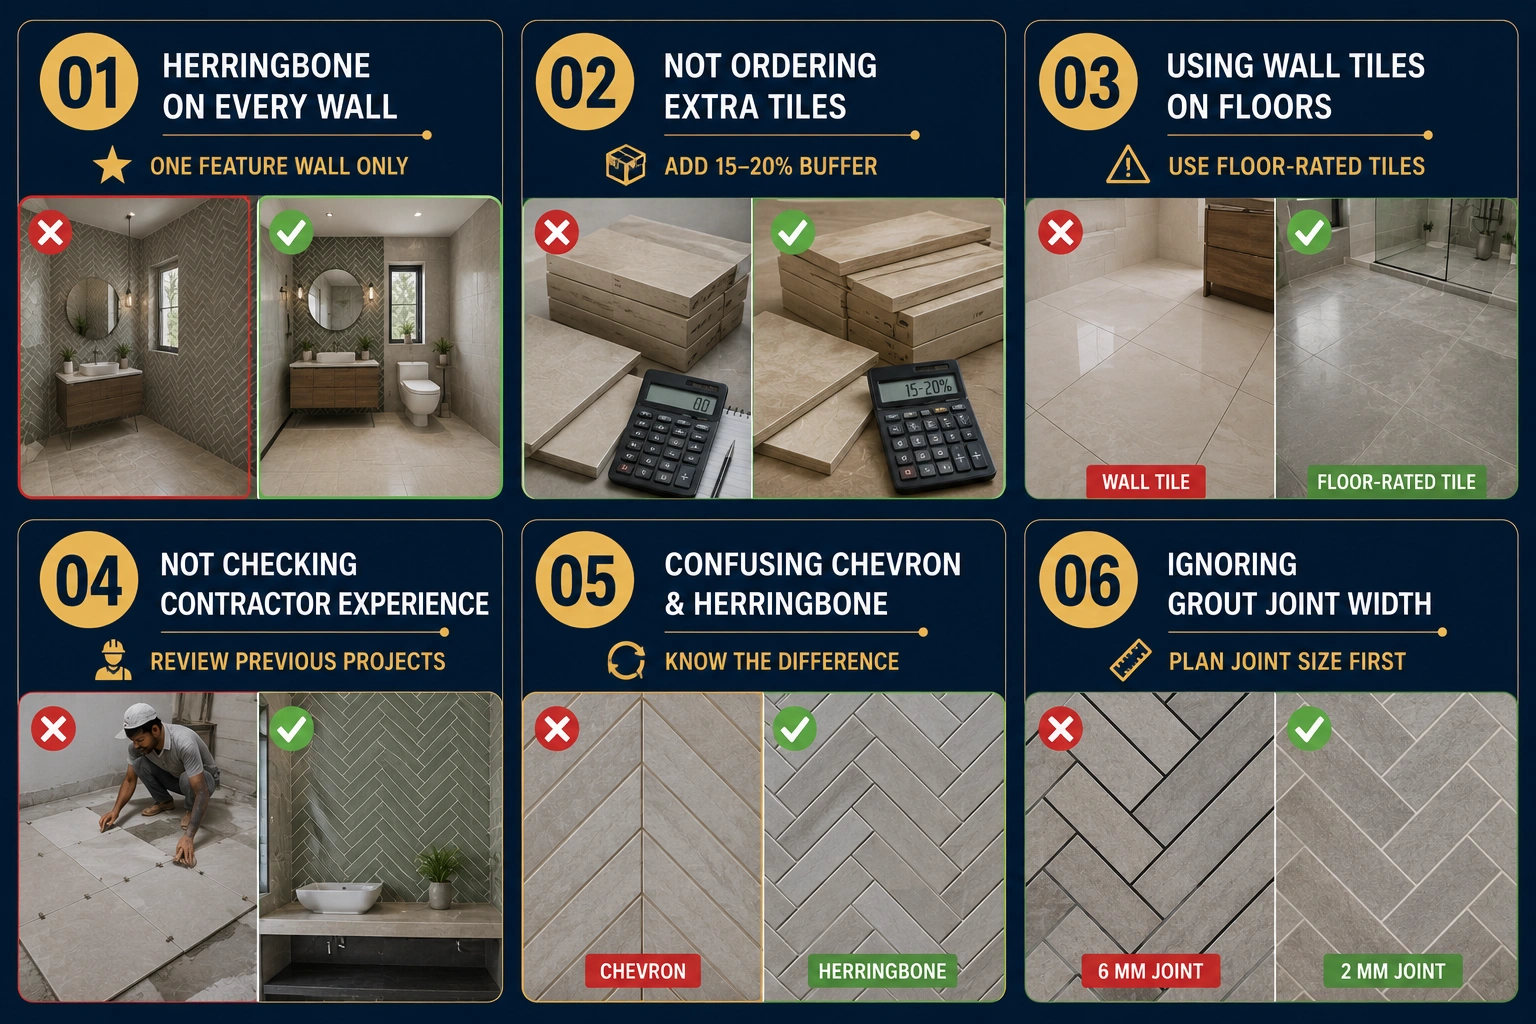
Picking herringbone for the whole bathroom. One feature wall in herringbone reads beautifully. All four walls in herringbone in a compact bathroom feel like a waiting room floor. Use the pattern where it has impact, and keep the rest simple.
Forgetting to increase the tile order for a complex pattern. A buyer who orders tiles for the measured area in square feet, then asks for herringbone on site, often runs short before the job is done. The extra 15 to 20 per cent buffer for herringbone or diagonal must be decided before the order is placed.
Using a wall-only tile size on the floor in a herringbone layout. The 12x18 and 12x24 sizes are wall tiles. Laying them on a bathroom floor in any pattern, including herringbone, is a technical error. The floor needs a proper floor-rated tile.
Not discussing the pattern with the contractorup frontt. Different contractors have different levels of comfort with complex patterns. A tiler who usually does straight lays in builder-finish projects may not have the experience to keep a herringbone layout aligned across a full bathroom. Check their previous work before confirming.
Confusing chevron with herringbone. A chevron pattern needs tiles with angled ends and is harder and more expensive to lay than herringbone. If your contractor quotes for chevron using standard rectangular tiles, they are likely planning to lay herringbone instead. Confirm which pattern you are actually getting.
Ignoring the grout joint width. A herringbone laid with 6 mm joints looks very different from one with 2 mm joints. Discuss the joint width with your contractor before work begins, not after the first few rows are set.
Bathroom Tile Pattern Planning Tips Before Finalising the Design
The pattern you choose for your bathroom will be visible every single day for the next decade or more. It makes sense to spend a little time on the decision before spending money at the showroom.
Before calling your contractor, settle on the pattern, the tile size that suits it, and whether you want one feature wall or the full room. Write down your bathroom dimensions and note which walls have fittings like the WC, basin, and shower, because those are where the tricky cuts happen.
You can browse tile options by size and finish across Indian suppliers on TilesFinders to compare what is available in the sizes that suit your chosen pattern. Having the tile shortlisted before the contractor visit makes for a much more focused conversation.
FAQs
Vertical stack is the most effective pattern for making a small bathroom feel taller. Laying rectangular tiles with the long edge running vertically pulls the eye upward and makes the ceiling feel higher. Diagonal on the floor also widens a narrow bathroom by drawing the eye across the longer diagonal instead of the shorter wall-to-wall span.
Yes, significantly more. A straight stack or brick bond needs a 5 to 10 per cent tile buffer above the measured area. A herringbone layout needs 15 to 20 per cent extra because every perimeter tile requires an angled cut that produces offcuts too small to reuse. Always increase your tile order before placing it, not after starting the work.
Yes, but only with a floor-rated tile. Use a 1x1 or 2x2 GVT with a matte or anti-skid finish for a bathroom floor herringbone. Never use 12x18 or 12x24 wall tiles on the floor, regardless of the pattern. The floor tile must carry a proper slip resistance rating for wet areas.
In herringbone, rectangular tiles are placed at 90 degrees to each other with the end of each tile meeting the side of the next, creating a zigzag from standard straight tiles. In chevron, each tile is cut at a 45-degree angle so the ends meet in a clear,n continuous V-shape. Chevron requires either purpose-made angled tiles or precision cutting, making it more expensive and less common in Indian bathrooms.
Stack bond (straight stack) has the lowest wastage at 5 to per cent above the area and is laid at the base labour rate. Brick bond is close behind at 8 to 10 per cent wastage with little or no labour premium. Both are significantly cheaper than herringbone or diagonal, which add 15 to 20 per cent in tile and 20 to 3per centnt in labour costs.
For wall herringbone, 12x18 or 12x24 ceramic or GVT wall tiles work well because the longer length makes the V-shape clearly visible. For floor herringbone, a 1x1 (300x300 mm) or 2x2 (600x600 mm) GVT in a matte anti-skid finish is the right choice. Larger floor tiles in herringbone can produce a very coarse pattern that reads awkwardly in a compact bathroom.
Both work well. Stack bond suits a 2BHK master bathroom that is being tiled with large-format 2x4 GVT tiles for a clean, slab-like look. Brick bond suits a standard mid-size bathroom with 12x24 wall tiles and gives the wall a little more structure than a plain grid without adding high cost or wastage.
See our tile guides first
Set TilesFinders as a preferred source and our buying guides surface ahead of the rest for you.
Add as preferred sourceTakes one tap. Nothing to install.
What Readers Say
I was about to redo my parking area with the wrong tile size until I read this. The layout comparisons saved me from a costly mistake.
We reference TilesFinders guides while briefing clients on material selection. The size and pattern breakdowns are accurate and easy to explain visually.
On site, I get asked about grout spacing all the time. This article gave me a solid reference I now share with my team before every job.
Finally a guide that doesn't just push generic advice. The oil stain removal steps actually worked on our clubhouse driveway tiles.
I run a small construction firm and now send this link to clients directly when they ask about entrance tile sizing. Saves me an hour of explaining.
Good practical detail, though I wish there were more examples for compact apartment entrances specifically, not just villas.
My mother-in-law wanted marble, I wanted vitrified. This blog gave us the neutral comparison we needed to actually decide together.
Detailed without being overwhelming. I appreciated that it covered both cost and maintenance, not just the aesthetics.
Used the algae and hard water removal tips on our terrace tiles after the monsoon. Worked better than what our regular cleaner was doing.
As someone who sources tiles for multiple builder projects, I find these comparisons genuinely useful for vendor conversations, not just consumer content.
Recommended this to a client who kept second-guessing the entrance design. The small vs large layout section settled the debate instantly.
Straightforward and honest, no unnecessary jargon. Would like to see a similar breakdown for outdoor pool-deck tiles next.
We've bookmarked several TilesFinders guides for our design handbook. Reliable source when clients want data, not just opinions.
Two paths, one marketplace.
Get free quotes from verified suppliers.
Share your room, budget, and style. Suppliers in Morbi respond within hours.
Get Free QuotesList your business, reach real buyers.
Put your showroom in front of homeowners searching for tiles right now.
List Your Business