1200x2400 Tile Installation: What Indian Contractors Must Know About Slab-Format Laying
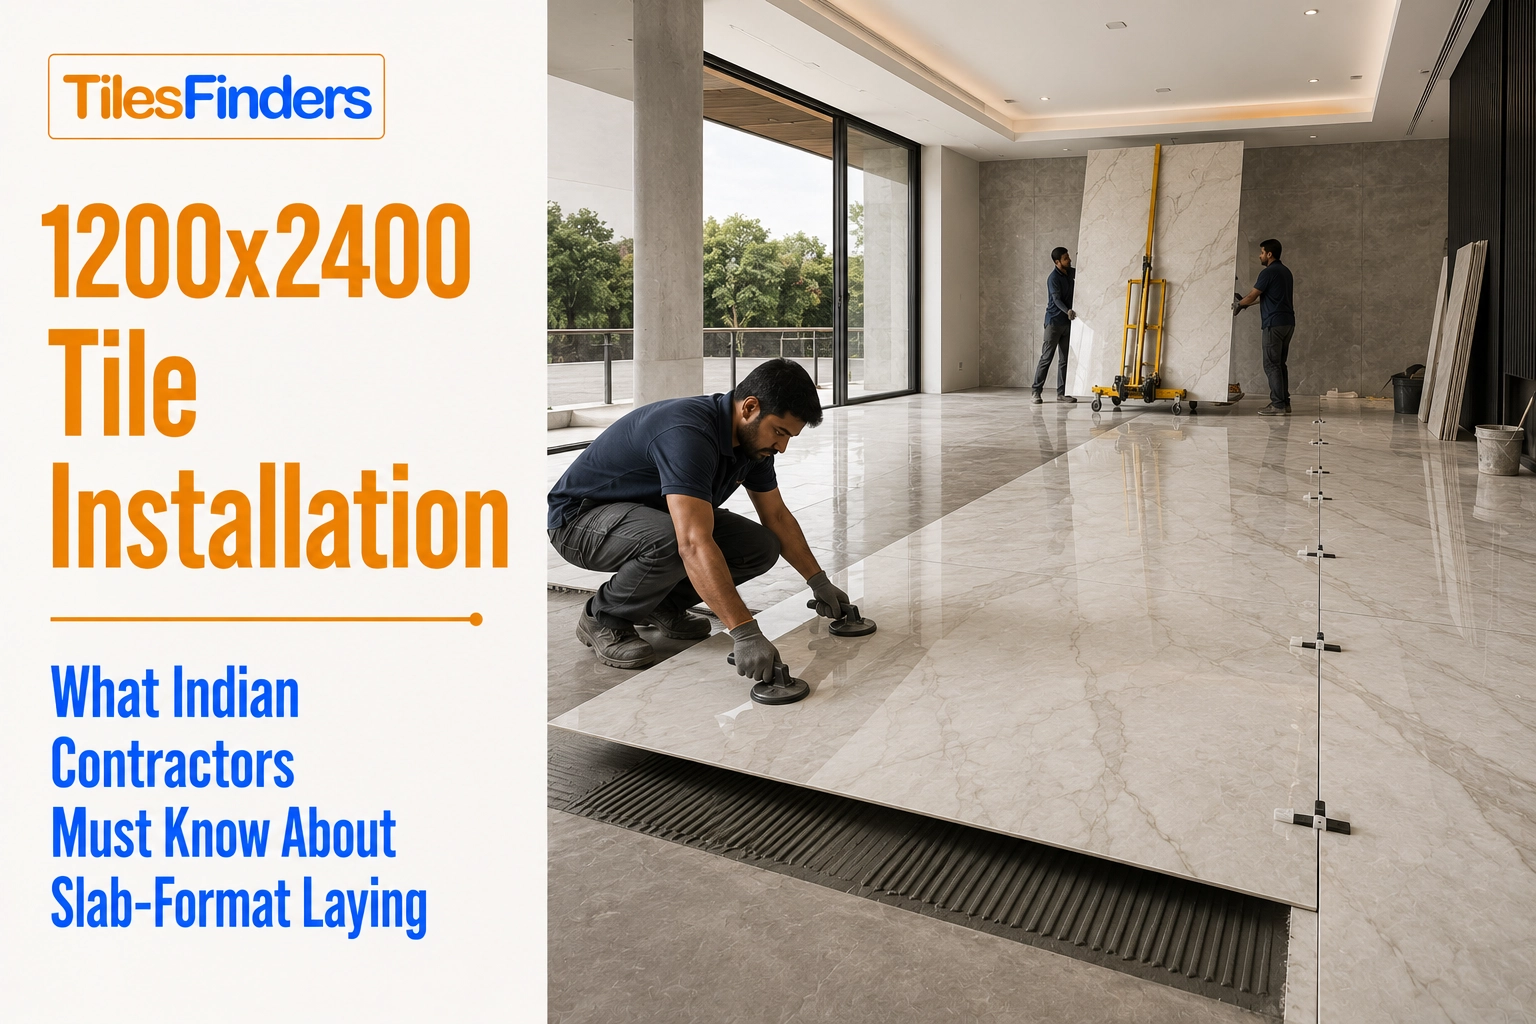
Installing 1200x2400 mm slab tiles is a different job from standard tile fixing, with stricter substrate flatness, full-bed adhesive, and specialist handling.
- Why 1200x2400 mm Slab Installation Is Not Standard Tile Work
- Substrate Preparation: The Most Critical Step
- Adhesive Selection for 1200x2400 mm Slab Tiles
- Handling, Lifting, and On-Site Movement
- Laying Sequence and Setting Out
- Cutting 1200x2400 mm Slabs: Equipment and Method
- Grouting 1200x2400 mm Slab Joints
- Quality Checkpoints at Every Stage
- The Five Most Common Slab Installation Failures in India and How to Avoid Them
- Slab-Format Installation Standards in Indian Construction
- Source 1200x2400 mm Slab Tiles from Verified Morbi Manufacturers
1200x2400 mm slab tiles need 95% full-bed adhesive, plus or minus 2 mm substrate flatness, and suction lifters, or Indian contractors risk cracked slabs.
Installing 1200x2400 mm tiles is a different job from installing standard-format tiles. The weight, span, substrate demands, and handling requirements of a full slab are outside the scope of standard tile-fixing training, and a contractor who applies standard tile-fixing methods to slab format will produce cracked slabs, visible lippage, and failed adhesive bonds within the first year.
This guide covers every installation variable that changes at slab format: substrate preparation, adhesive selection and application, handling equipment, laying sequence, joint specification, grouting, and quality checkpoints. It is written for experienced Indian tile fixers and contractors moving into slab-format work for the first time, and for project managers specifying large-format tile work on luxury residential and commercial sites.
Why 1200x2400 mm Slab Installation Is Not Standard Tile Work
The key difference is that a standard tile installation manages small units across a large area. A slab installation manages large units where each tile occupies 31 sq ft of floor or wall, and every placement decision affects a much larger visual and structural zone than a standard tile.
| Variable | Standard Tile (600x1200 mm) | Slab Format (1200x2400 mm) |
| Weight per unit | 22 to 26 kg. One person can carry and position. | 65 to 85 kg. Cannot be safely moved or positioned by hand without lifting equipment. |
| Number of tiles per 1,000 sq.ft | 130 to 140 tiles | 32 to 33 tiles |
| Adhesive coverage required | Minimum 80% back coverage for residential floor use. | Minimum 95% full-bed coverage mandatory. Partial coverage creates hollow spots that cause cracking under point load. |
| Substrate flatness tolerance | ±3 mm over 2 m is acceptable. | ±2 mm over 2 m is mandatory. Beyond this, flex stress on the slab during and after installation causes fracture. |
| Placement error correction window | A tile can be repositioned within 15 to 20 minutes of adhesive contact. | A slab can be repositioned within 5 to 10 minutes, depending on the adhesive type. After this, the slab must be lifted, the adhesive bed stripped, and the process restarted. |
| Breakage risk | Low. A single cracked tile is a local event. | High if handled incorrectly. A cracked slab mid-installation is a large-area setback requiring replacement material with a 4 to 8 week lead time. |
| Lippage visibility | Slight lippage at tile edges reads as textural variation at normal viewing distances. | Lippage at slab joints is amplified by the flat tile surface and matte finish. Even 0.5 mm lippage reads as a defect at normal viewing distance on a large slab floor. |
Before planning a slab installation, it's important to understand where 1200×2400 mm tiles are most suitable. Our 1200×2400 Slab Guide explains slab sizes, applications, finishes, structural requirements, pricing, and the key considerations for using large-format tiles in luxury Indian interiors.
Substrate Preparation: The Most Critical Step
More slab-format installation failures in India begin at substrate preparation than at any other stage. A substrate that would produce an acceptable result with 600x600 mm tiles will fail with 1200x2400 mm slabs.
Flatness Testing
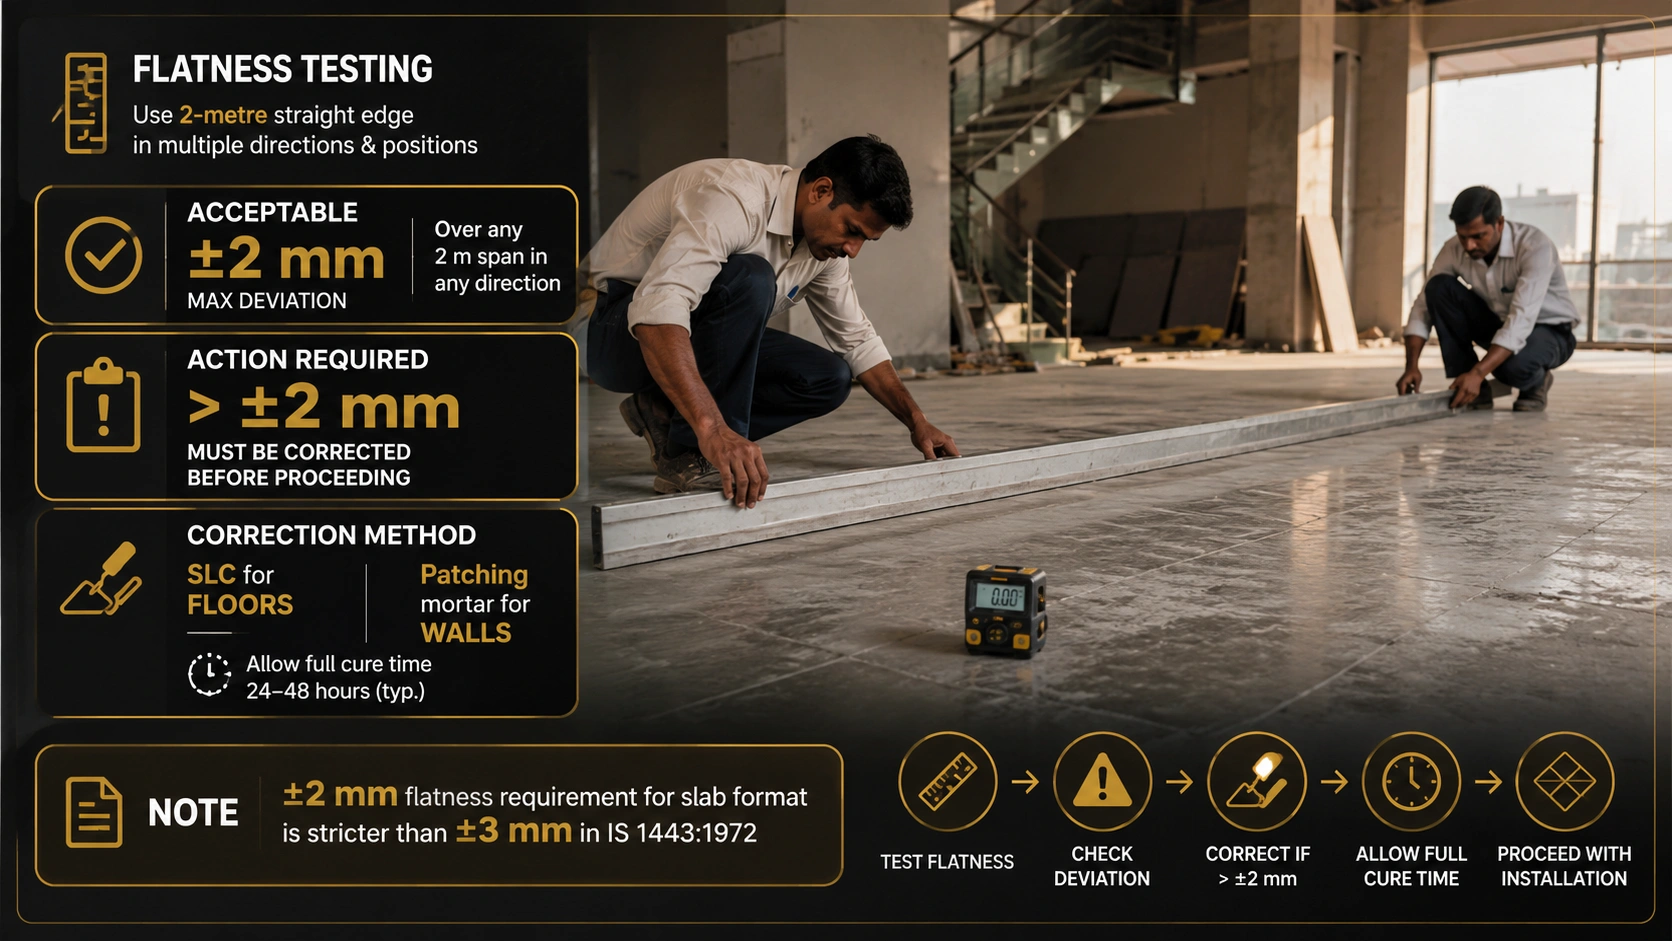
Before any adhesive is applied, the substrate flatness must be tested and documented. Use a 2-metre straight edge placed in multiple directions across the floor and in multiple positions across the wall. Record the maximum deviation at every position.
- Acceptable: Maximum ±2 mm deviation over any 2 m span in any direction.
- Action required: Any reading above ±2 mm must be corrected before proceeding. Do not proceed with slab installation over a non-flat substrate.
- Correction method: Self-leveling compound (SLC) for floors. Patching mortar for walls. Allow full cure time per manufacturer specification before adhesive application, typically 24 to 48 hours for SLC, depending on the product.
Note: The ±2 mm flatness requirement for slab format is stricter than the ±3 mm that IS 1443:1972 specifies for standard tile installation in India. When writing a specification document or site quality plan for a 1200x2400 mm installation, use ±2 mm as the project standard and note this explicitly, as the standard tile tolerance may be what the contractor or site supervisor defaults to if not specified.
Substrate Type and Condition
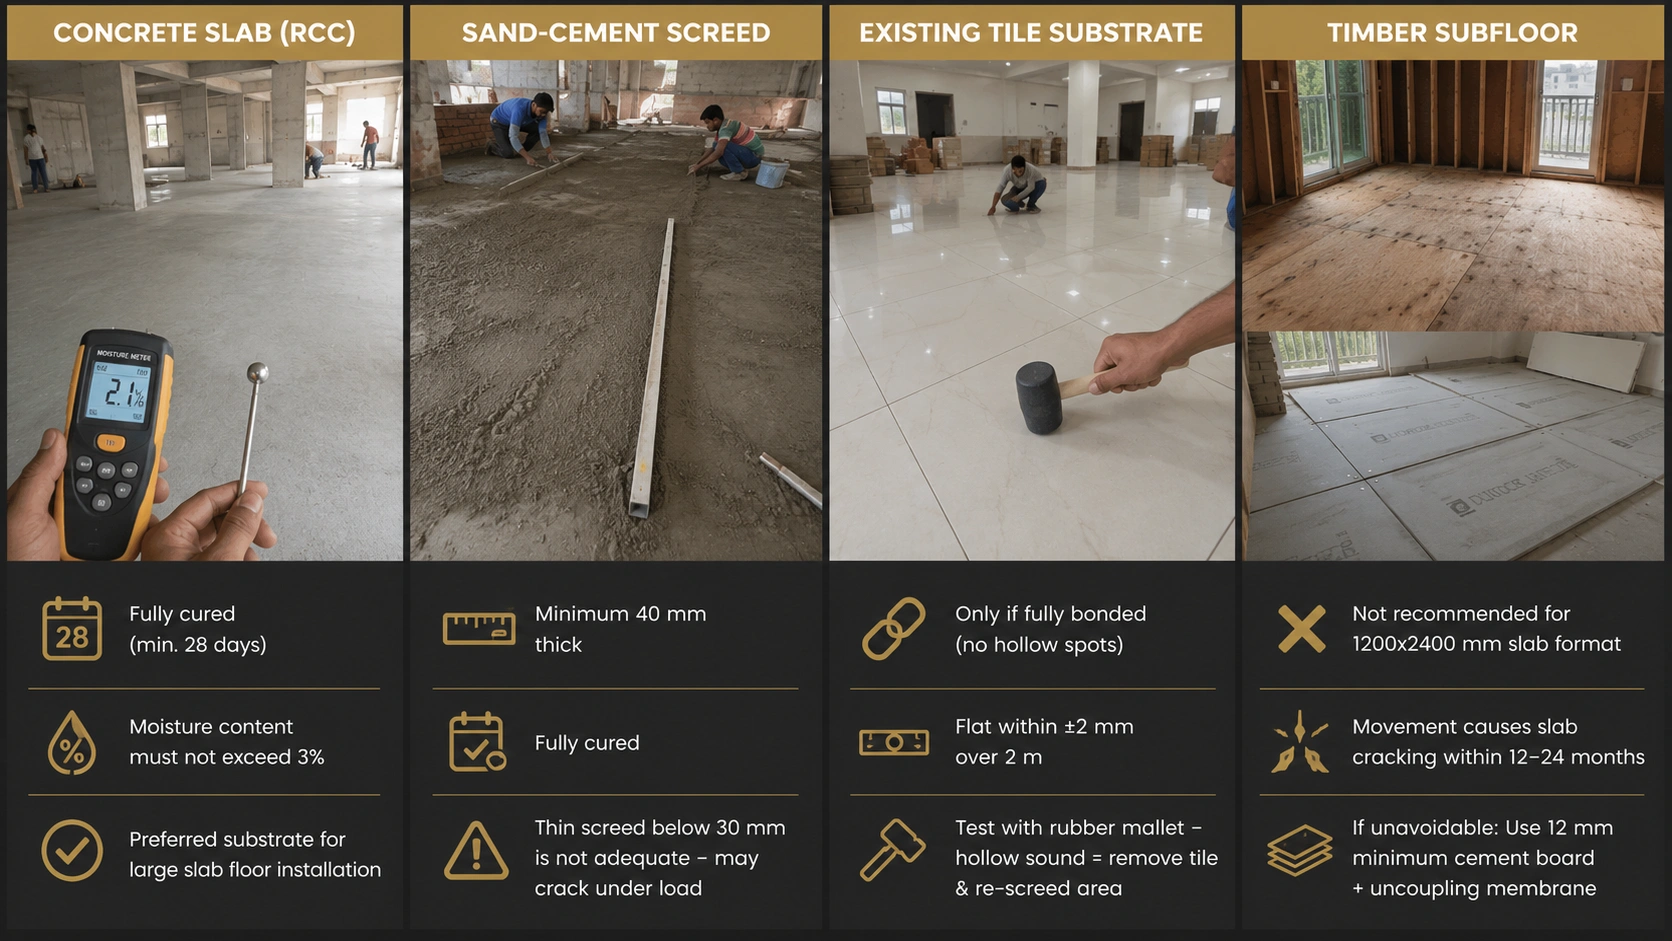
- Concrete slab (RCC): Preferred substrate for large slab floor installation. Must be fully cured (minimum 28 days). Moisture content must not exceed 3% before adhesive application. Test with a moisture meter; do not estimate.
- Sand-cement screed: Acceptable substrate if minimum 40 mm thick and fully cured. Thin screed below 30 mm is not an adequate base for 65 to 85 kg slab units and may crack under the combined dead load.
- Existing tile substrate: A slab can be laid over an existing tiled floor only if the existing tile is fully bonded (no hollow spots), flat within ±2 mm over 2 m, and the floor height gain from the additional tile and adhesive layer is structurally and architecturally acceptable. Test with a rubber mallet: any hollow sound indicates a debonded tile that must be removed and the area re-screeded before slab installation proceeds.
- Timber subfloor: Not recommended for 1200x2400 mm slab format in Indian residential construction. Timber subfloors in Indian buildings have significantly more flex and movement than concrete, and this movement causes slab cracking at the adhesive bond layer within 12 to 24 months. Specify a rigid cement board overlay of a minimum 12 mm if a timber substrate cannot be avoided, and use an uncoupling membrane under the adhesive.
Substrate Priming
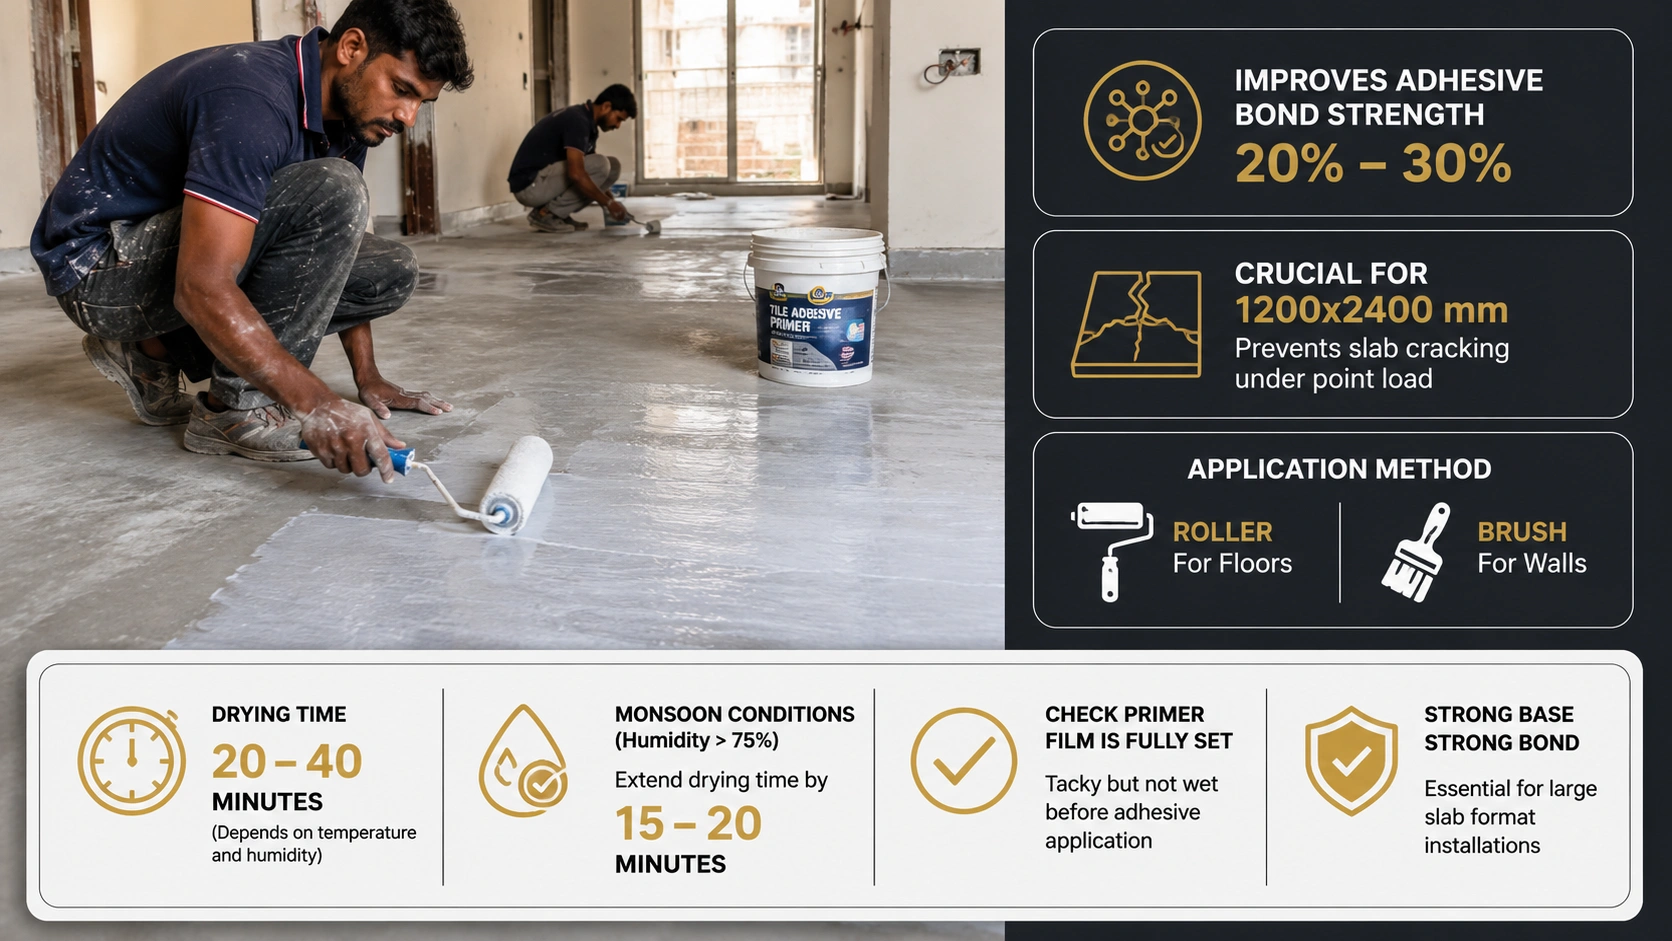
All concrete and screed substrates must be primed with a tile adhesive primer (acrylic or SBR-based) before adhesive application. Primer improves adhesive bond strength by 20 to 30% and is particularly important for the 1200x2400 mm format, where bond failure on even a small percentage of the tile back coverage can lead to slab cracking under point load.
Pro tip: Apply primer with a roller for floor substrates and a brush for wall substrates. Allow primer to dry to a tacky but not wet state before adhesive application, typically 20 to 40 minutes depending on ambient temperature and humidity. In Indian monsoon conditions with ambient humidity above 75%, extend the primer drying time by 15 to 20 minutes and check that the primer film is fully set before beginning adhesive application.
Adhesive Selection for 1200x2400 mm Slab Tiles
Standard tile adhesive is not the correct product for 1200x2400 mm slab installation. The adhesive must be selected specifically for large-format and heavy-tile applications.
| Adhesive Type | Suitable for 1200x2400 mm? | When to Use | Indian Market Availability |
| Standard C1 cementitious adhesive | No. Insufficient open time, bond strength below the requirement for slab weight. | Standard tile formats only. | Widely available. Not for slab use. |
| C2 improved cementitious adhesive. | Yes, for floor use with supplementary back-buttering. Open time is 30 to 45 minutes. | Floor installations where the substrate is fully flat and primed. Cost-effective for large residential floor areas. | Available from Laticrete, Ardex, Weber, and Mapei in India. |
| C2TE improved cementitious adhesive with extended open time | Yes. The T (thixotropic) property prevents slippage on walls; E (extended) gives 45 to 60 minutes open time. | Floor and wall installations. Preferred specification for slab format due to the extended positioning window before the adhesive skins over. | Available from Laticrete, Ardex, and Weber in India. |
| Epoxy adhesive (two-part) | Yes, for specific high-performance applications. Bond strength exceeds all cementitious options. | Chemical-resistant environments, pools, and heavy commercial floors where substrate movement is a concern. Significantly higher cost and shorter working time. | Available from Laticrete, Ardex, and Mapei. Specialist contractor application required. |
| Polymer-modified ready-mix adhesive | Not recommended for floor slab use. Inadequate compressive strength under the slab dead load. | Wall cladding only, and only where the wall substrate is perfectly flat. | Widely available but not appropriate for large-format floor work. |
Spec to confirm: Ask any adhesive supplier for the maximum tile size and tile weight the product is tested and rated for, not just whether it 'works for large format tiles'. C2TE adhesive from a reputable manufacturer will carry a documented maximum tile size and weight in its TDS. If the product TDS does not list these values, the product has not been tested for slab-format use and should not be specified.
Adhesive Application Method: Full-Bed with Back-Buttering
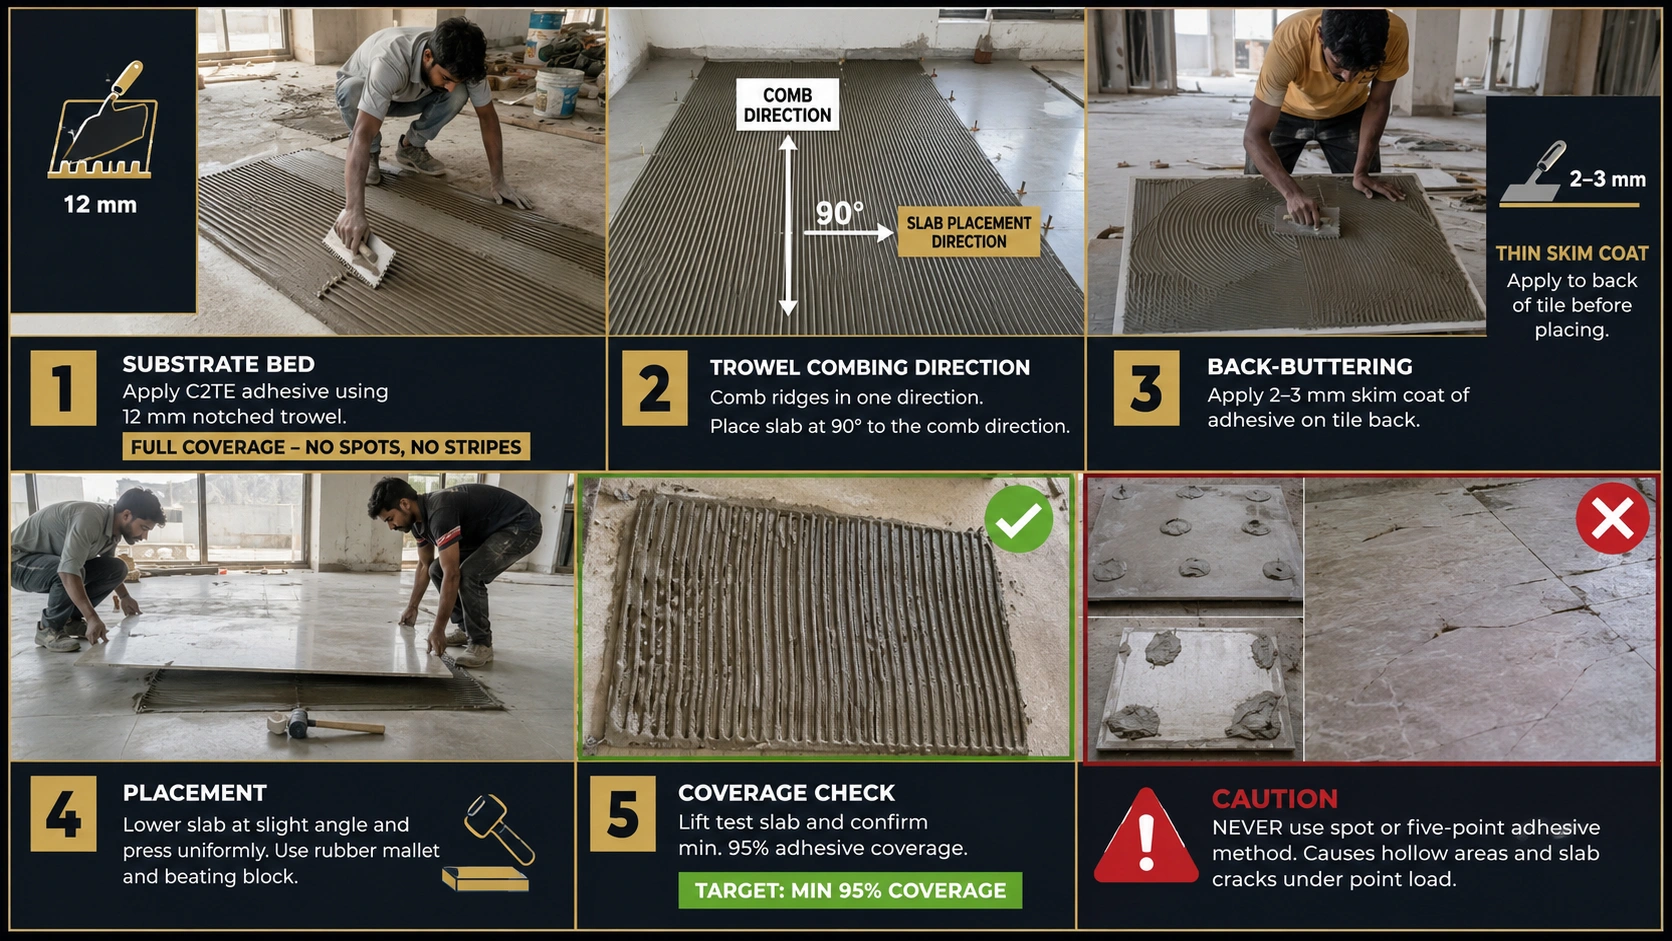
The adhesive application method for 1200x2400 mm slab tiles is full-bed with back-buttering. This means adhesive is applied to both the substrate and the back of the tile.
1. Substrate bed: Apply C2TE adhesive to the substrate using a 12 mm notched trowel. Coverage must be uniform across the full area. Do not apply adhesive in spots or stripes.
2. Trowel combing direction: Comb the adhesive ridges in a single consistent direction across the entire floor. When the slab is placed, it should be slid at 90 degrees to the comb direction to collapse the ridges and fill the valleys, achieving full coverage.
3. Back-buttering: Apply a thin skim coat (2 to 3 mm) of the same adhesive to the back of the tile using a flat trowel before placing. This fills any surface irregularities in the tile back and maximises contact area between tile and substrate bed.
4. Placement: Lower the slab onto the adhesive bed at a slight angle and press down uniformly across the full tile surface. Use a rubber mallet and beating block - never a direct metal hammer blow - to set the slab into the adhesive.
5. Coverage check: Lift one slab from a test placement before setting the full floor to confirm adhesive coverage. The target is a minimum 95% of the tile back covered in adhesive. Any dry or partially covered areas indicate the trowel size or bed depth needs adjustment.
Caution: Never use a spot or five-point (dot and four corners) adhesive application method for 1200x2400 mm slab tiles. This method, which is used by inexperienced fixers to save adhesive cost and time, leaves large hollow areas under the slab. Under the point load of furniture legs, trolley wheels, or even high-heel footwear, a partially bonded slab cracks at the unsupported hollow zones. Full-bed coverage is not optional for this format.
Handling, Lifting, and On-Site Movement
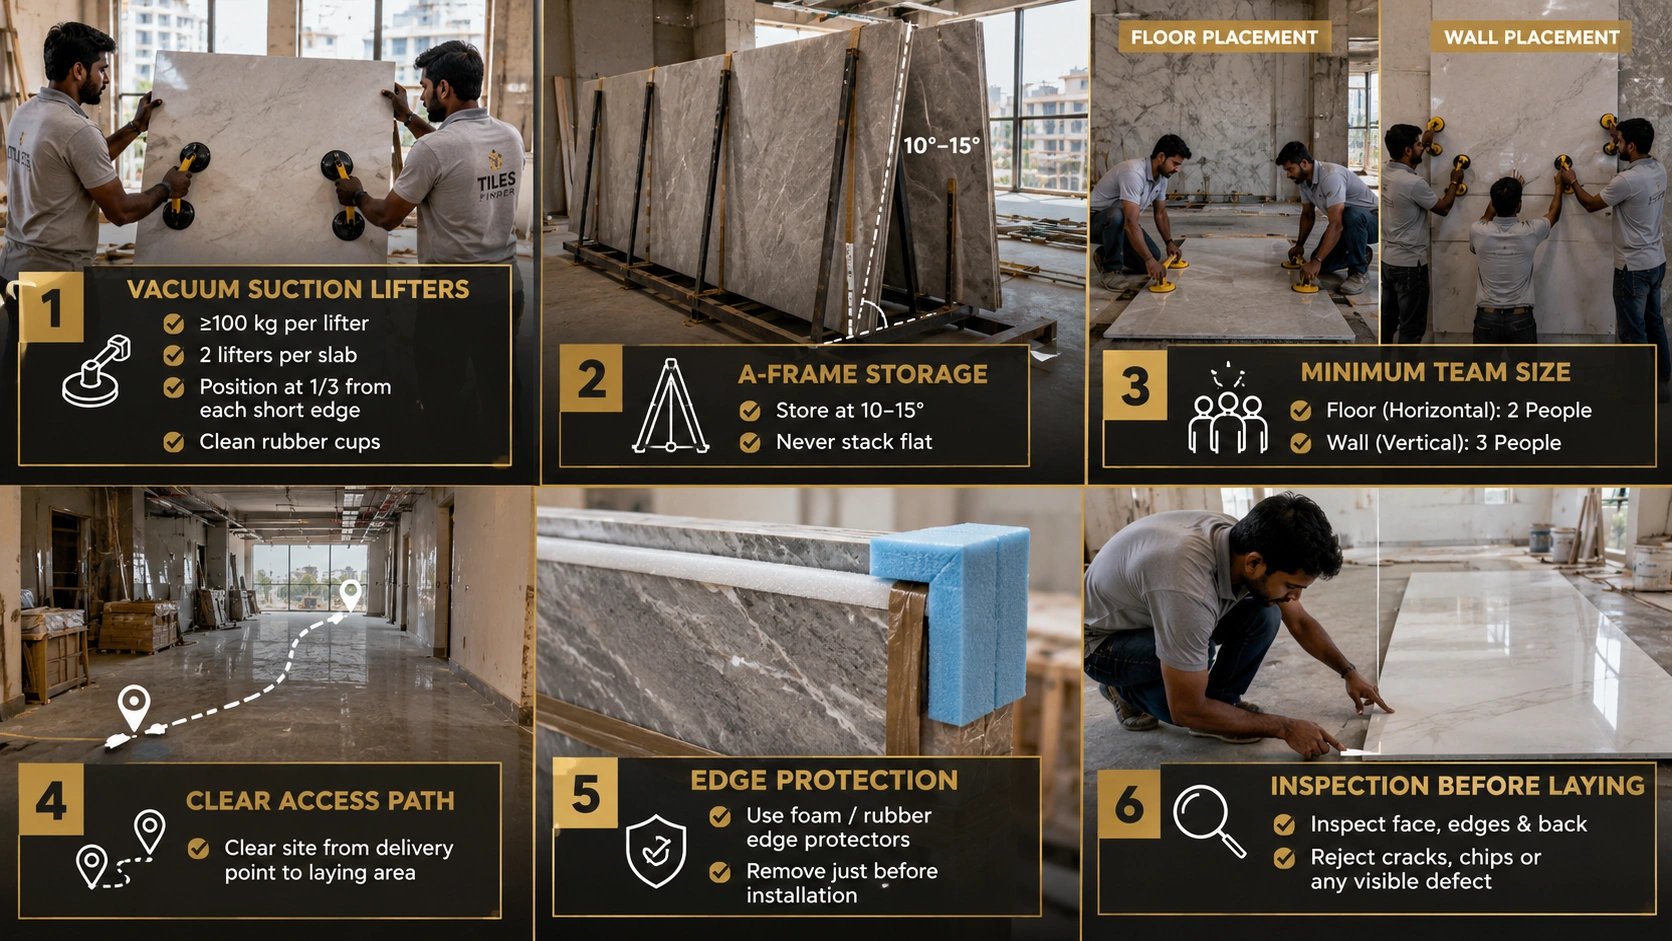
On-site breakage is the most expensive installation failure in slab-format tile work. A 1200x2400 mm slab that breaks during handling represents lost material cost, a 4 to 8 week replacement lead time, and potential project delay. Safe handling protocol is the single most cost-effective investment in a slab-format project.
- Vacuum suction lifters: Rated for a minimum of 100 kg per lifter, two lifters per slab minimum. The lifters should be placed approximately one-third from each short edge of the slab, not at the centre. Confirm the lifter rubber cups are clean and undamaged before each use; a contaminated cup seal reduces suction strength and increases drop risk.
- A-frame transport: Slabs should be stored and transported on-site in an A-frame rack leaning at 10 to 15 degrees from vertical, never laid flat on top of each other. Flat stacking applies uneven pressure across the slab body and causes cracking, particularly at the centre of a stack.
- Minimum team size: Two people for horizontal (floor) slab placement. Three people for vertical (wall) slab placement. The third person stabilises the slab while the other two operate the suction lifters and guide the tile into position.
- Site access path: Clear the installation site of all obstructions from the delivery point to the laying area before the first slab is moved. A slab being carried on suction lifters cannot be easily redirected mid-path if an obstacle is encountered.
- Edge protection: All slab edges are vulnerable to chipping during handling. Transport slabs with foam or rubber edge protectors on all four sides. Remove protectors immediately before installation, not before transport.
- Inspection before laying: Inspect each slab face, edges, and back before installation. Any crack, chip, or defect visible before laying must be rejected. Once a defective slab is installed, the cost of removal, substrate repair, and replacement significantly exceeds the cost of rejecting it before placement.
Laying Sequence and Setting Out
Setting out for 1200x2400 mm tiles requires more planning than standard tile work because each error or misalignment at this scale is visible across a much larger area, and correcting a misaligned slab requires significant rework.
Dry Layout Before Any Adhesive
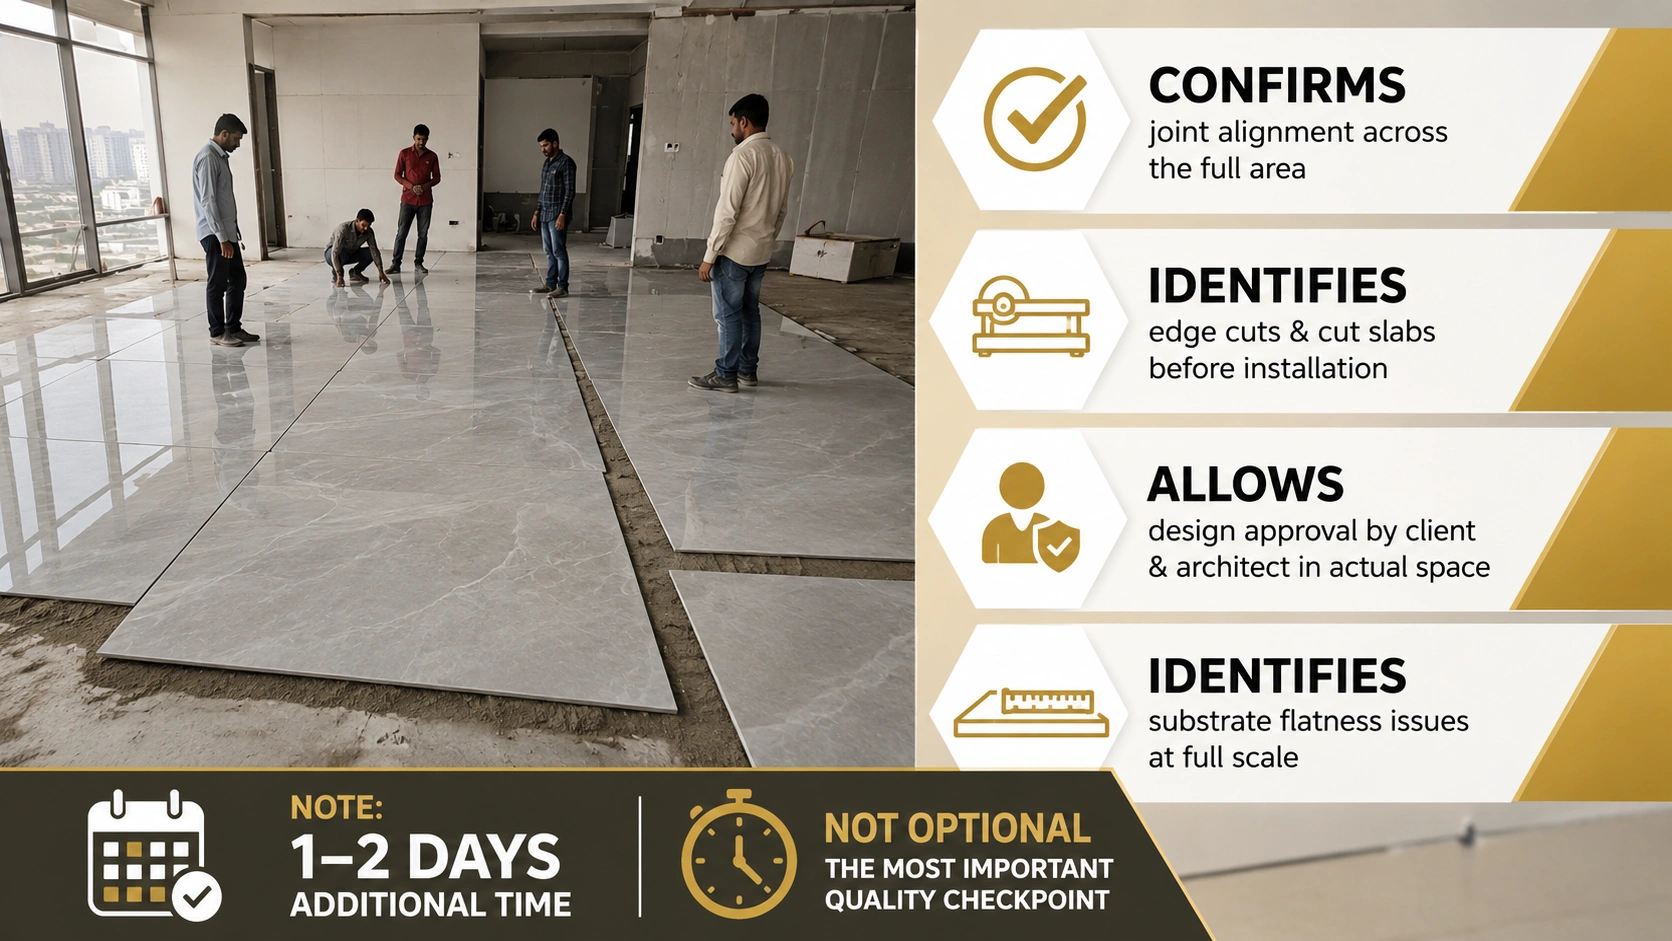
A full dry layout, placing all slabs without adhesive in their intended positions, is mandatory for any 1200x2400 mm installation above 200 sq.ft. The dry layout:
- Confirms the joint alignment is correct across the full floor or wall area.
- Identifies edge cuts and reveals where cut slabs will fall, allowing cut pieces to be sent to the cutting facility before installation begins.
- Allows the design to be confirmed by the client and architect in the actual space before irreversible adhesive work begins.
- Identifies any substrate flatness issues that became visible only at full scale, which the initial straight-edge testing may have missed at tile boundaries.
Note: The dry layout adds one to two days to the installation timeline on a large-floor project. This is not optional time that can be recovered by skipping the dry layout; it is the single most effective quality checkpoint in the entire slab installation process and should be built into the project programme.
Once the installation process is planned, the next step is selecting the right slab design. Explore our 1200×2400 Design Ideas featuring 15+ premium marble, concrete, wood, onyx, and solid-colour slab styles for luxury Indian living rooms, bedrooms, bathrooms, and feature walls.
Setting Out from the Centre
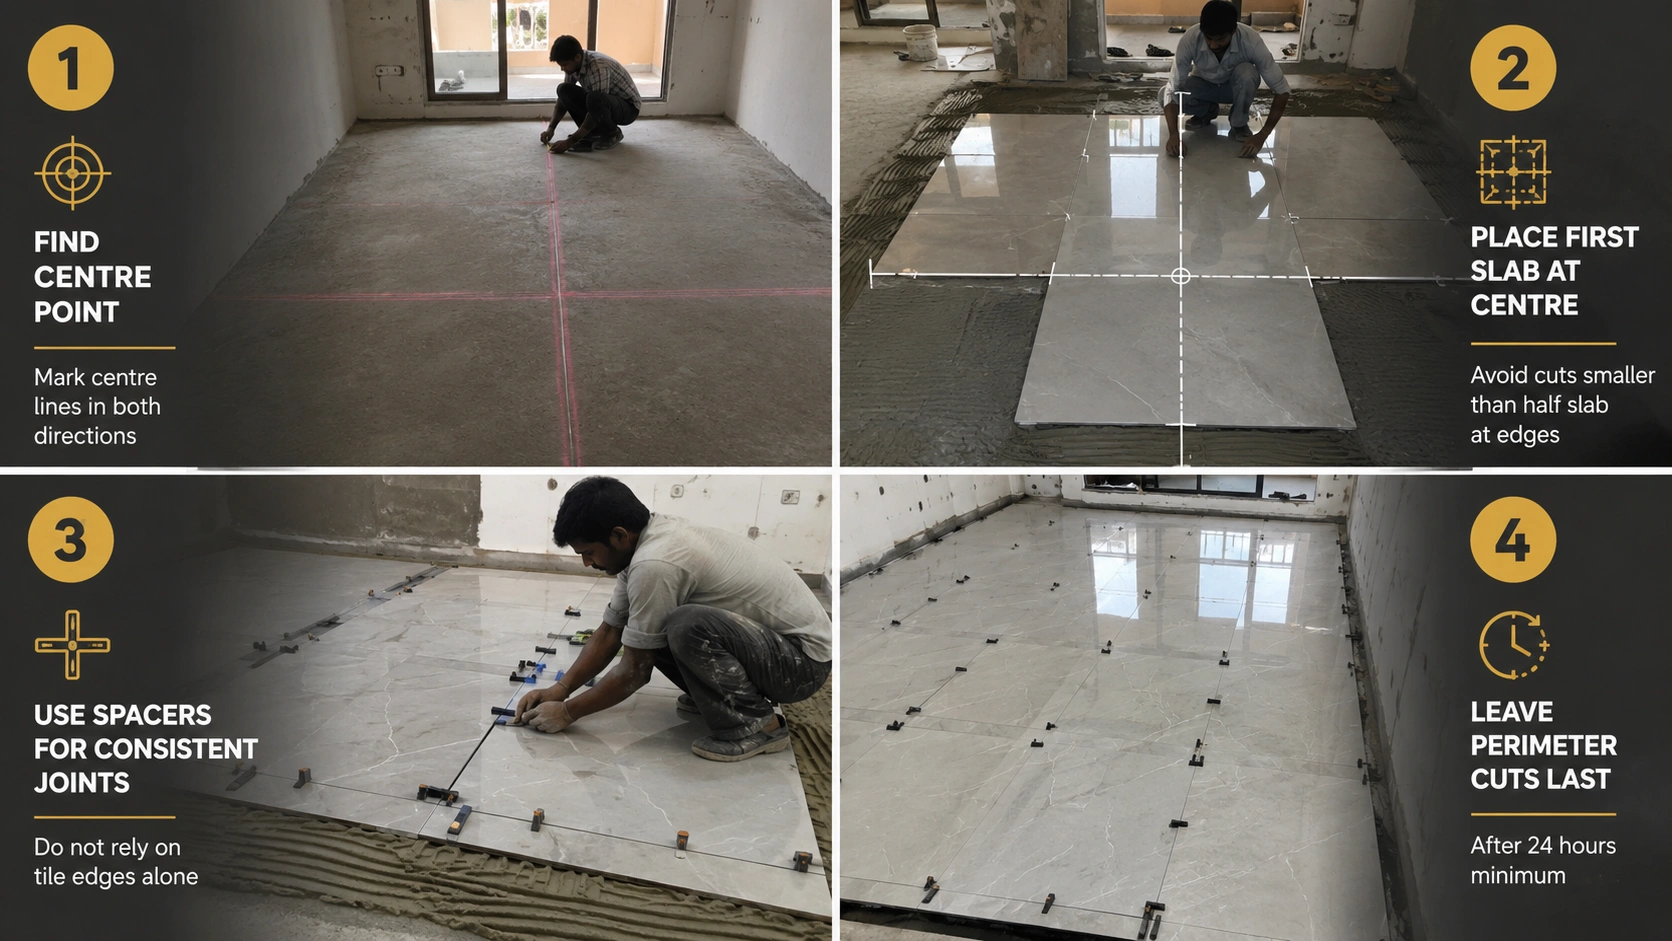
1. Find the centre point of the room or wall area. Mark the centre lines in both directions using chalk lines.
2. Position the first slab at the centre, or at a central alignment grid point that produces the most balanced cut at the perimeter. Avoid cuts smaller than half a slab width at the room edges, as narrow cuts on a slab this size are difficult to achieve cleanly and read as awkward at the perimeter.
3. Work outward from the centre in all directions. Place each slab using spacers or wedge spacers to maintain a consistent joint width. Do not rely on the tile edges alone to set the joint; slab-format tiles have a calibration tolerance of ±0.3 to ±0.5 mm, and the joint spacers compensate for this variation.
4. Leave all perimeter cuts until the field tiles are fully set and the adhesive has cured for a minimum of 24 hours. This prevents perimeter slab placement from disturbing the positioning of the main field.
Joint Width
| Joint Width | Acceptable For | Notes |
| 1.5 mm | Not recommended for a 1200x2400 mm slab. This is the minimum for 800x1600 mm. | At 1200x2400 mm, a 1.5 mm joint does not allow adequate thermal expansion and increases lippage visibility. |
| 2 mm | Minimum acceptable joint width for 1200x2400 mm interior floor use. | Standard specification for residential slab-format floors in controlled-climate Indian interiors (air-conditioned throughout). |
| 3 mm | Recommended for 1200x2400 mm in non-air-conditioned Indian interiors and all outdoor applications. | Wider joint accommodates greater thermal movement from India's seasonal temperature range. |
| 4 to 5 mm | Acceptable for commercial floors with heavy traffic and outdoor covered areas. | A wider joint reduces lippage visibility risk but increases grout maintenance area. |
Cutting 1200x2400 mm Slabs: Equipment and Method
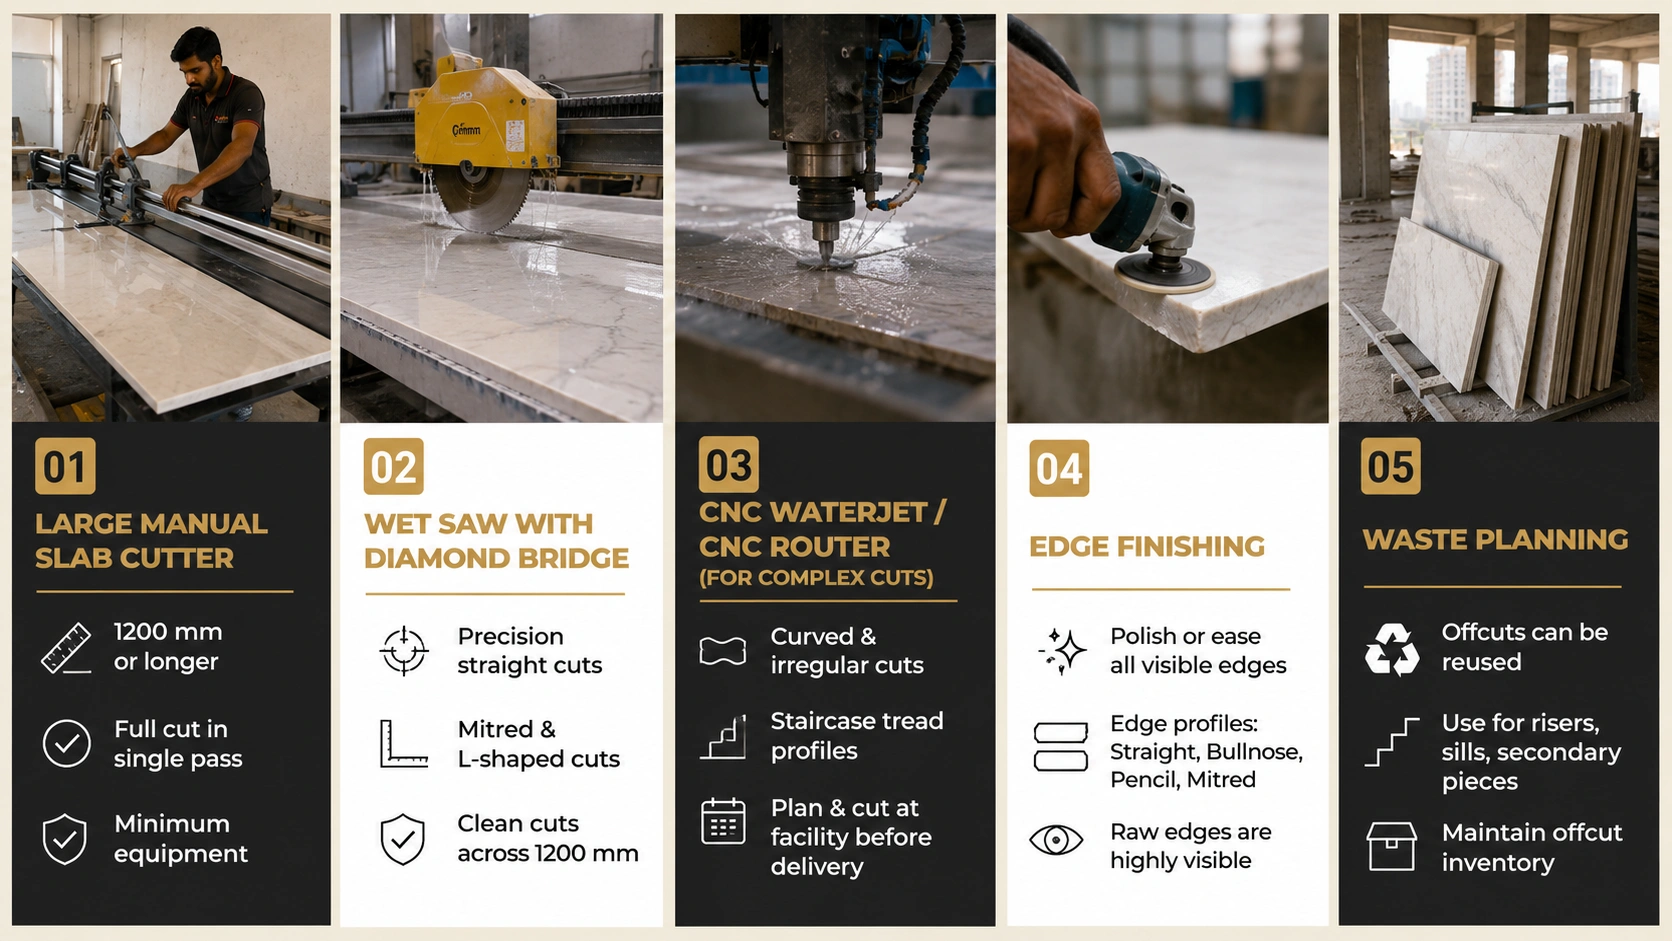
Cutting a 1200x2400 mm slab on-site with standard tile tools produces inaccurate cuts, edge chipping, and a high breakage rate. All cutting for this format must be approached differently from standard tile work.
- Large manual slab cutter: A heavy-duty manual tile cutter rated for 1200 mm or longer cuts (not a standard 600 mm or 800 mm cutter) is the minimum equipment for straight cuts on a slab-format tile. The cutter must be long enough to complete the full cut in a single pass without repositioning.
- Wet saw with diamond bridge: A bridge-type wet saw with a long cutting rail is the correct tool for precision straight cuts, mitred edges, and L-shaped cuts. A standard table wet saw with a short rail cannot make a clean cut across a 1200 mm dimension without repositioning, which produces a visible step at the repositioning point.
- CNC waterjet or CNC router (for complex cuts): Curved cuts, irregular shapes, and staircase tread profiles cut from a 1200x2400 mm slab require a CNC cutting facility, not on-site equipment. All complex cuts must be measured, planned, and sent to a cutting facility before the slab is delivered to the site, as the slab cannot be safely sent back to a facility once it is on a busy construction site.
- Edge finishing: All cut edges that will be visible (countertop edges, slab ends exposed at doorways, staircase nose edges) must be polished or eased after cutting. A raw saw-cut edge on a slab format is visually prominent at this scale. Specify the edge profile in the cutting plan: straight polish, bullnose, pencil edge, or mitred for waterfall applications.
- Waste planning: A 1200x2400 mm slab cut for a staircase tread or countertop edge produces offcuts that are large enough to use for other elements in the project. Maintain an offcut inventory during the project and use offcuts for risers, window sills, or secondary cut pieces before ordering additional material.
Grouting 1200x2400 mm Slab Joints
Grouting slab-format tiles requires a grout product and method matched to the narrow joint width and the large tile surface area.
| Grout Type | Suitable for 1200x2400 mm? | Joint Width | Stain Resistance | Recommended Use |
| Standard cementitious grout (CG1/CG2) | Acceptable for matte finish slabs only. Not for polished or GHR finish, where grout haze is harder to remove. | 2 mm and above | Low to medium. Requires sealing for kitchen and bathroom use. | Residential floor and wall joints in matte slab applications. |
| Epoxy grout (RG) | Yes. Best specification for large-format slab joints. | 2 mm and above | High. Non-porous. No sealing required. | Kitchen countertops, bathroom floors, all wet areas, and any application where joint staining is a concern. |
| Sanded cementitious grout | Not recommended for 1200x2400 mm joints below 3 mm. Sand particle size creates visible joint texture at narrow widths. | 3 mm and above only | Medium. Requires sealing. | Wider joints in outdoor or commercial slab applications. |
| Unsanded cementitious grout | Yes, for 2 to 3 mm joints on matte slab only. | 2 to 3 mm | Low. Requires sealing for wet areas. | Residential matte slab floor joints only. |
Grouting Method for Large Slab
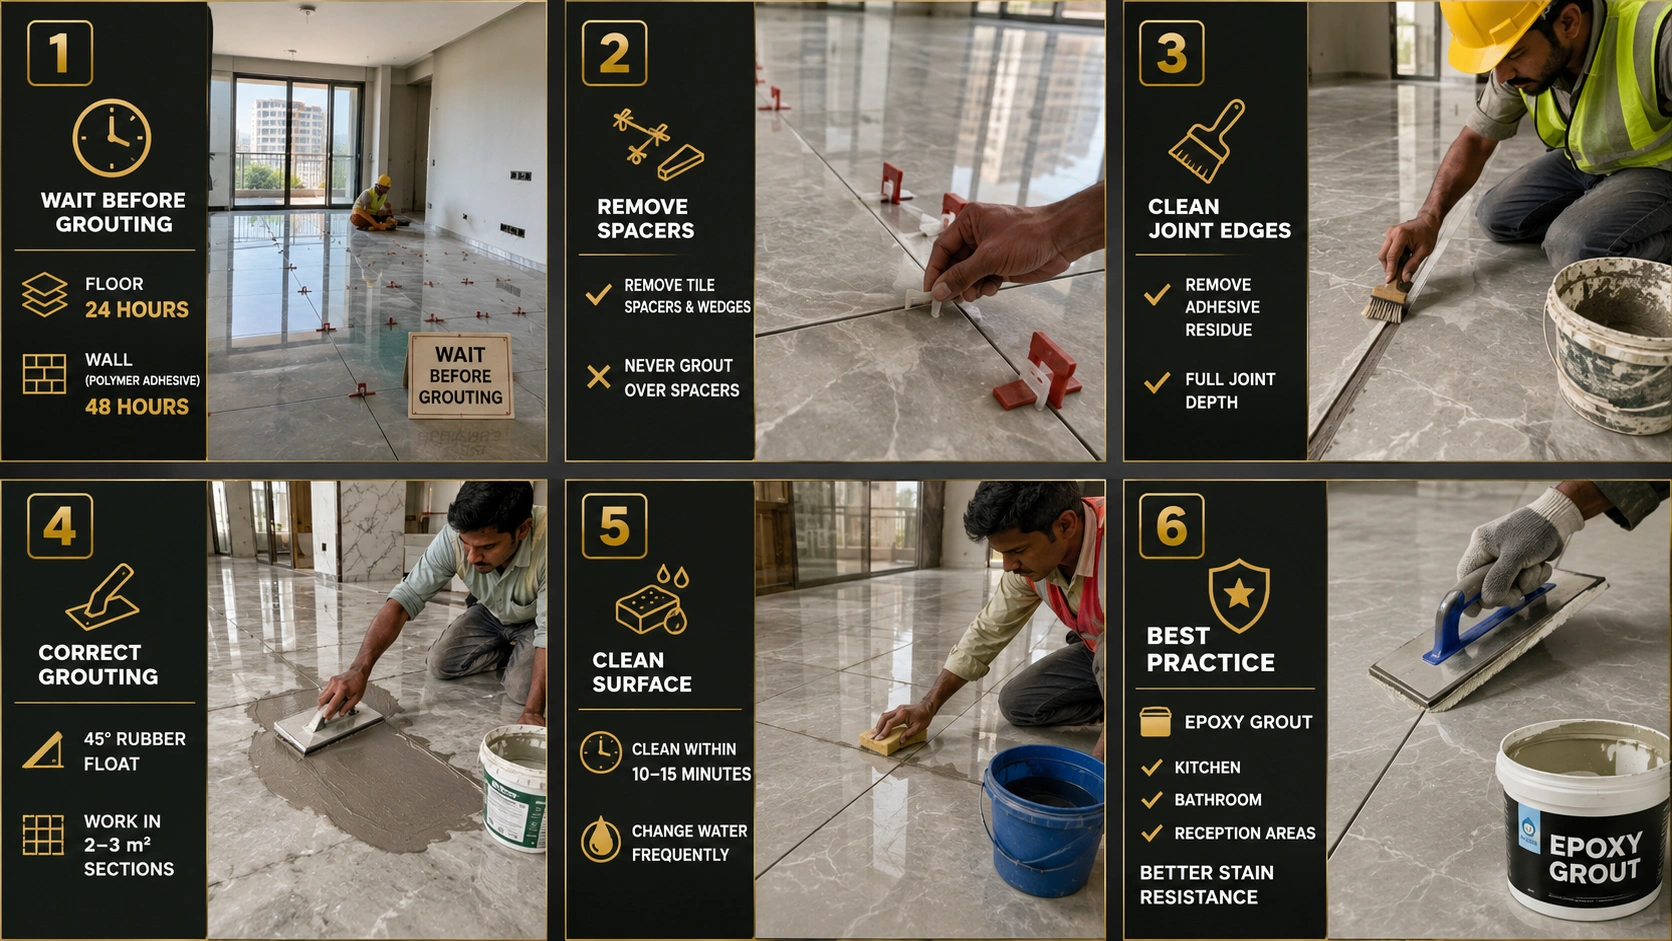
- Wait a minimum of 24 hours after slab placement before grouting. For wall slabs with polymer-modified adhesive, wait 48 hours to ensure full skin-over.
- Remove all tile spacers or wedges before grouting. Do not grout over spacers.
- Clean all joint edges with a brush to remove adhesive squeeze-out before grouting. Adhesive residue in the joint prevents the grout from filling the full joint depth.
- Apply grout with a rubber grout float at 45 degrees to the joint direction, pressing firmly to fill the joint. Work in 2 to 3 square metre sections at a time.
- Remove surface grout from the tile face within 10 to 15 minutes using a damp sponge. Change the water frequently. Grout haze on a large matte slab surface is difficult to remove once it has fully hardened.
- On polished or GHR finish slabs, apply a grout release agent (haze protector) to the tile face before grouting begins. Remove the agent after grouting is complete per the manufacturer's instructions.
Pro tip: Specify epoxy grout for all 1200x2400 mm slab joints in kitchen, bathroom, and reception area applications, even when the tile finish does not demand it. The joint stain resistance of epoxy grout eliminates the most common visual failure point in slab installations in Indian climates, where kitchen oil vapour and bathroom humidity stain standard cementitious grout joints within 12 to 18 months. The higher cost of epoxy grout per joint metre is marginal relative to the total project cost at slab scale, because the number of joints per 1,000 sq ft is so low.
Quality Checkpoints at Every Stage
| Stage | Checkpoint | Method | Accept / Reject Criteria |
| Substrate preparation | Flatness | 2 m straight edge, measure maximum deviation | Accept: ±2 mm max. Reject: any reading above ±2 mm until corrected. |
| Substrate preparation | Moisture content | Moisture meter reading at five or more points across the floor | Accept: below 3%. Reject: above 3%, delay installation until reading drops. |
| Adhesive application | Coverage test (first tile) | Lift one tile within the open time window, inspect back coverage | Accept: 95% or higher full coverage. Reject: any dry spots or lines, adjust trowel or method. |
| Tile laying | Lippage | Aluminium straightedge or lippage gauge across tile joint | Accept: maximum 1 mm lippage for matte floor slabs. Maximum 0.5 mm for GHR or polished finish. Reject: above limit, adjust before adhesive cures. |
| Tile laying | Joint consistency | Measure joint width at multiple points across the floor | Accept: ±0.5 mm variation from the specified joint width. Reject: wider variation, readjust spacers. |
| After adhesive cure (24 to 48 hours) | Bond check | Rubber mallet tap across the full slab surface, listen for a hollow sound | Accept: solid, consistent sound throughout. Reject: hollow sound in any zone, mark and investigate. A hollow zone must be lifted and re-laid. |
| Grouting | Joint fill | Visual inspection of each joint length after grouting and the first clean | Accept: joint filled flush to tile surface. Reject: voids, cracks, or low-fill zones. Re-grout before the grout batch cures. |
| Final inspection | Grout haze | View floor under raking (oblique) light from a low angle | Accept: no visible haze across tile faces. Reject: visible haze, treat with appropriate grout haze remover before client handover. |
The Five Most Common Slab Installation Failures in India and How to Avoid Them
1. Slab Cracking After Installation
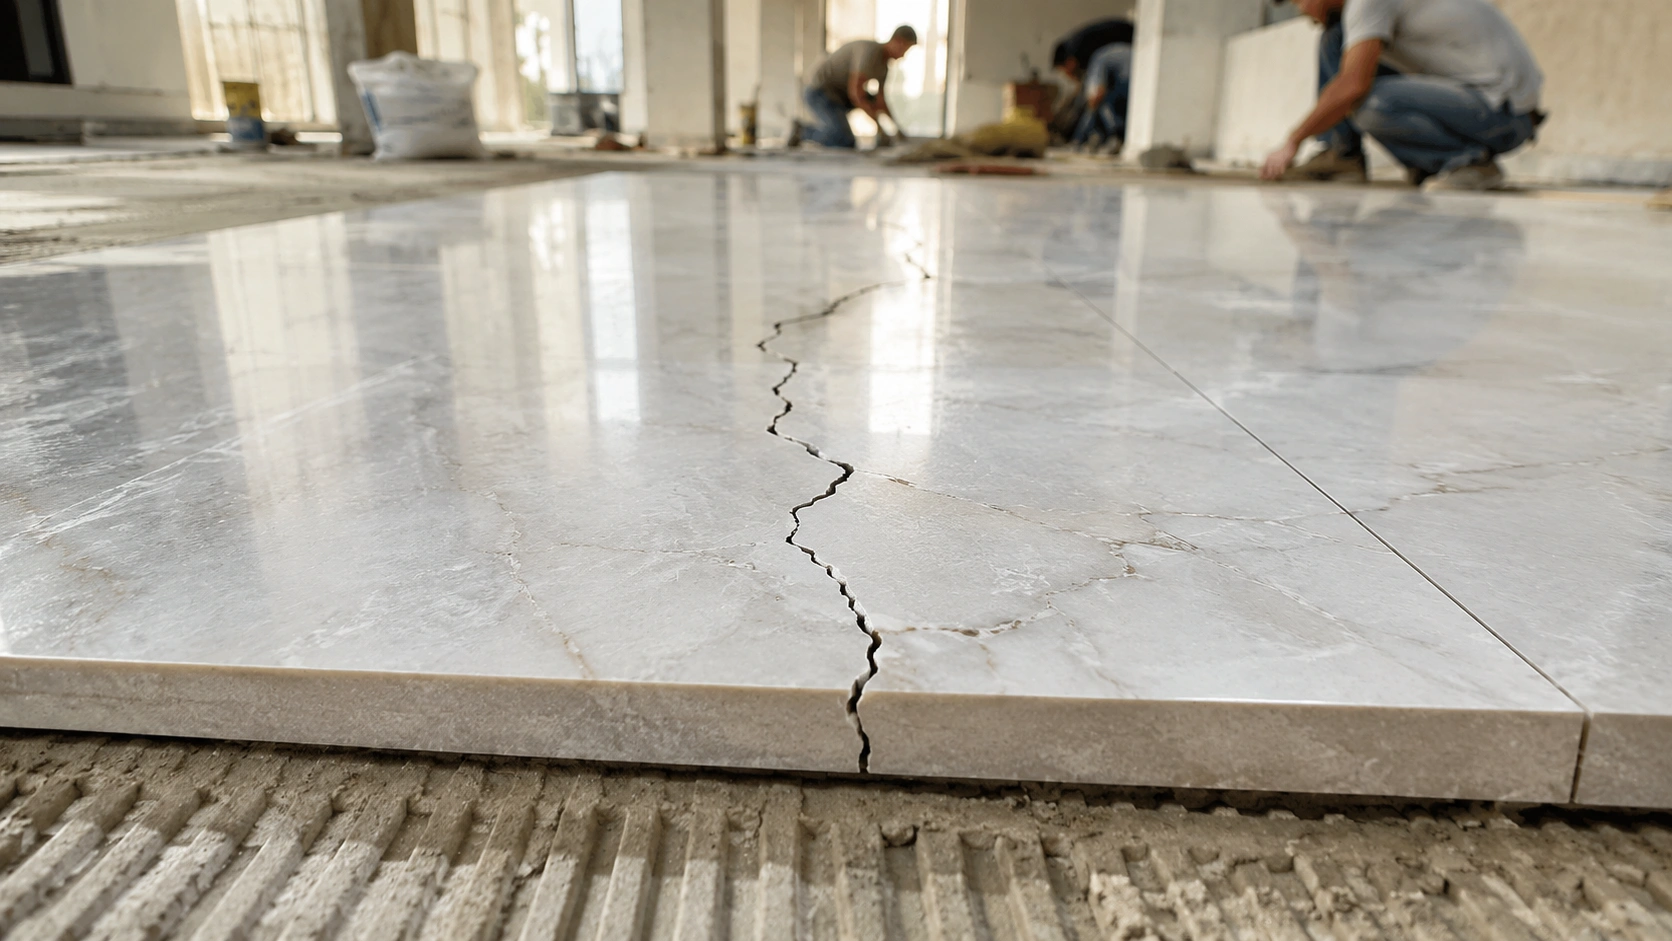
Cause: hollow adhesive coverage under the slab. A slab with 60 to 70% adhesive coverage has unsupported zones that fracture under point load from furniture legs, trolley wheels, or concentrated foot traffic. Prevention: mandatory 95% full-bed coverage confirmed by lift test on the first tile.
2. Lippage Visible at Slab Joints
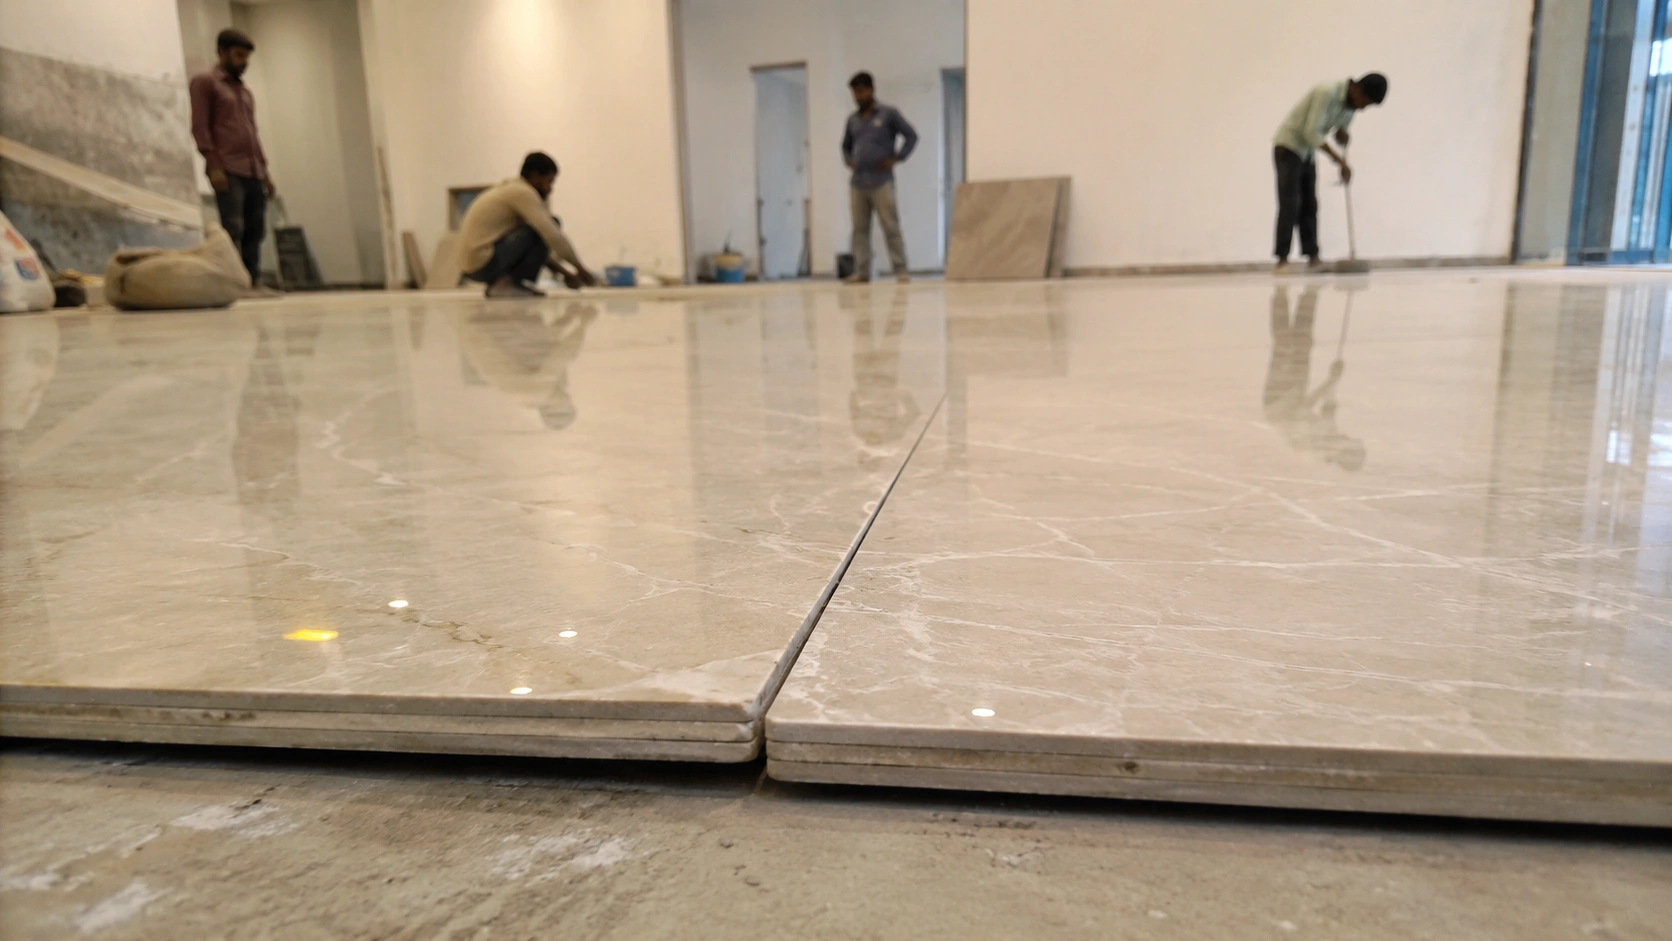
Cause: substrate flatness deviation above ±2 mm, or inconsistent adhesive bed depth across the installation. At the slab scale, lippage that would be minor at the standard tile scale is amplified by the large flat surfaces on either side of the joint. Prevention: laser-verified substrate flatness before adhesive application, and consistent notched trowel technique throughout.
3. Adhesive Open Time Exceeded Mid-Placement
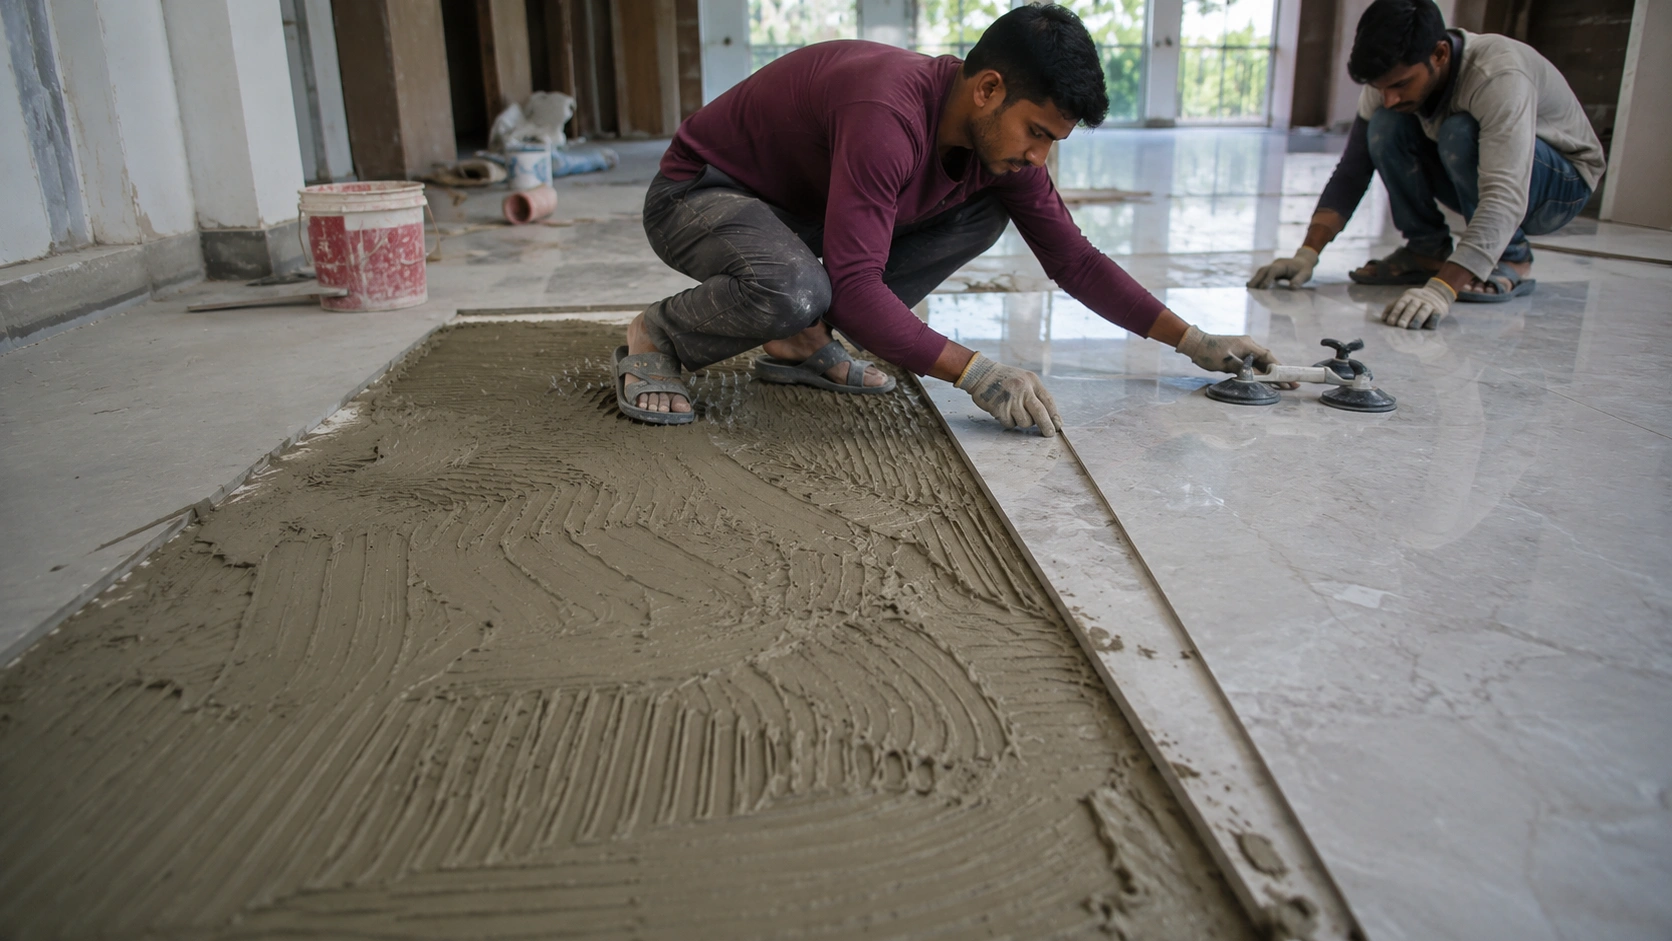
Cause: using C2 (standard open time) adhesive in high-temperature Indian summer conditions, where ambient temperature above 35 degrees Celsius reduces adhesive open time from 30 to 45 minutes to 15 to 20 minutes. A large slab takes longer to position than a standard tile, and if the adhesive has partially skinned over before the tile is placed, bond strength drops significantly. Prevention: Use C2TE (extended open time) adhesive for all slab installations in Indian climatic conditions. Do not install large-format slabs between 12:00 and 15:00 on hot days if the installation area is not temperature-controlled.
4. Slab Breakage During On-Site Handling
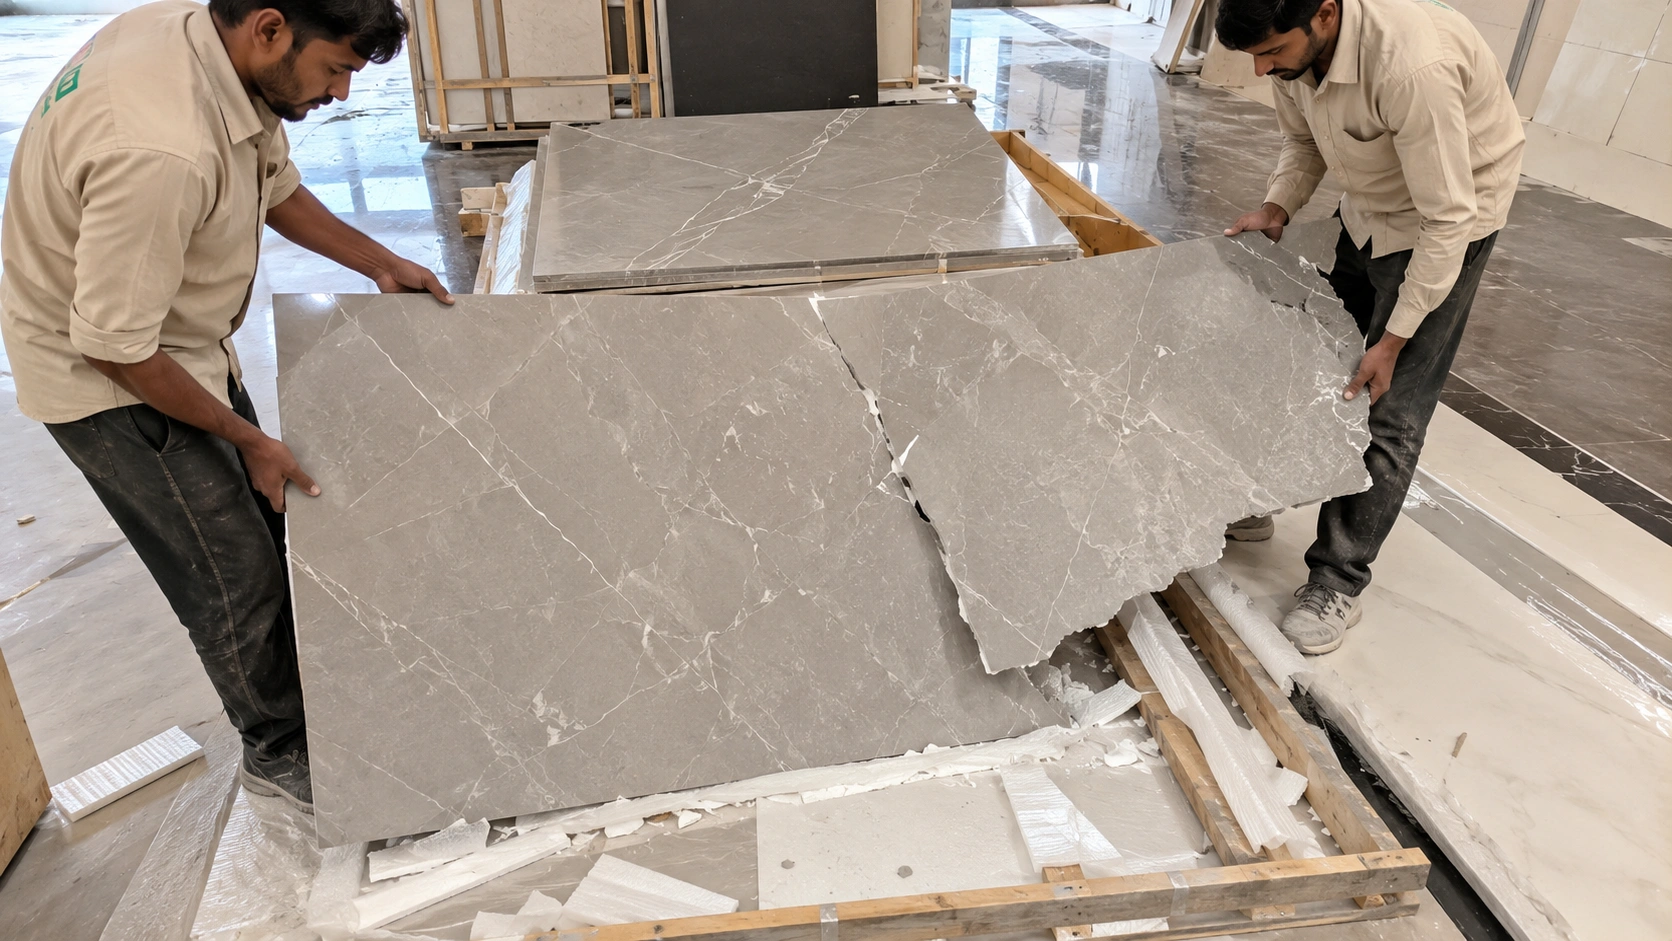
Cause: handling a 1200x2400 mm slab without vacuum suction lifters, or using lifters with worn or dirty suction cups that lose grip mid-lift. A slab dropped from a suction lifter failure during handling is a complete loss. Prevention: inspect all suction lifter cups before each use, clean cup surfaces before applying, and never move a slab on suction lifters without a spotter person watching the cup seals throughout the move.
5. Grout Joint Staining Within 12 Months
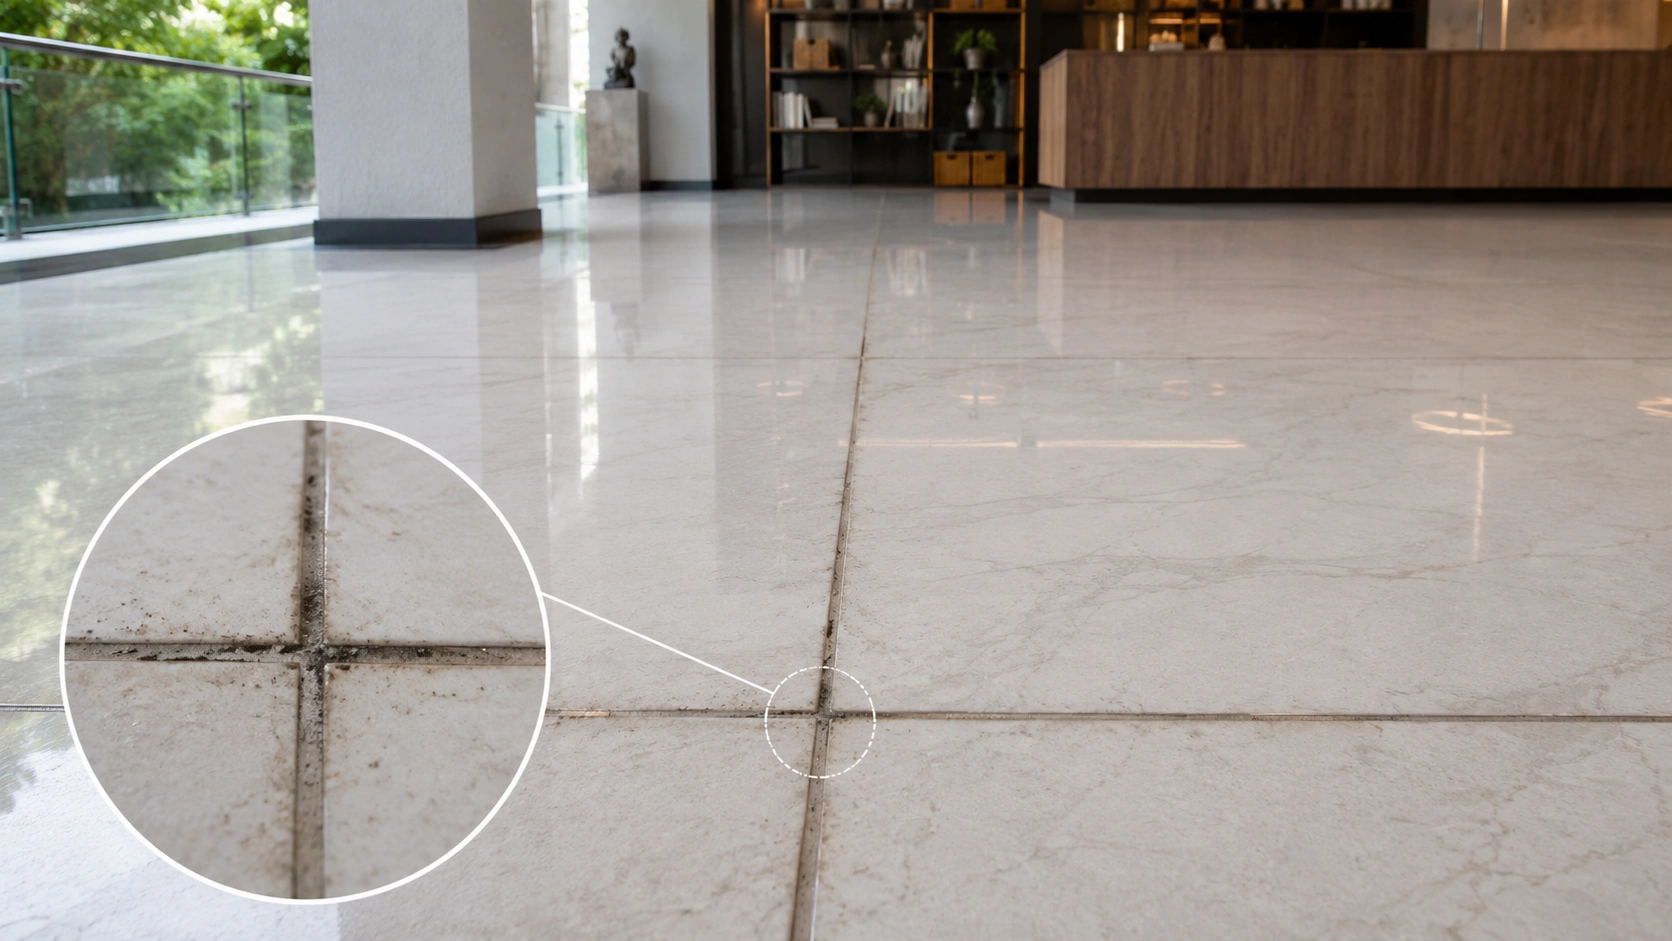
Cause: using standard cementitious grout in kitchen and bathroom applications where oil vapour, soap residue, and cleaning chemicals penetrate the porous grout joint and cause permanent discolouration. Prevention: specify epoxy grout for all wet areas and kitchen slab joints. Seal standard cementitious grout with a penetrating sealer within 24 hours of full grout cure if epoxy grout is not specified.
Slab-Format Installation Standards in Indian Construction
1200x2400 mm GVT tiles installed in Indian residential and commercial projects are subject to IS 15622:2006 for tile material standards and general tile installation guidelines under IS 1443:1972, though IS 1443 does not specifically address slab-format installation methods, and the ±3 mm flatness tolerance it specifies for standard tiles must be tightened to ±2 mm for slab format as a project-specific requirement. C2TE polymer-modified adhesives from manufacturers including Laticrete, Ardex, Weber, and Mapei are available across Indian metro cities, with specialist distributors in tile installation hubs including Morbi, Ahmedabad, Mumbai, Bengaluru, and Delhi-NCR. The adhesive, grout, and lifting equipment cost for a 1200x2400 mm installation adds Rs. 20 to Rs. 40 per sq.ft to the material budget over a standard tile installation, which is the correct budget allowance for a slab-format specification in Indian project pricing.
India's seasonal temperature range, from 8 to 12 degrees Celsius in North Indian winters in Delhi and Jaipur to 42 to 48 degrees Celsius in Gujarat and Rajasthan summers, creates a thermal movement cycle in building structures that is more pronounced than in the European construction contexts where many large-format tile installation guides are written. For Indian slab-format floors in non-air-conditioned spaces, the 3 mm joint width specification is the correct choice over the 2 mm minimum, because it provides adequate room for the tile and substrate to expand and contract across the full annual temperature cycle without putting stress on the grout joint. All slab installation work in coastal Indian cities,s including Mumbai, Chennai, Kochi, and Goa, should use C2TE adhesive and epoxy grout as the default specification, given the year-round humidity above 70% that affects adhesive open time and grout porosity performance.
Source 1200x2400 mm Slab Tiles from Verified Morbi Manufacturers
Contractors and architects specifying 1200x2400 mm slab format for Indian luxury projects can browse confirmed-stock designs across GVT, porcelain slab, and large-format categories on TilesFinders, with direct access to Morbi manufacturers who supply technical data sheets, sample tiles, and confirmed lead times before bulk order.

FAQs
C2TE (improved cementitious adhesive with extended open time and non-slip property) is the correct adhesive specification for 1200x2400 mm slab tiles in India. The extended open time (45 to 60 minutes versus 30 minutes for standard C2) is required because large slabs take longer to position than standard tiles. Standard C1 or C2 adhesive is not adequate for slab-format installation.
Maximum plus or minus 2 mm deviation over any 2 m span in any direction. This is stricter than the plus or minus 3 mm tolerance specified in IS 1443:1972 for standard tiles and must be stated explicitly in the project specification document. Substrate flatness above this must be corrected with self-levelling compound before adhesive application.
Minimum two people for floor slab placement, both operating vacuum suction lifters rated for the slab weight. Three people are required for wall slab placement: two operating suction lifters and one stabilising the slab during positioning. Single-person handling of a 65 to 85 kg slab is not safe and risks breakage and personal injury.
Epoxy grout (RG class) is the recommended specification for 1200x2400 mm slab joints in kitchen, bathroom, and reception area applications. For dry residential areas, unsanded cementitious grout at 2 to 3 mm joint width is acceptable for matte finish slabs, with penetrating sealer applied within 24 hours of full grout cure.
Straight cuts can be made on-site with a heavy-duty, large manual slab cutter or a bridge-type wet saw with a cutting rail long enough to complete the cut in a single pass. Complex cuts, including curves, L-shapes, mitred edges, and staircase profiles, must be planned and executed at a specialist CNC cutting facility before the slab is delivered to the site.
Minimum 2 mm for air-conditioned Indian interiors. Recommended 3 mm for non-air-conditioned spaces and all outdoor covered applications in India, to accommodate the greater thermal movement from India's seasonal temperature range. Never specify a 1.5 mm joint for this format.
Wait 24 to 48 hours for the adhesive to cure, then tap across the full surface of each slab with a rubber mallet. A solid, consistent sound indicates a full adhesive bond. A hollow or drum-like sound indicates an unbonded zone that must be lifted, re-prepared, and re-laid before grouting proceeds.
Minimum 24 hours after slab placement for floor applications using C2TE cementitious adhesive. Minimum 48 hours for wall slab applications and for any installation where polymer-modified adhesive was used, to ensure full adhesive skin-over before grout pressure is applied to the joint edges.

See our tile guides first
Set TilesFinders as a preferred source and our buying guides surface ahead of the rest for you.
Add as preferred sourceTakes one tap. Nothing to install.
What Readers Say
I was about to redo my parking area with the wrong tile size until I read this. The layout comparisons saved me from a costly mistake.
We reference TilesFinders guides while briefing clients on material selection. The size and pattern breakdowns are accurate and easy to explain visually.
On site, I get asked about grout spacing all the time. This article gave me a solid reference I now share with my team before every job.
Finally a guide that doesn't just push generic advice. The oil stain removal steps actually worked on our clubhouse driveway tiles.
I run a small construction firm and now send this link to clients directly when they ask about entrance tile sizing. Saves me an hour of explaining.
Good practical detail, though I wish there were more examples for compact apartment entrances specifically, not just villas.
My mother-in-law wanted marble, I wanted vitrified. This blog gave us the neutral comparison we needed to actually decide together.
Detailed without being overwhelming. I appreciated that it covered both cost and maintenance, not just the aesthetics.
Used the algae and hard water removal tips on our terrace tiles after the monsoon. Worked better than what our regular cleaner was doing.
As someone who sources tiles for multiple builder projects, I find these comparisons genuinely useful for vendor conversations, not just consumer content.
Recommended this to a client who kept second-guessing the entrance design. The small vs large layout section settled the debate instantly.
Straightforward and honest, no unnecessary jargon. Would like to see a similar breakdown for outdoor pool-deck tiles next.
We've bookmarked several TilesFinders guides for our design handbook. Reliable source when clients want data, not just opinions.
Two paths, one marketplace.
Get free quotes from verified suppliers.
Share your room, budget, and style. Suppliers in Morbi respond within hours.
Get Free QuotesList your business, reach real buyers.
Put your showroom in front of homeowners searching for tiles right now.
List Your Business